
New to Apple Pages or just on the lookout for various things to do with the app on Mac? We’ll stroll via a number of suggestions for utilizing the app that’ll flip you into an Apple Pages Professional very quickly!
What’s Apple Pages?
Apple Pages is a phrase processing instrument for macOS. It comes preinstalled while you buy a Mac and can also be obtainable at no cost within the App Retailer.
Just like Microsoft Phrase, you’ll be able to create paperwork like articles, experiences, and resumes, in addition to brochures, newsletters, and flyers in Pages.
With the built-in options of Apple Pages, you’ll be able to format textual content, insert media, use bullets and numbering for lists, add tables and charts, share paperwork, and far, far more.
Whether or not you’re new to Pages or have used it earlier than, we’ll share some suggestions for benefiting from the Apple Pages on Mac.
Find out how to open Pages on Mac
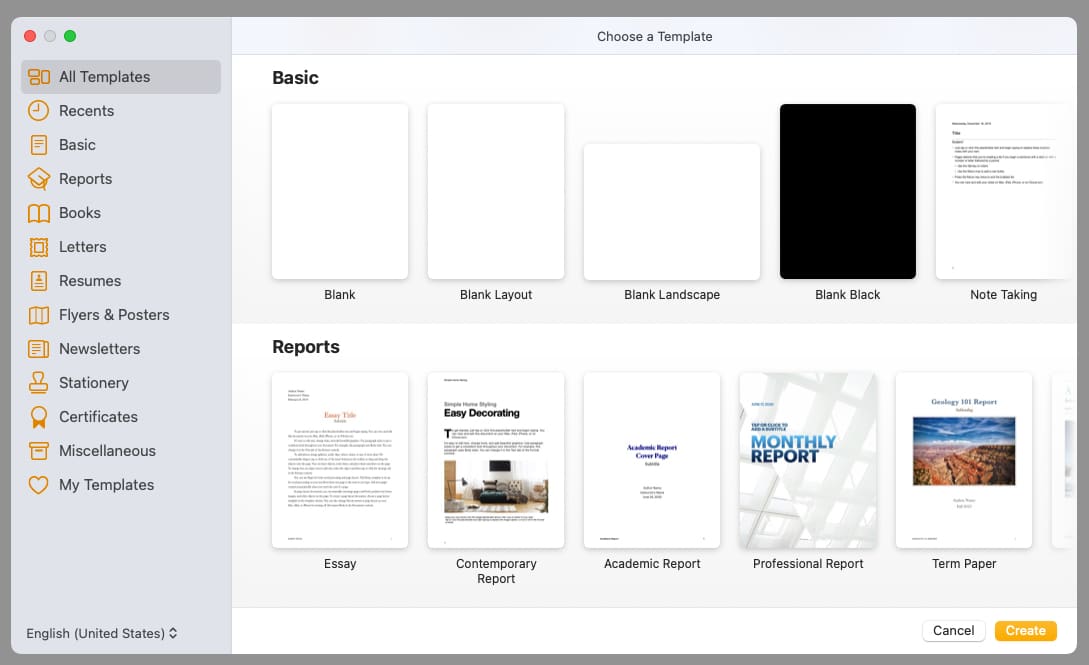
- To get began, open Pages from the Functions folder in your Mac. Choose New Doc.
- Then, decide a template for a fast begin or the Clean possibility to begin from scratch.
- Click on Create and prepare to make use of Pages!
1. Find out how to save paperwork in Pages
One characteristic you’ll virtually at all times use is saving a Pages doc. What makes the app even higher is which you can save a doc in a special file format or use the password-protection characteristic.
Save a doc
- To avoid wasting a doc, go to File → Save within the menu bar. The primary time you save the file, you’ll be requested to offer a reputation.
- Subsequent to The place, select a location. Optionally, add tags → Click on Save.
- After you save the primary time, you’ll be able to merely choose File → Save to avoid wasting with the identical settings.
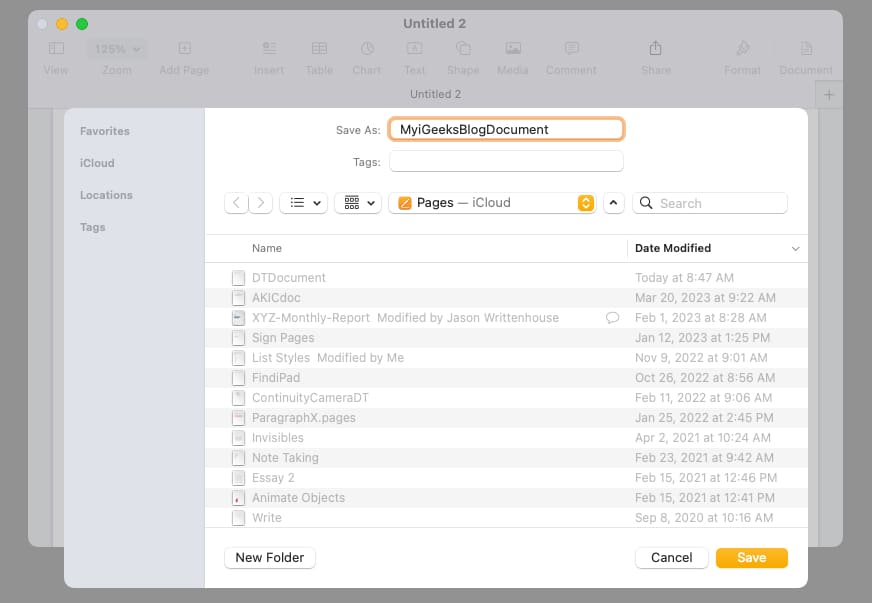
To avoid wasting a doc with a special file identify, go to File within the menu bar, maintain your Possibility key, and select Save as. Then, enter the brand new identify, decide a location, optionally add tags, and click on Save.
Save as a special file kind
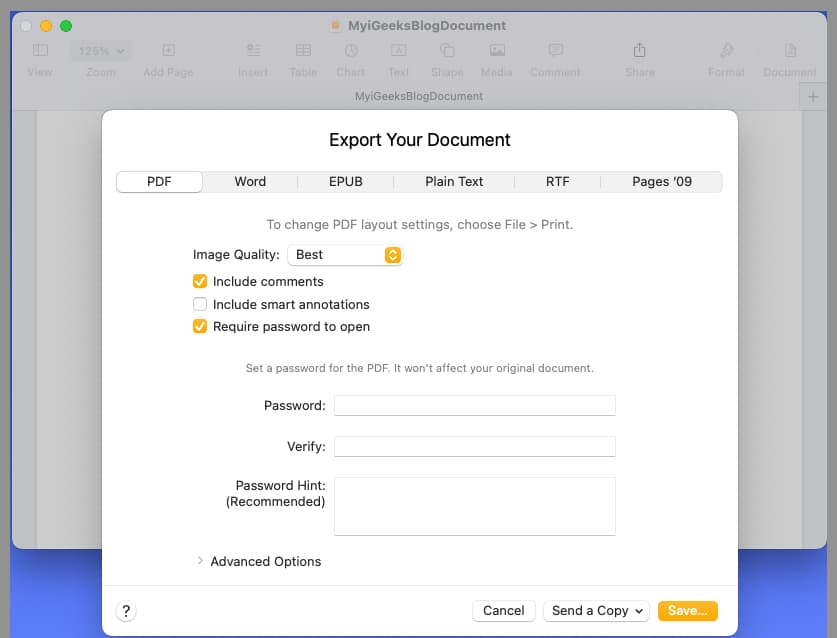
In case you’d wish to convert your Pages doc to a special file kind while you reserve it, that is straightforward to do. You’ll be able to export it as a PDF, Phrase, Epub, plain textual content, or RTF doc.
- Go to File within the menu bar → Select Export to → Choose a format within the pop-out menu.

- When the Export Your Doc field opens, affirm you’re on the proper tab for the file kind you chose.
- Relying on the sort you decide, you may even see extra settings. As an illustration, you’ll be able to select the standard and embrace feedback for a PDF file.
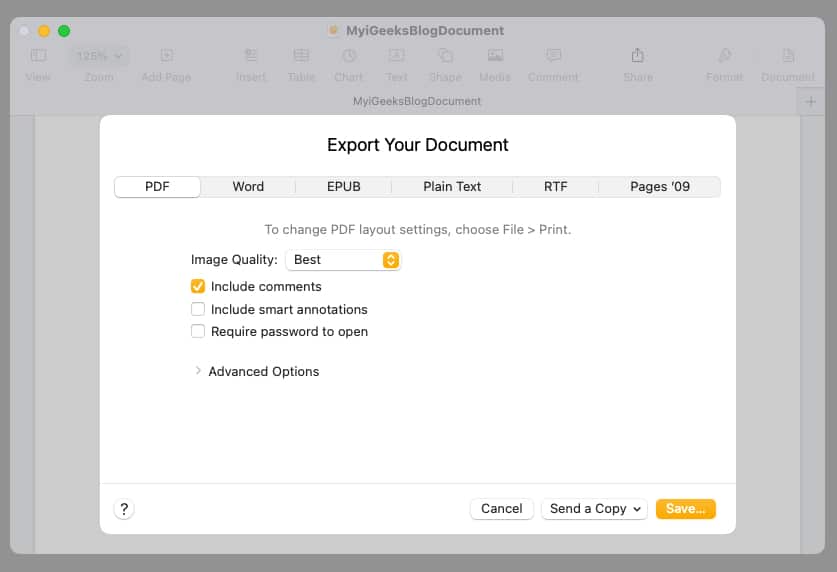
- While you’re prepared, choose Save.
- Then, identify the file, optionally add tags, and decide the location to put it aside.
- Choose Export, and also you’re achieved.
Password-protect a Pages doc
With the PDF and Phrase file codecs, you’ll be able to add a password while you export and save the Pages doc.
- Comply with the steps above to pick out both PDF or Phrase. Within the Export Your Doc field, test the choice for Require password to open.
- Enter the password, confirm it, and optionally embrace a touch.
- Choose Save, and ensure to jot down the password in a secure spot.
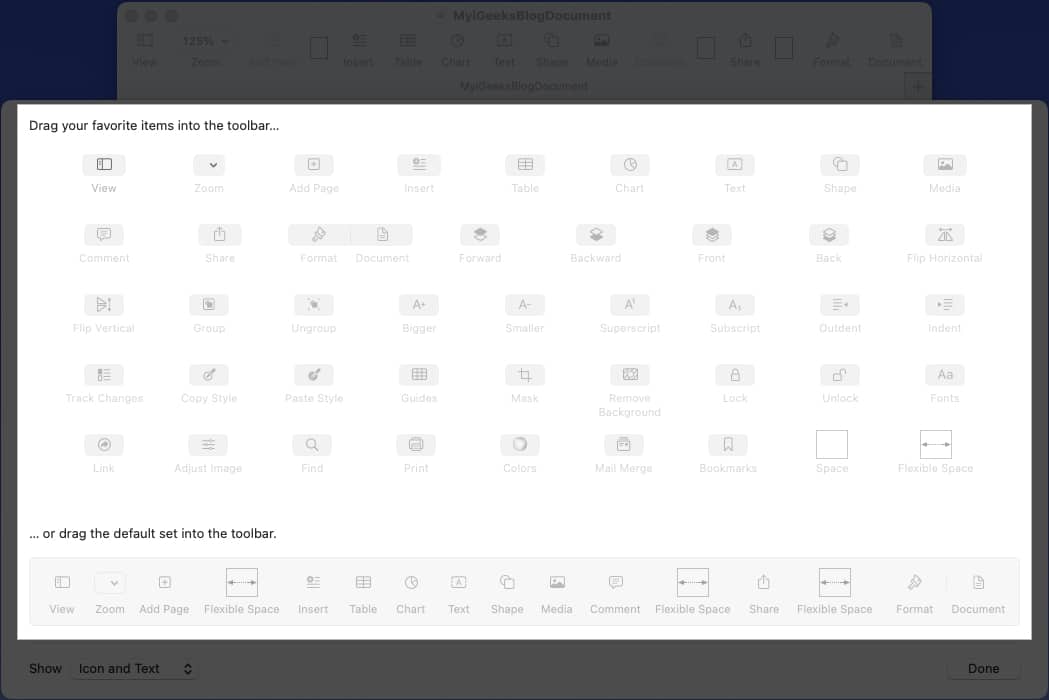
2. Customise the toolbar in Pages
The great factor about Pages, together with different macOS apps, is which you can customise the toolbar on the high. This lets you embrace these actions you carry out most and take away these you by no means use.
- Proper–click on the toolbar on the high of Pages and select Customise Toolbar.
- When the toolbar window seems, you’ll see all the gadgets you’ll be able to add. You’ll be able to then do the next:
- To add an merchandise, drag it from the window to the placement you need it within the toolbar.
- To make use of the default set of things, drag that grey bar from the underside onto the toolbar.
- To take away an merchandise from the toolbar, drag it out and all the way down to the window.
- To rearrange gadgets within the toolbar, choose and drag them the place you need them.
- To select from icons and textual content or solely icons, choose an possibility within the Present drop-down field on the underside left.
- While you end, click on Completed.
3. Alter auto-correct settings in Pages
Auto-correct is a useful characteristic that anticipates what you need to kind and corrects it if it’s misspelled. Whilst you’re most likely used to the characteristic in apps like Messages on iPhone, you may also use it in Pages on Mac. And by chance, you’ll be able to customise how auto-correct works.
- Choose Pages → Settings within the menu bar and decide the Auto-Correction tab within the field that seems.
- You’ll see sections for Spelling, Formatting, and Alternative.
- Spelling: Examine the bins to appropriate spelling and capitalize phrases mechanically. For phrases you need Pages to disregard, choose Ignored Phrases, add them to the listing, and click on OK.
- Formatting: Examine the bins for the formatting choices you need to embrace and use the drop-down bins to decide on the Double and Single quotes codecs.
- Alternative: Optionally test the field to make use of image and textual content substitutions. Then, evaluate the textual content replacements and use the plus signal button so as to add one or the minus signal button to take away one.
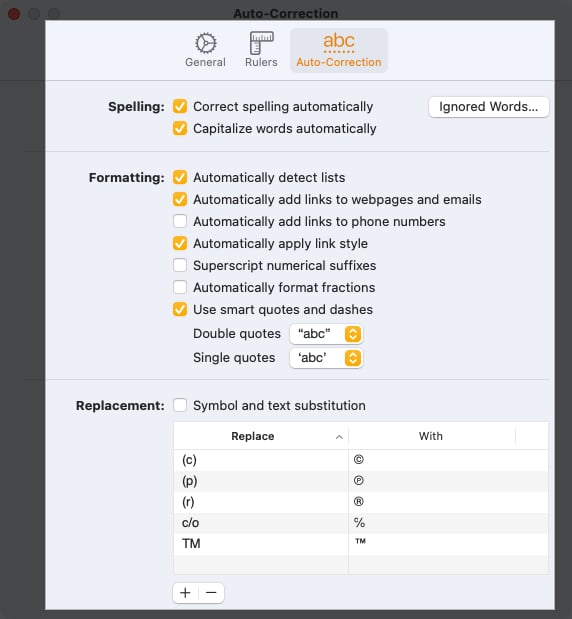
- While you end, shut the field utilizing the X on the highest left.
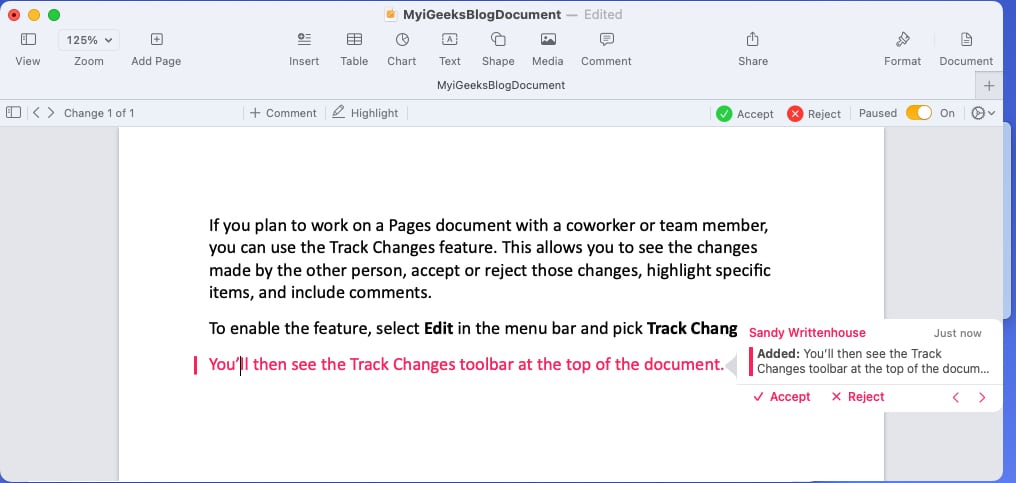
4. Find out how to observe adjustments in Pages
In case you plan to work on a Pages doc with a coworker or group member, you should use the Observe Modifications characteristic. This lets you see the adjustments made by the opposite individual, settle for or reject these adjustments, spotlight particular gadgets, and embrace feedback.
- To allow the characteristic, choose Edit within the menu bar → Choose Observe Modifications.
- You’ll then see the Observe Modifications toolbar on the high of the doc.
- Ranging from the left, you’ll be able to see the variety of adjustments made, add a remark or spotlight, settle for or reject a change, and pause monitoring.
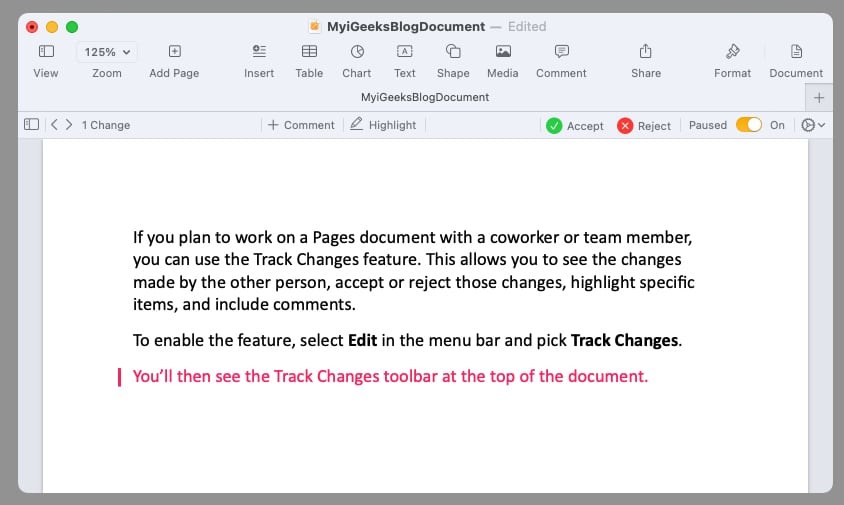
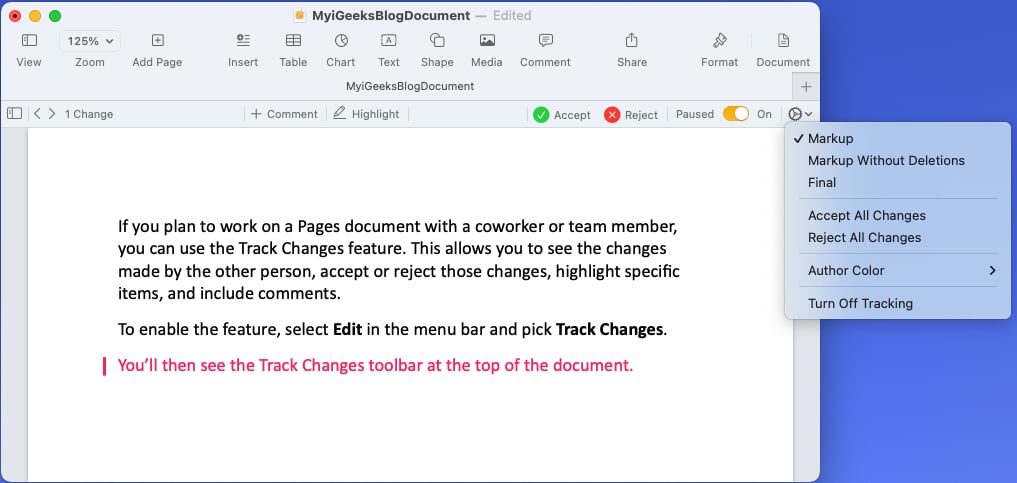
- On the far proper, choose the gear icon to regulate the settings for the monitoring, together with utilizing markup or making the model closing, accepting or rejecting all adjustments, and selecting your creator shade (to point adjustments you make).
- As you and others add gadgets or make adjustments, you’ll see them highlighted while you use Markup mode (above). You’ll be able to then settle for or reject adjustments by clicking Settle for or Reject within the toolbar or within the pop-up window subsequent to the edit.
- To cease monitoring, choose Edit within the menu bar or use the gear icon and decide Flip Off Observe Modifications. While you flip off monitoring, you could be requested to just accept or reject any adjustments you haven’t already.
- Ranging from the left, you’ll be able to see the variety of adjustments made, add a remark or spotlight, settle for or reject a change, and pause monitoring.
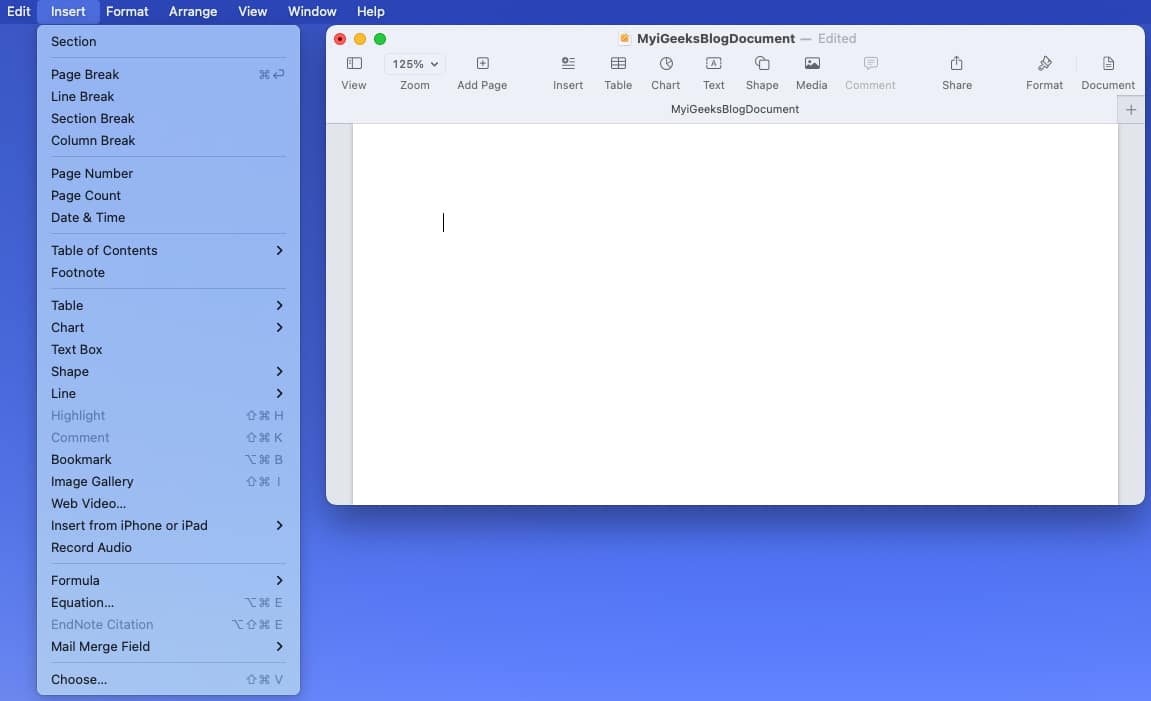
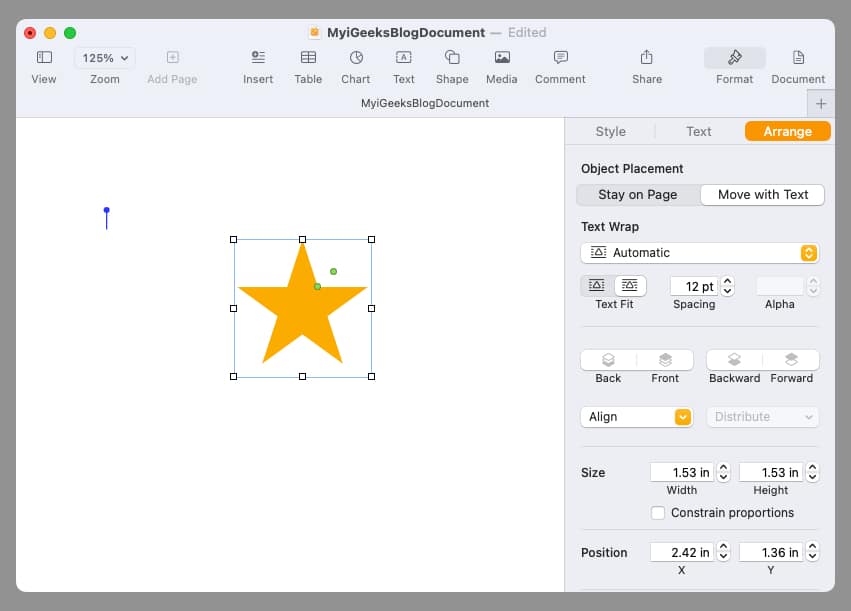
5. Find out how to add objects in Pages
It’s possible you’ll need to insert an object in your Pages, doc like a desk, chart, textual content field, or form.
- So as to add an object, choose it within the toolbar or open Insert within the menu bar and select the merchandise.
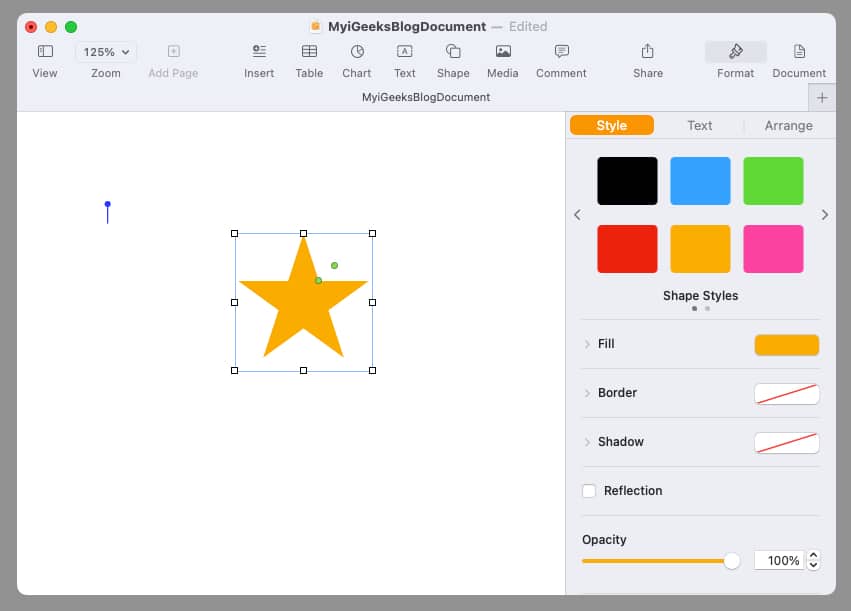
- When you add your object, you’ll be able to format it to your liking. Choose the merchandise and click on Format on the highest proper to open the sidebar.
- Relying on the kind of object you insert, you’ll have quite a lot of choices. For instance, for those who add a form, you’ll be able to change its shade, add a border, and toss in a shadow impact.
- Relying on the kind of object you insert, you’ll have quite a lot of choices. For instance, for those who add a form, you’ll be able to change its shade, add a border, and toss in a shadow impact.
- Make the most of the tabs within the sidebar per the article you add to format it, organize it, or wrap the textual content round it.
6. Find out how to insert photos in Pages
For paperwork like brochures, flyers, college essays, or perhaps a resume, you could need to add a picture in Pages. You may have varied choices for including a photograph, image, or picture out of your Mac, iPhone, or iPad.
- Place your cursor within the doc the place you need the picture.
- Choose the Media button within the toolbar. You can even use Insert within the menu bar. Nevertheless, you might have restricted choices.
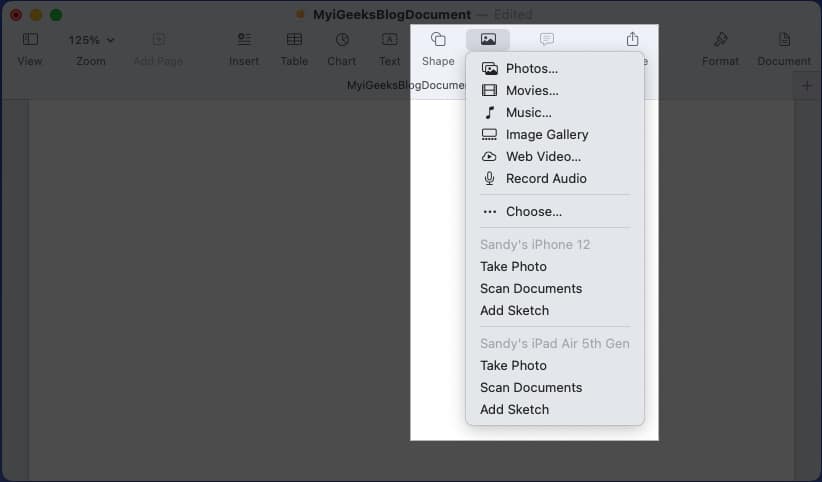
- Then, decide one of many following:
- Pictures: Select an image from the Pictures app on Mac.
- Picture Gallery: Insert a scrolling set of photos. Click on the picture icon on the underside proper, choose all the photos you need to add, and click on Insert. You’ll be able to then use the arrows on the gallery to maneuver via the photographs.
- Select: To insert a picture from a location in your Mac, decide Select after which browse for the image.
- iPhone and iPad: When you’ve got a linked iPhone or iPad, you’ll see choices beneath that system to Take Picture, Scan Doc, and Add Sketch. Choose one in all these choices after which comply with the prompts on that system to snap a photograph, scan a doc, or sketch an illustration and insert it in Pages.
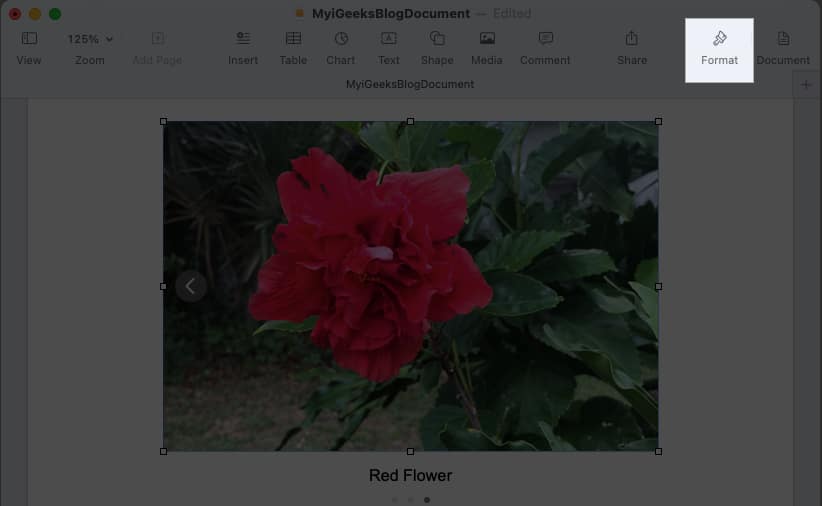
- When you add your picture to your doc, you’ll be able to click on the Format button to open the sidebar for added choices relying on the kind of picture you add. As an illustration, for those who merely insert an image from Pictures, you’ll be able to alter the publicity or take away the background.
7. Insert web page numbers in Pages
When you’ve got a doc that requires web page numbers or just favor to incorporate them, you’ll be able to simply add them to both the header or footer in your Pages doc.
- Hover your cursor over the header or footer space to show the part.
- Click on in one of many bins that seem on the left, heart, or proper, and choose Insert Web page Quantity.
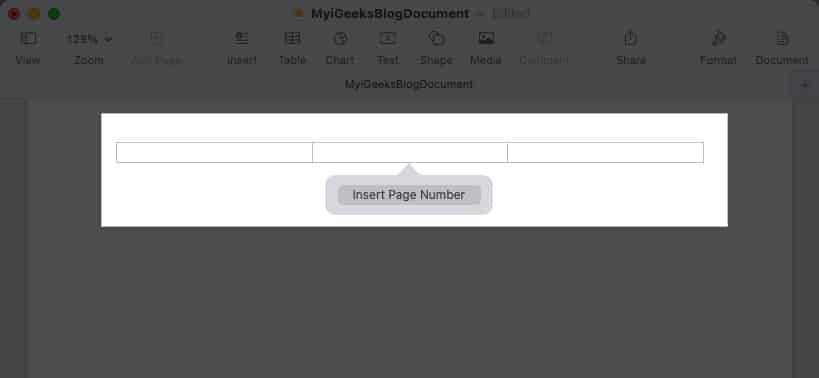
- Select the format for the web page numbers you need to use from the listing that shows.
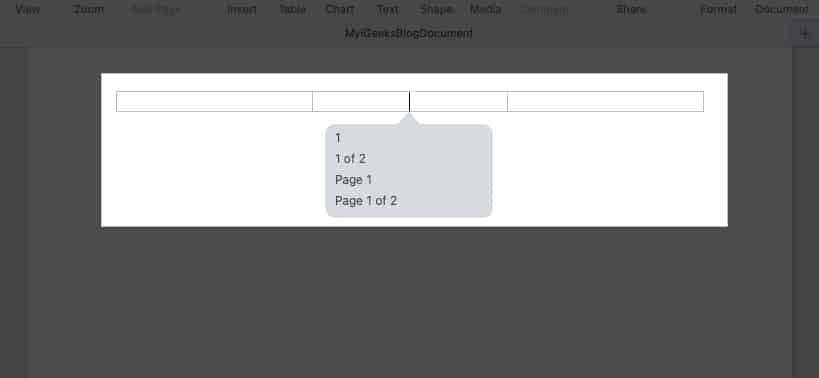
- You’ll be able to then click on one other spot in your doc to exit the header or footer.
Your web page numbers mechanically seem on the high or backside of every web page.
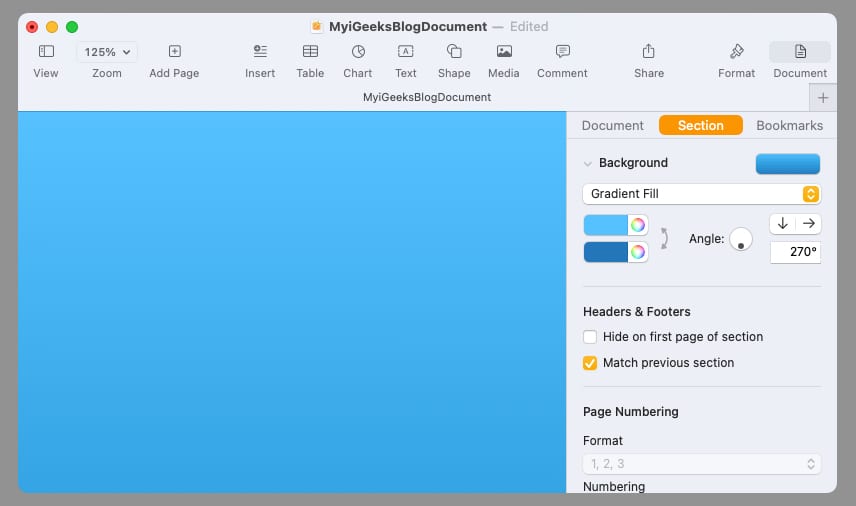
8. Change the background shade in Pages
Perhaps the doc you’re creating wants a little bit of pizzazz. You’ll be able to change the background shade of the doc in only a few clicks.
- Click on the Doc button on the highest proper to open the sidebar.
- Go to the Part tab and increase the Background possibility.
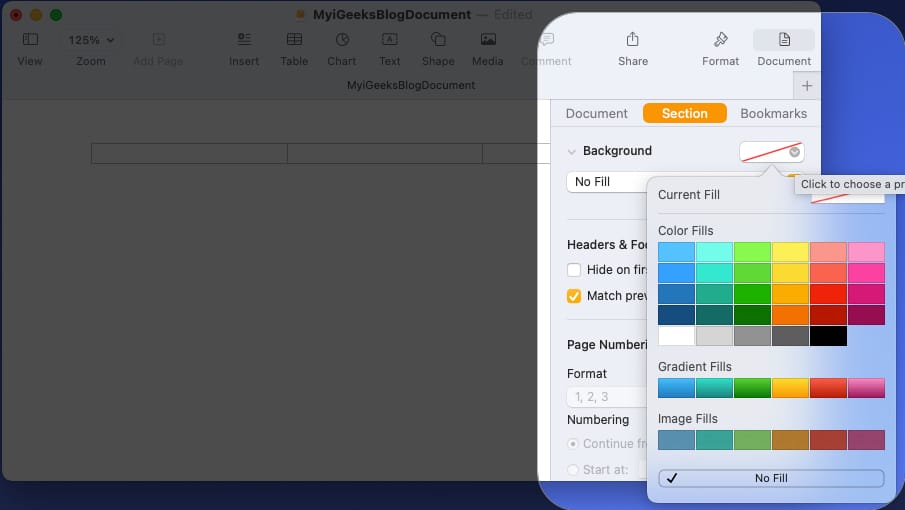
- To the correct, click on the palette button and select a shade for the doc background.
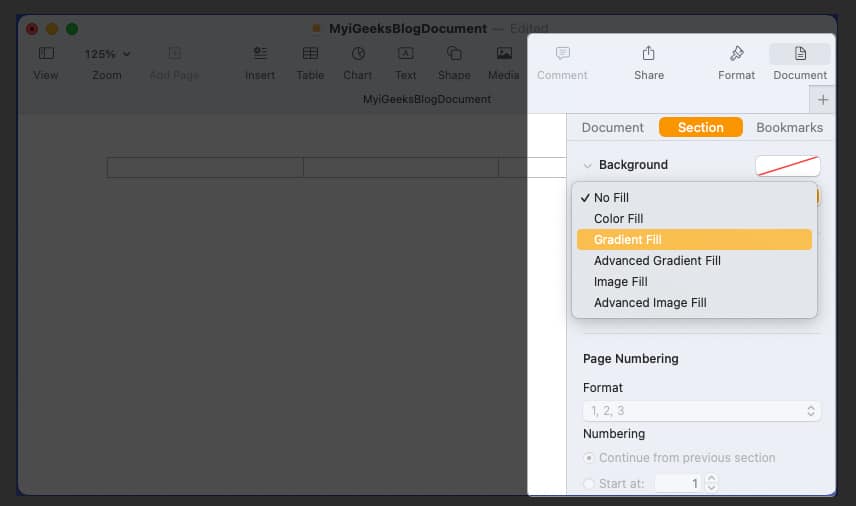
- To make use of a gradient, picture, or superior choices, click on the No Fill drop-down field and make your choice.
- Relying on the kind of background you select, you may even see extra choices. For instance, for those who decide Gradient, you’ll be able to decide the colours and alter the angle.
While you end, you’ll be able to shut the sidebar by deselecting the Doc button.
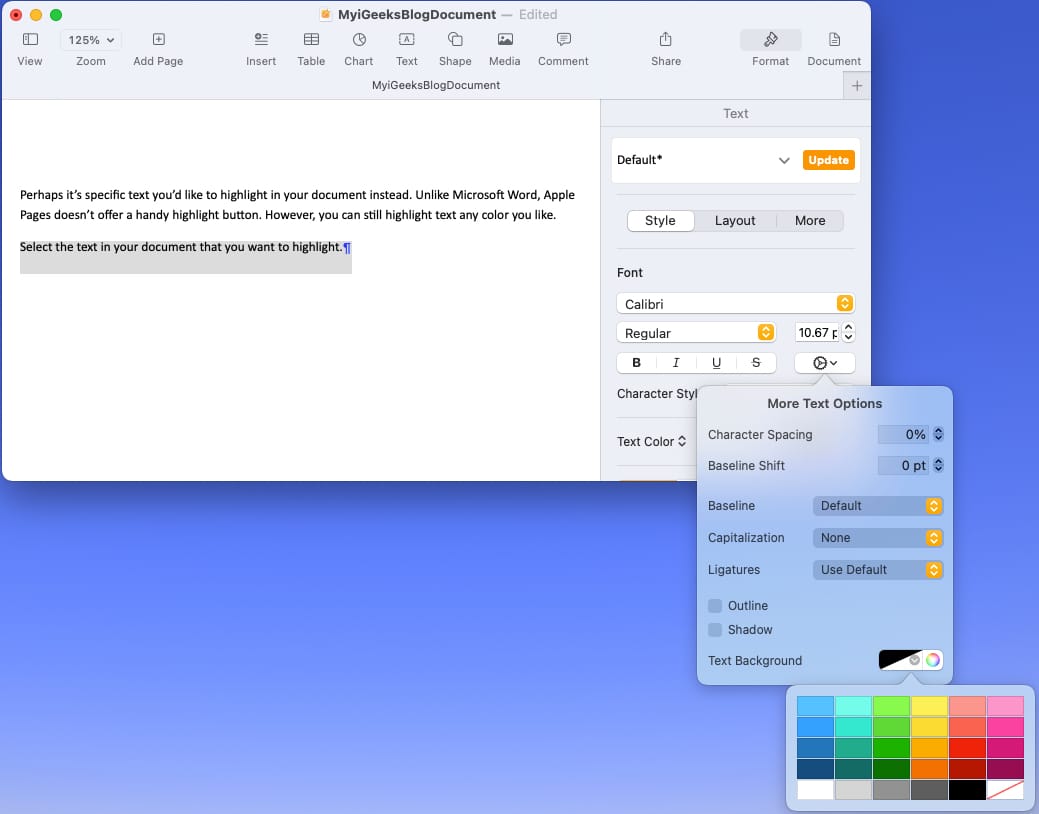
9. Find out how to spotlight textual content in Pages
Maybe it’s particular textual content you’d like to focus on in your doc as a substitute. Not like Microsoft Phrase, Apple Pages doesn’t supply a useful spotlight button. Nevertheless, you’ll be able to nonetheless spotlight textual content in any shade you want.
- Choose the textual content in your doc that you just need to spotlight.
- Click on the Format button on the highest proper to open the sidebar.
- To spotlight a phrase, phrase, or sentence, go to the Type tab. Click on the gear icon and use the palette or shade wheel subsequent to Textual content Background to decide on a shade.
- To spotlight a paragraph, go to the Format tab and increase Borders & Rulers. Use the palette or shade wheel subsequent to Paragraph Background to decide on a shade.
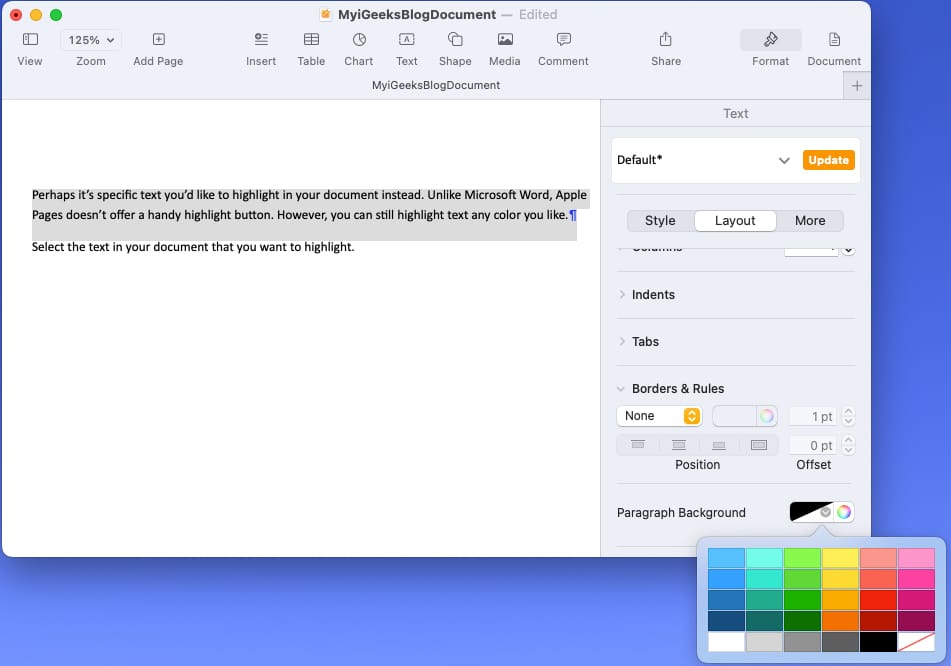
- You’ll then see your textual content highlighted in your shade of selection.
Click on the Format button to deselect it and shut the sidebar.
10. Find out how to present the phrase depend in Pages
One easy setting that is available in tremendous useful however could also be missed is seeing the phrase depend to your doc. Together with the variety of phrases, you’ll be able to see the variety of characters, paragraphs, and pages.
- Go to View within the menu bar and decide Present Phrase Depend.
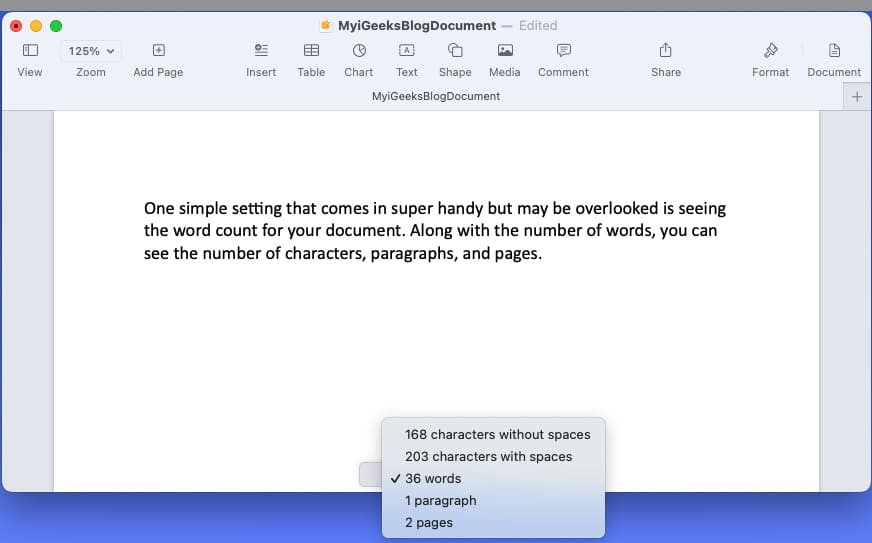
- When the counter shows on the backside of the Pages window, you’ll be able to click on it to view and show the depend for phrases, characters, paragraphs, or pages.
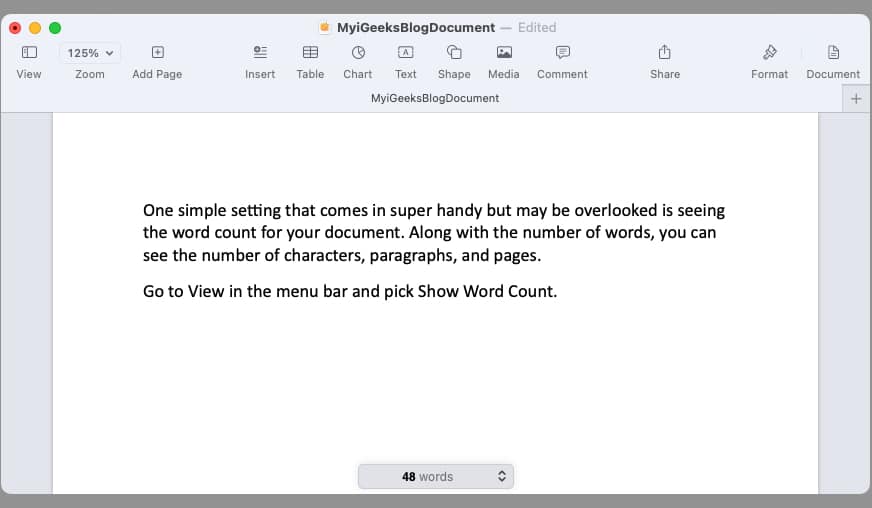
- As you’re employed in your doc, you’ll see the depend on the backside alter accordingly.
To take away the phrase depend on the backside, choose View and decide Cover Phrase Depend.
Are you pumped for Pages?
Hopefully the following tips have you ever able to do one thing a little bit completely different in Pages. However bear in mind, this isn’t an inclusive listing. You are able to do much more than what you see right here to create gorgeous paperwork utilizing Pages on Mac. Plus, you should use and sync the app together with your iPhone and iPad as properly.
Examine again with iGeeksBlog for extra on utilizing Apple Pages! Within the meantime, share your personal suggestions and tips for utilizing Pages on Mac.
Learn extra: