

Maybe one of the crucial generally requested questions by those that simply bought a brand new MacBook is how can they take an image utilizing their new laptop computer. Some of us may additionally ask how can they entry the digicam on their MacBook. This fast information will reply these questions. So, learn alongside as I present you take an image on MacBook.
Can You Take a Picture with Your MacBook?
The straight reply to that’s sure, you may. Though the MacBook’s built-in FaceTime HD digicam was constructed for video calls, nothing is stopping you from utilizing it to take a photograph of your self and even of you along with different folks. However first, you should know use your MacBook’s FaceTime HD digicam. To do this, you want the built-in Picture Sales space app in your Mac.
Learn how to Take a Image on Mac Utilizing the Picture Sales space App
For individuals who are unfamiliar, you don’t must go to System Settings in your Mac to allow the FaceTime HD digicam or webcam. You’ll be able to routinely use it when you open the FaceTime app or different supported video conferencing apps equivalent to Fb Messenger, WhatsApp, and others. You’ll know that the webcam has been activated when a inexperienced gentle flashes beside it.
Time wanted: 1 minute.
Comply with the steps under to take an image utilizing the Picture Sales space app in your MacBook.
- Open the Picture Sales space app.
- Click on both the group picture or single picture icon on the lower-left facet of the display.
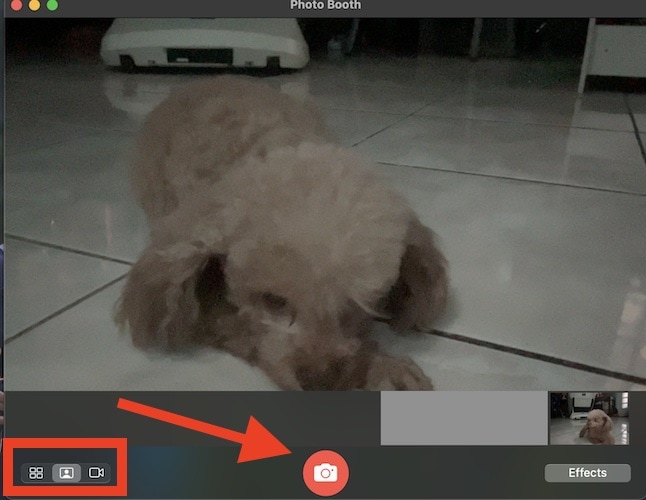
- On the alternative facet, it’s also possible to select so as to add results.
- Click on on the digicam icon to take an image.
To avoid wasting the image in your MacBook, merely right-click on the thumbnail on the lower-right facet of the display, then choose Export from the context menu. Click on Save after naming your image and selecting the place to reserve it in your Mac.

Alternatively, you could wish to instantly share the image you took utilizing the webcam by way of AirDrop or different apps. You are able to do so by clicking on the Share icon on the backside of your Mac’s display.
Bonus Tip: How To Take a Image on Mac Utilizing the Continuity Digicam Function
That’s how simple it’s to take an image in your Mac utilizing the Picture Sales space app. Nonetheless, it’s best to notice that the standard of images that you simply take utilizing the FaceTime HD digicam gained’t be nearly as good as, say, in your iPhone. That’s as a result of the webcam is just not meant for taking high-quality photos. In case you simply wish to have enjoyable and take random photos of your self and different folks, the FaceTime HD digicam is sweet sufficient, particularly in the event you apply the built-in results.
However if you wish to take better-quality photos of your self or different folks whereas on a FaceTime name, you need to use the Continuity Digicam function on macOS Ventura. Utilizing this function, your iPhone is utilized by your MacBook as a webcam; it should take the image. And because the iPhone has a greater digicam than your MacBook, the photographs can have increased high quality.
We beforehand featured a step-by-step process for disabling the Continuity Digicam function on macOS Ventura. You’ll be able to learn to allow it by following the identical steps however selecting to toggle on the function as a substitute of toggling it off.