

That is a part of the Jetpack Compose navigation sequence:
A deep hyperlink is a hyperlink that takes you on to a sure display in your app.
For instance, clicking on my weblog’s URL, the Android OS reveals an inventory of apps that can be utilized to open the URL as you’ll be able to see under.

Observe: The UI above might look a bit totally different on totally different Android OS
Since my weblog’s app helps deep hyperlinks, it reveals up as one of many apps, the primary one from the left. If I open it with my weblog’s app, it takes me to specify display content material inside my app. That is the known as deep hyperlink.
To show how you can implement the deep hyperlink, I take advantage of this easy Jetpack Compose navigation for instance. Let’s add the deep hyperlink.
Overview
The instance app has 4 screens:
-
Login Display
-
House Display
-
Profile Display
-
Search Display
I will add the deep hyperlink for every display on this instance app.
1. Add hostname within the exercise’s intent filter
In AndroidManifest.xml, add the <information>, <class> and <motion> tags within the exercise’s intent filter as proven under.
<manifest xmlns:android="http://schemas.android.com/apk/res/android">
...
    <exercise
        ...
        <intent-filter>
            <information android:host="vinchamp77.github.io"
                android:scheme="https" />
            <class android:title="android.intent.class.DEFAULT" />
            <class android:title="android.intent.class.BROWSABLE" />
            <motion android:title="android.intent.motion.VIEW" />
        </intent-filter>

    </exercise>
...
</manifest>
Observe: Hostname is case-sensitive and must be lowercase characters.
2. Add NavDeepLink in NavGraphBuilder.composable()
The next code in NavGraph.kt must be up to date by including the deepLinks parameter when calling the NavGraphBuilder.composable().
navGraphBuilder.composable(
    route = NavRoute.Login.path,
    deepLinks = listOf (
        navDeepLink {
            uriPattern = "https://vinchamp77.github.io/deeplink/login"
            motion = Intent.ACTION_VIEW
        }
    ),
) {

}


navGraphBuilder.composable(
    route = NavRoute.House.path,
    deepLinks = listOf (
        navDeepLink {
            uriPattern = "https://vinchamp77.github.io/deeplink/residence"
            motion = Intent.ACTION_VIEW
        }
    ),
) {

}


navGraphBuilder.composable(
    route = NavRoute.Profile.withArgsFormat(NavRoute.Profile.id, NavRoute.Profile.showDetails),
    deepLinks = listOf (
        navDeepLink {
            uriPattern = "https://vinchamp77.github.io/deeplink/profile?id={id}&showDetails={showDetails}"
            motion = Intent.ACTION_VIEW
        }
    ),

) {


}


navGraphBuilder.composable(
    route = NavRoute.Search.withArgsFormat(NavRoute.Search.question),
    deepLinks = listOf (
        navDeepLink {
            uriPattern = "https://vinchamp77.github.io/deeplink/search?question={question}"
            motion = Intent.ACTION_VIEW
        }
    ),

) {

}
You construct the listing of NavDeepLink utilizing navDeepLink() helper operate by specifying the uriPattern and the motion parameters.
URI sample with none argument is easy ahead no large deal. Nevertheless, when the URI sample has arguments, it should observe the normal URL question parameters format.
It took me some time to determine this out. For instance, the next URI sample will not work.
uriPattern = "https://vinchamp77.github.io/deeplink/search/{question}"
It really works solely when you’ve got one deep hyperlink outlined. If there’s multiple deep hyperlink, it falls again to the primary deep hyperlink that you simply outlined.
So it should be on this format.
uriPattern = "https://vinchamp77.github.io/deeplink/search?question={question}"
3. Check the Deep Hyperlink
The best technique to take a look at the deep hyperlink is to make use of the Instruments -> App LInks Assistant in Android Studio.
Go to step 4 – Check on machine or emulator immediately.
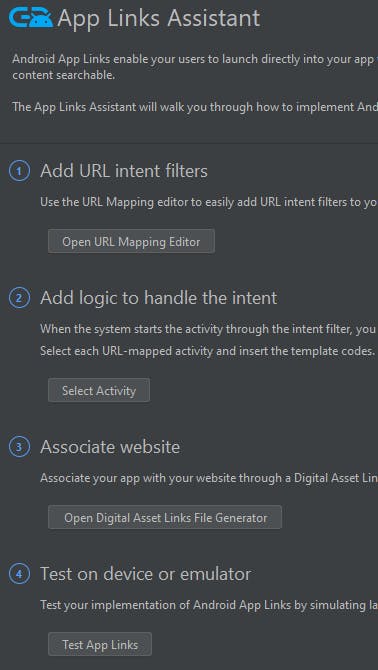
Then, add the URL that you simply wish to take a look at and click on Run Check.
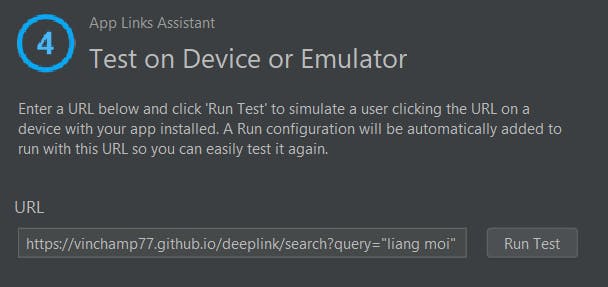
Observe: These are equal adb instructions.
$ adb shell setprop log.tag.AppIndexApi VERBOSE
$ adb shell am begin -a android.intent.motion.VIEW -c android.intent.class.BROWSABLE -d 'https://vinchamp77.github.io/deeplink/search?question="liang moi"'
Click on JUST ONCE or ALWAYS to open with Easy Navigation Compose App.
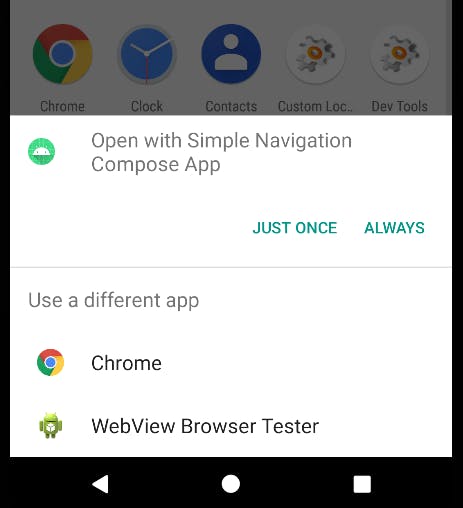
The search display is proven with the search question that we handed in from the URL.

You are not accomplished! Deep hyperlinks are lastly carried out in your app.
4. Confirm Deep Hyperlink Host Title
Properly, not likely. When you run this app on Android 12 (API degree 31). The hyperlink would not take you to the app in any respect. It requires you to confirm the deep hyperlinks’ hostname belongs to your app.
To do this, you first have to generate a Digital Asset Hyperlinks file and add it to your as specify location in your web site.
- <your hostname>/.well-know/assetlinks.json
Now, proceed to step 3 – Affiliate web site within the App Hyperlinks Assistant
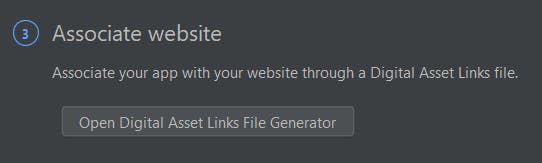
A number of information ought to be already pre-filled for you. Choose Signing config -> Debug, and click on Generate Digital Asset Hyperlinks File.
For a manufacturing construct, choose Choose keystore file as a substitute
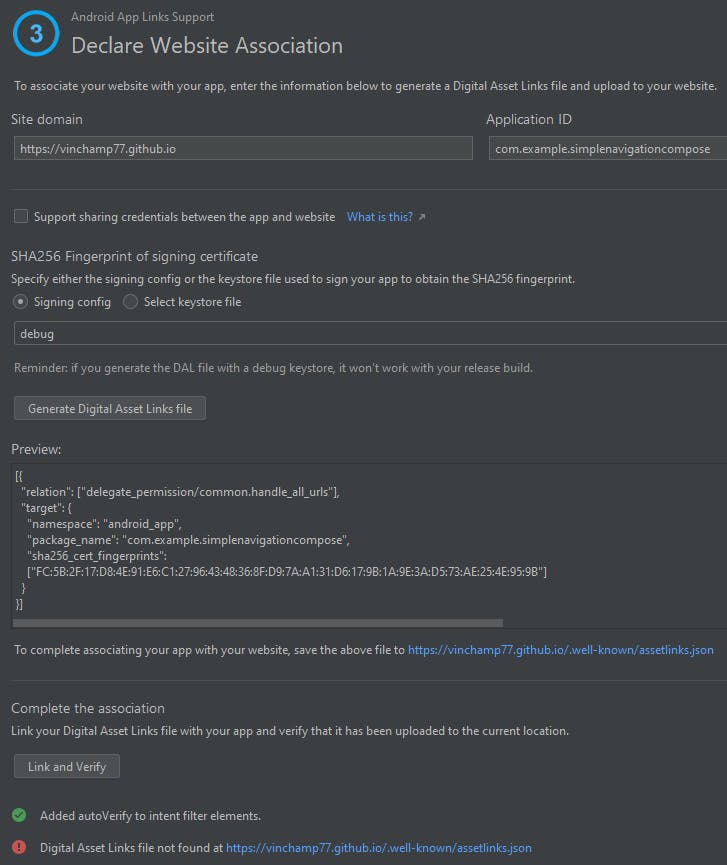
As soon as the file is generated, you’ll be able to click on Save file to obtain the file. You want to copy the file to your web site. On this instance, the file location is
If you’re utilizing a <username>.github.io web page like mine, there are some stuff you want to concentrate on to ensure that the .well-known folder to be acknowledged.
Technique 1 – When you have _config.yml, you must add the embody: [“.well-known”]. That is an instance of my github web page’s _config.yml.
theme: jekyll-theme-minimal
title: Vincent Tsen
description: Self-taught Hobbyist Native Android Kotlin Developer
embody: [".well-known"]
Technique 2 – When you haven’t got _config.yml, you add .nojekyll in your root listing**.** The .nojekyII is simply an empty file with none content material.
Click on Hyperlink and Confirm and you need to see
Success! Your app is related to the chosen area(s).

The Android Studio additionally routinely added the autoVerify to the intent filter parts.
<intent-filter android:autoVerify="true">
    <information android:host="vinchamp77.github.io"
        android:scheme="https" />
    <class android:title="android.intent.class.DEFAULT" />
    <class android:title="android.intent.class.BROWSABLE" />
    <motion android:title="android.intent.motion.VIEW" />
</intent-filter>
Attempt to take a look at the app hyperlink in step 3 above on Android 12 (API degree 31) and above, it really works!
You may additionally discover that it would not immediate you to select from an inventory of apps, however as a substitute takes you on to your app. That is additionally the good thing about verifying your hostname.
Abstract
Deep hyperlink is sort of helpful as a result of it brings you on to a selected display. One factor I seen is that if the URL would not match any of the URL patterns, it falls again to the primary deep hyperlink. For instance, the primary deep hyperlink on this instance is the login display. All of the invalid URL brings you to the login display immediately.
Aside from triggering a deep hyperlink from URL, it’s also possible to set off the deep hyperlink from one other app utilizing PendingIntent. I’ll cowl the PendingIntent matter in a while. Take pleasure in!
Supply Code
GitHub Repository: Demo_SimpleNavigationCompose (deep hyperlink department)