
Learn to add feedback, references, additional data, formulation, and hints to your PDF paperwork utilizing notes and speech bubbles in your Mac, iPhone, and iPad.
Suppose you’re going via an vital PDF doc and wish to add transient notes or data to particular spots. Simply place a word and enter your textual content, and clicking on it should reveal the related information.
Equally, speech bubbles, generally utilized in photos and memes, will be added to PDFs for commenting functions, with their protruding arrow pointing on the speaker or referenced textual content.
This fast tutorial reveals you learn how to put notes or speech bubbles in your PDF information utilizing built-in or free apps on macOS and iOS.
Associated: Methods to spotlight, underline, and strikethrough textual content in PDF paperwork on iPhone, iPad, and Mac
Add notes to PDF on Mac
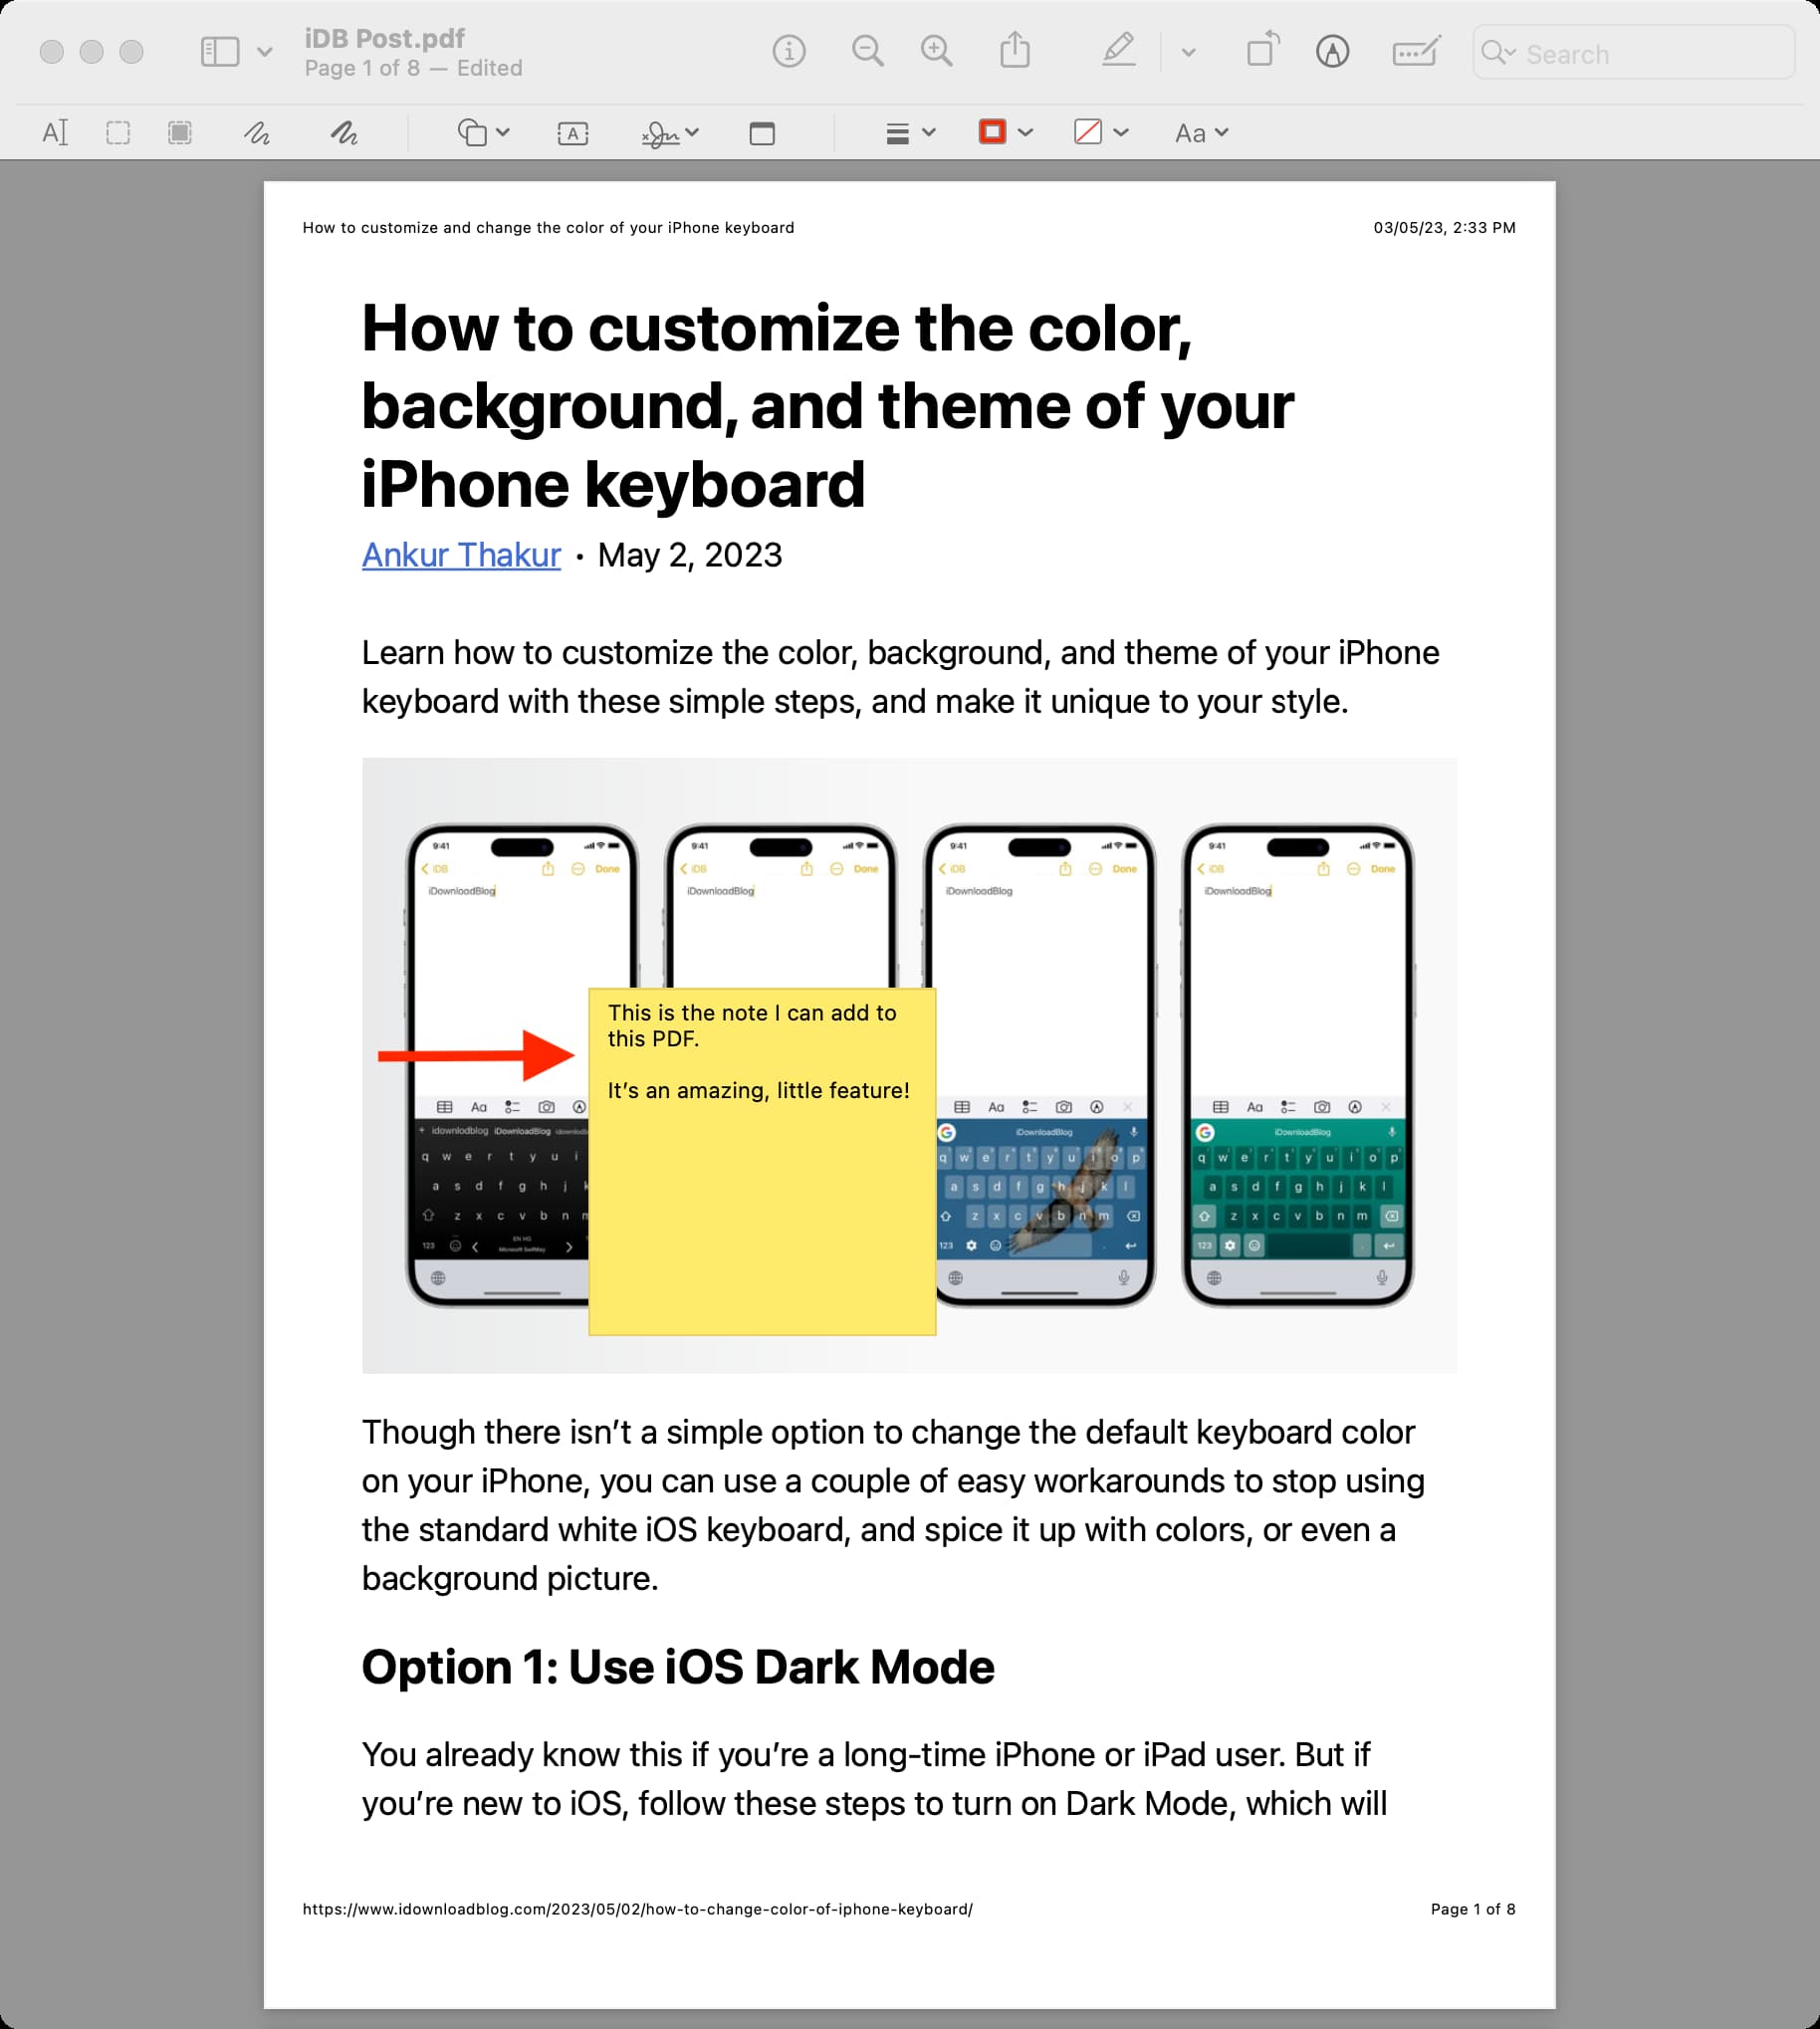
1) Open the PDF within the built-in Apple Preview app.
2) Click on the Markup icon from the highest to indicate the Markup toolbar if it isn’t already seen.
![]()
3) Scroll to the PDF web page the place you wish to add the word.
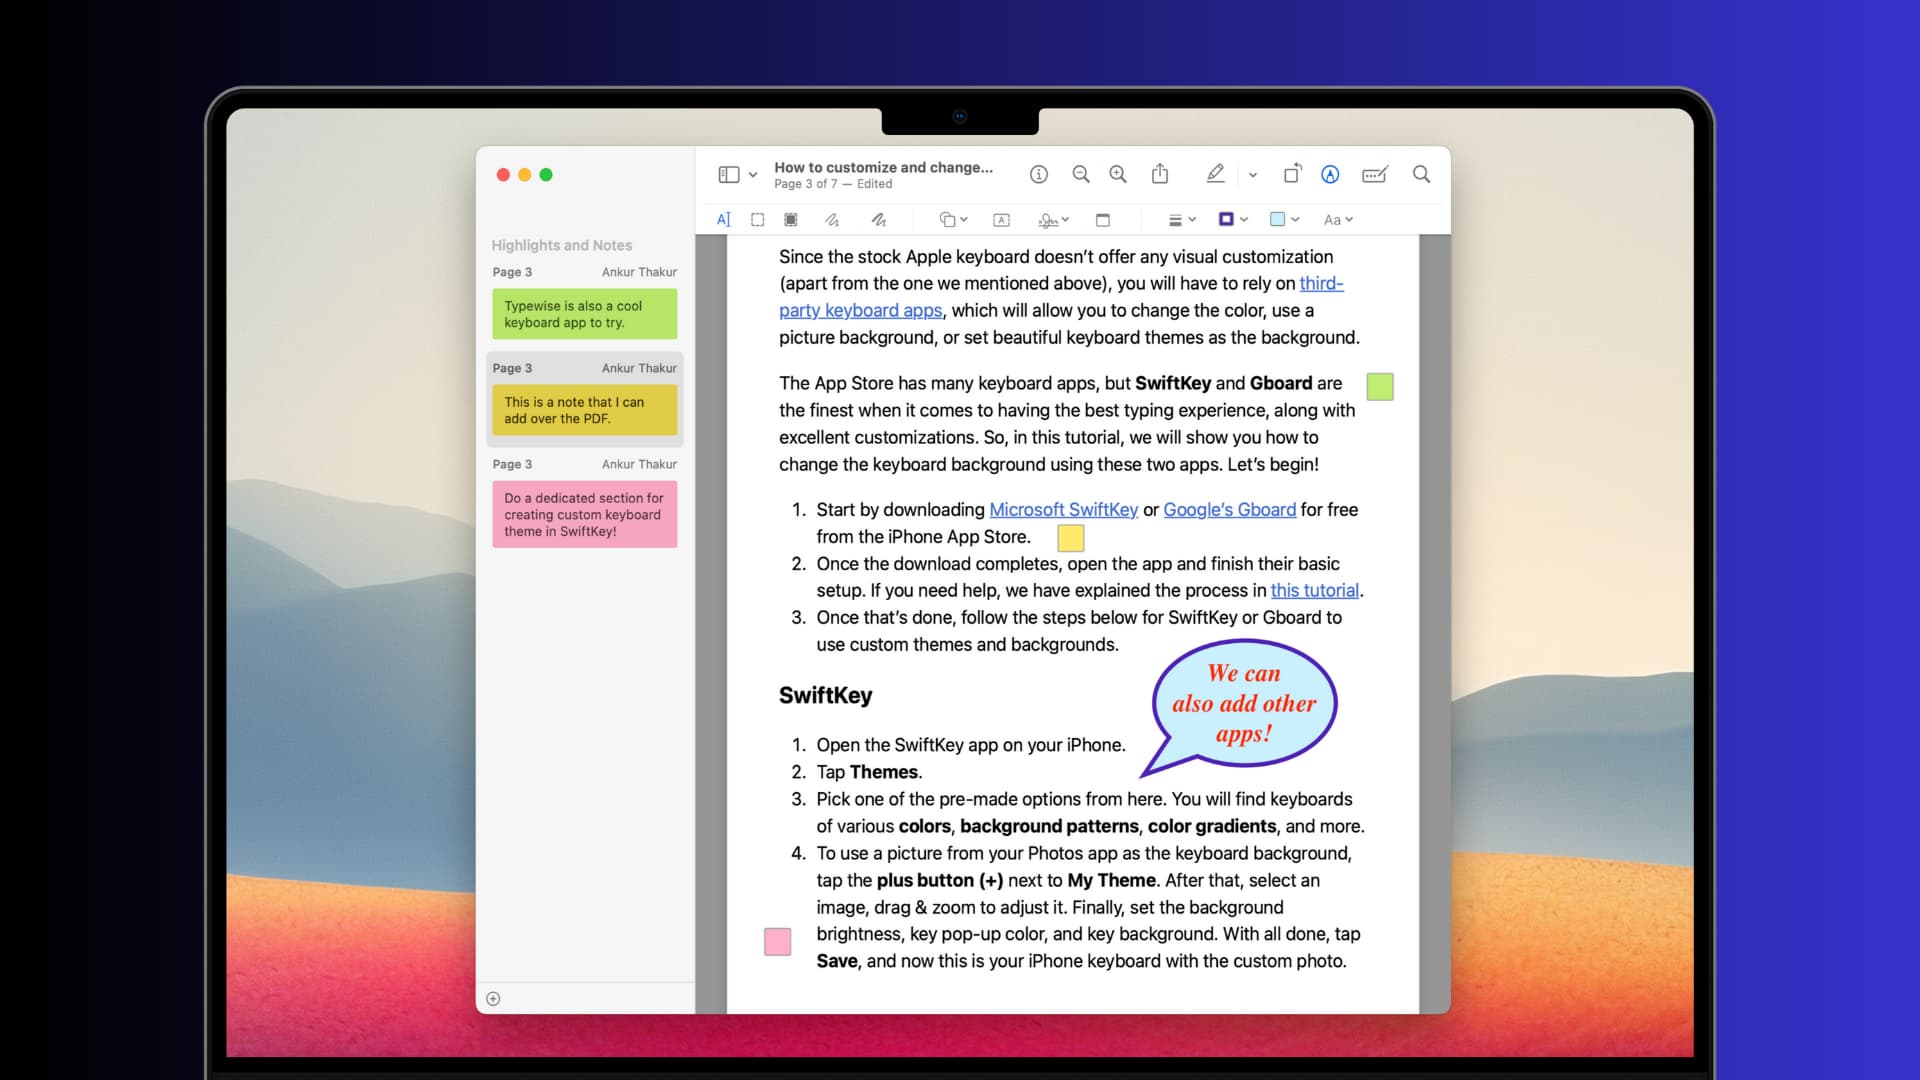
4) Click on the Notice icon within the toolbar, and it’ll immediately come out a small yellow sticky note-like interface on the PDF web page.
![]()
5) Sort your remark or word on this field.
6) Once you’re performed, click on anyplace exterior the field to attenuate the word.
Different methods so as to add a word
- From the highest menu bar: Open the PDF in Preview and click on Instruments > Annotate > Notice.
- Use the keyboard shortcut: Open the PDF in Preview and go to the PDF web page the place you wish to add the word. Now press the Command + Management + N keys collectively so as to add a word.
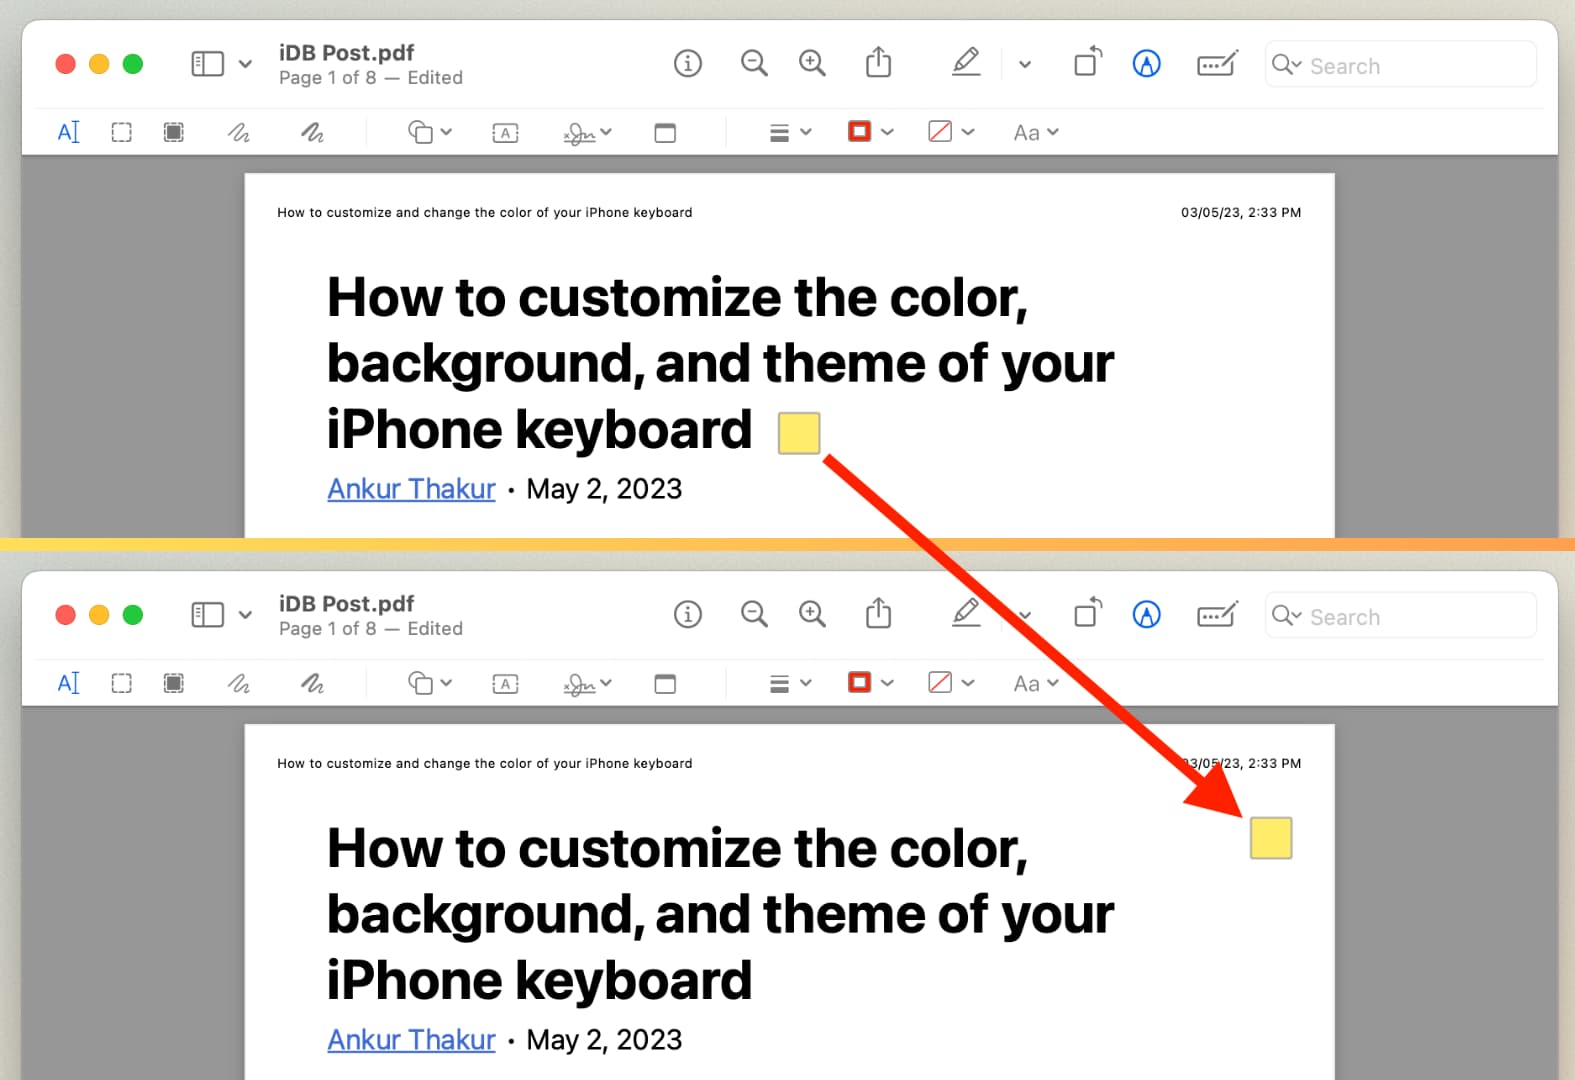
Change the place of the word
Put your mouse pointer over the minimized word field and drag it anyplace on that PDF web page the place you want that word. Notice: You may’t transfer the word to a brand new PDF web page.
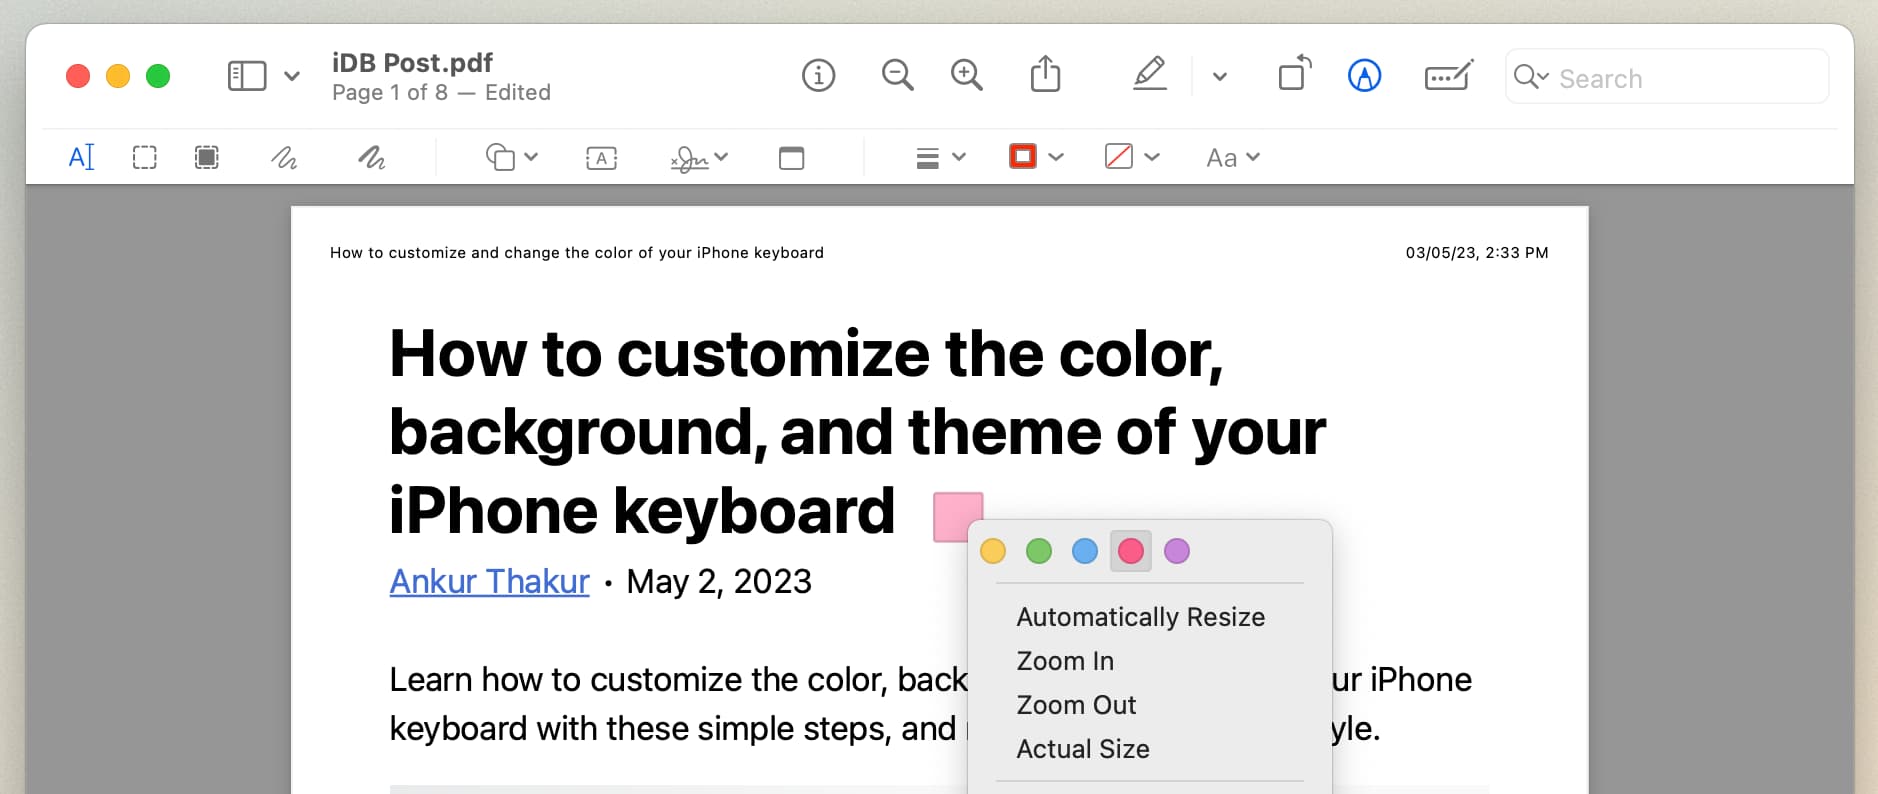
Change the word shade
- Ensure that your word is minimized as slightly sq..
- Now, place your pointer over that word sq. and right-click or Management-click.
- Select yellow, inexperienced, blue, pink, or purple.
Edit a word
Click on the word sq. to view it and edit it by including new textual content or eradicating what’s at the moment there.
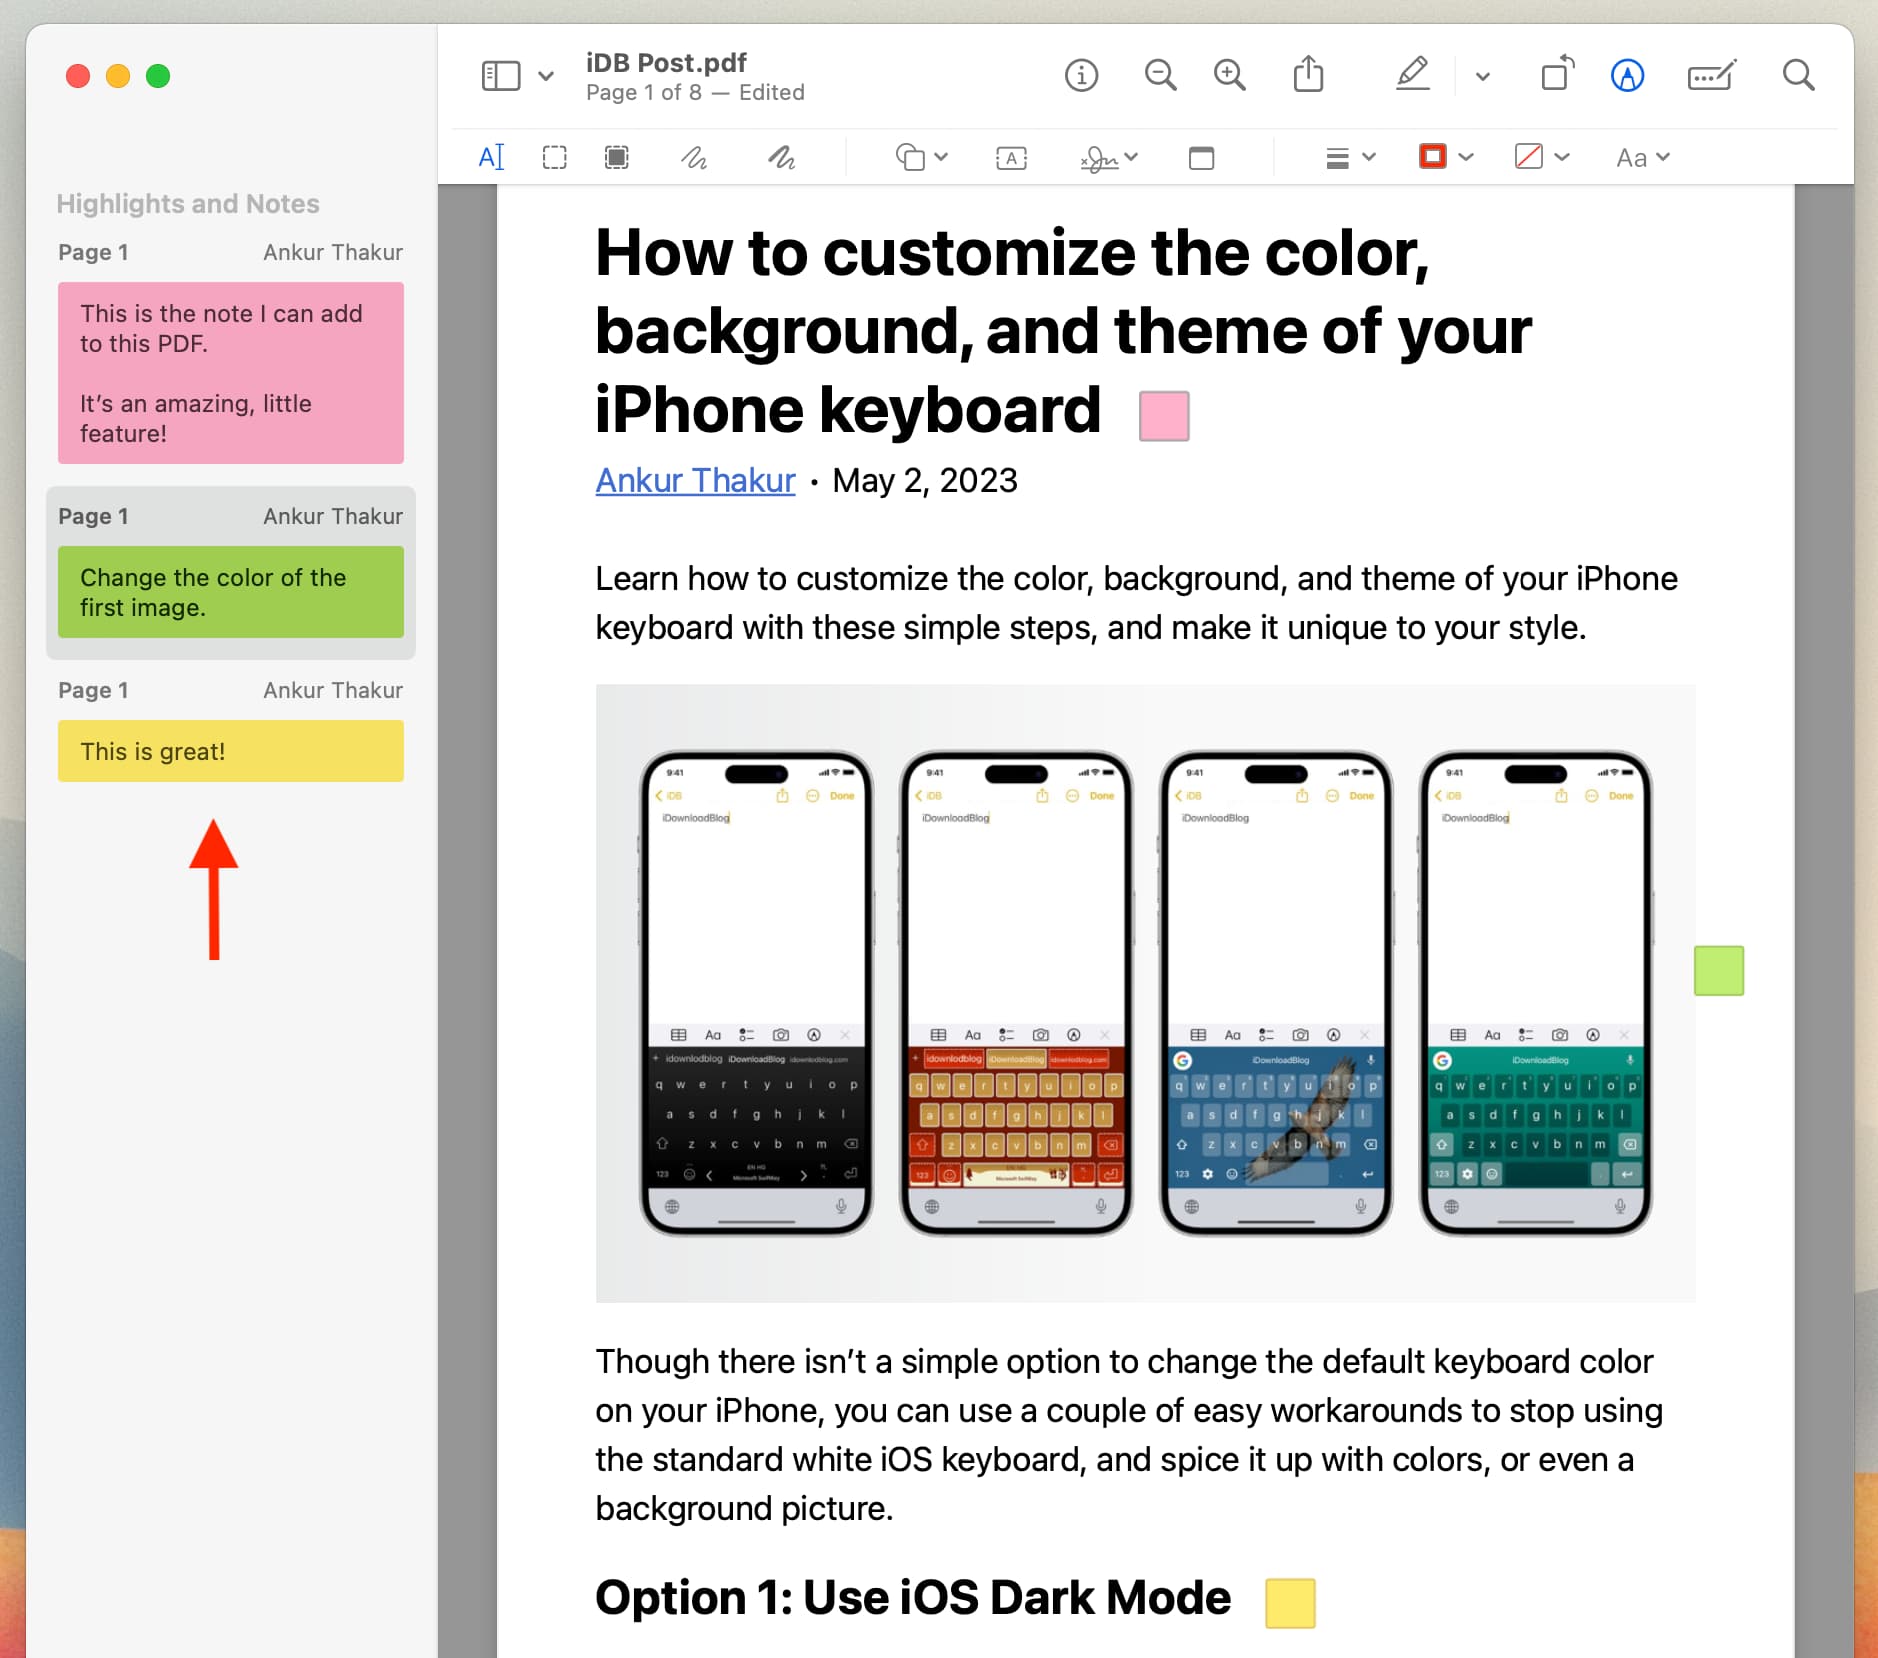
See all added notes
- Ensure that the PDF is open in Preview.
- From the highest menu bar, click on View > Highlights and Notes, which can present the left sidebar with all of your added notes.
Delete a word
Choose the word within the left sidebar and press the delete key in your keyboard.
Alternatively, be certain the word is minimized into slightly sq.. Now, place the mouse pointer over the little sq. and hit the delete key to take away it.
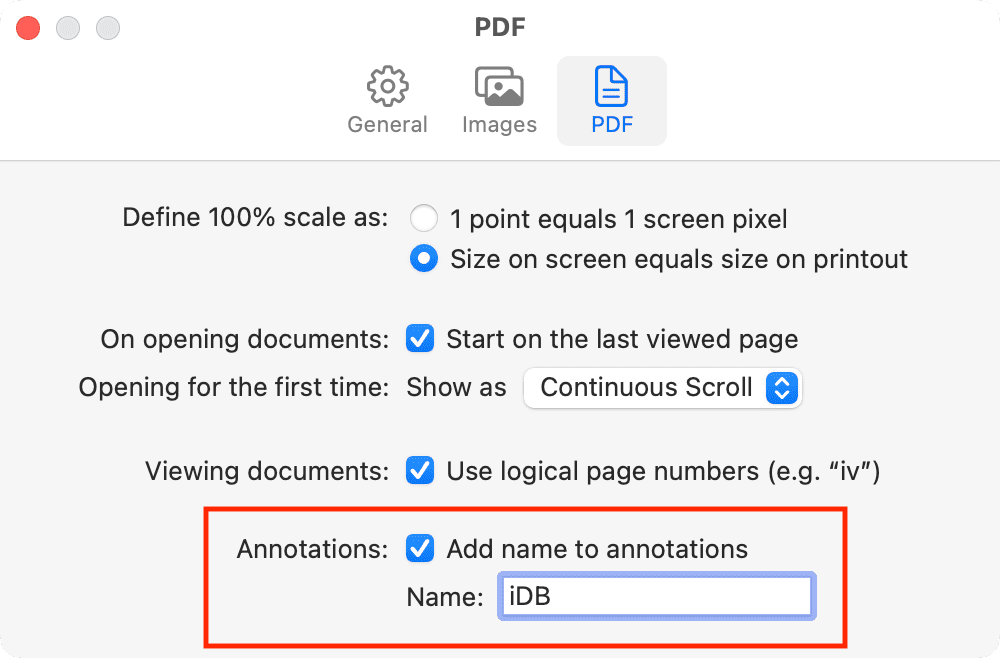
After you select View > Highlights and Notes, you’ll almost certainly see your title because the creator of each word. It is because, by default, the Mac makes use of your person login title because the creator. However you’ll be able to simply change it or take away the creator’s title from the Preview settings. Right here’s how:
- Click on Preview subsequent to the highest Apple icon and select Settings or Preferences.
- Go to the PDF part.
- Uncheck ‘Add title to annotations‘ to take away the creator title.
- Or, to alter the creator title, sort the brand new title within the Identify field.
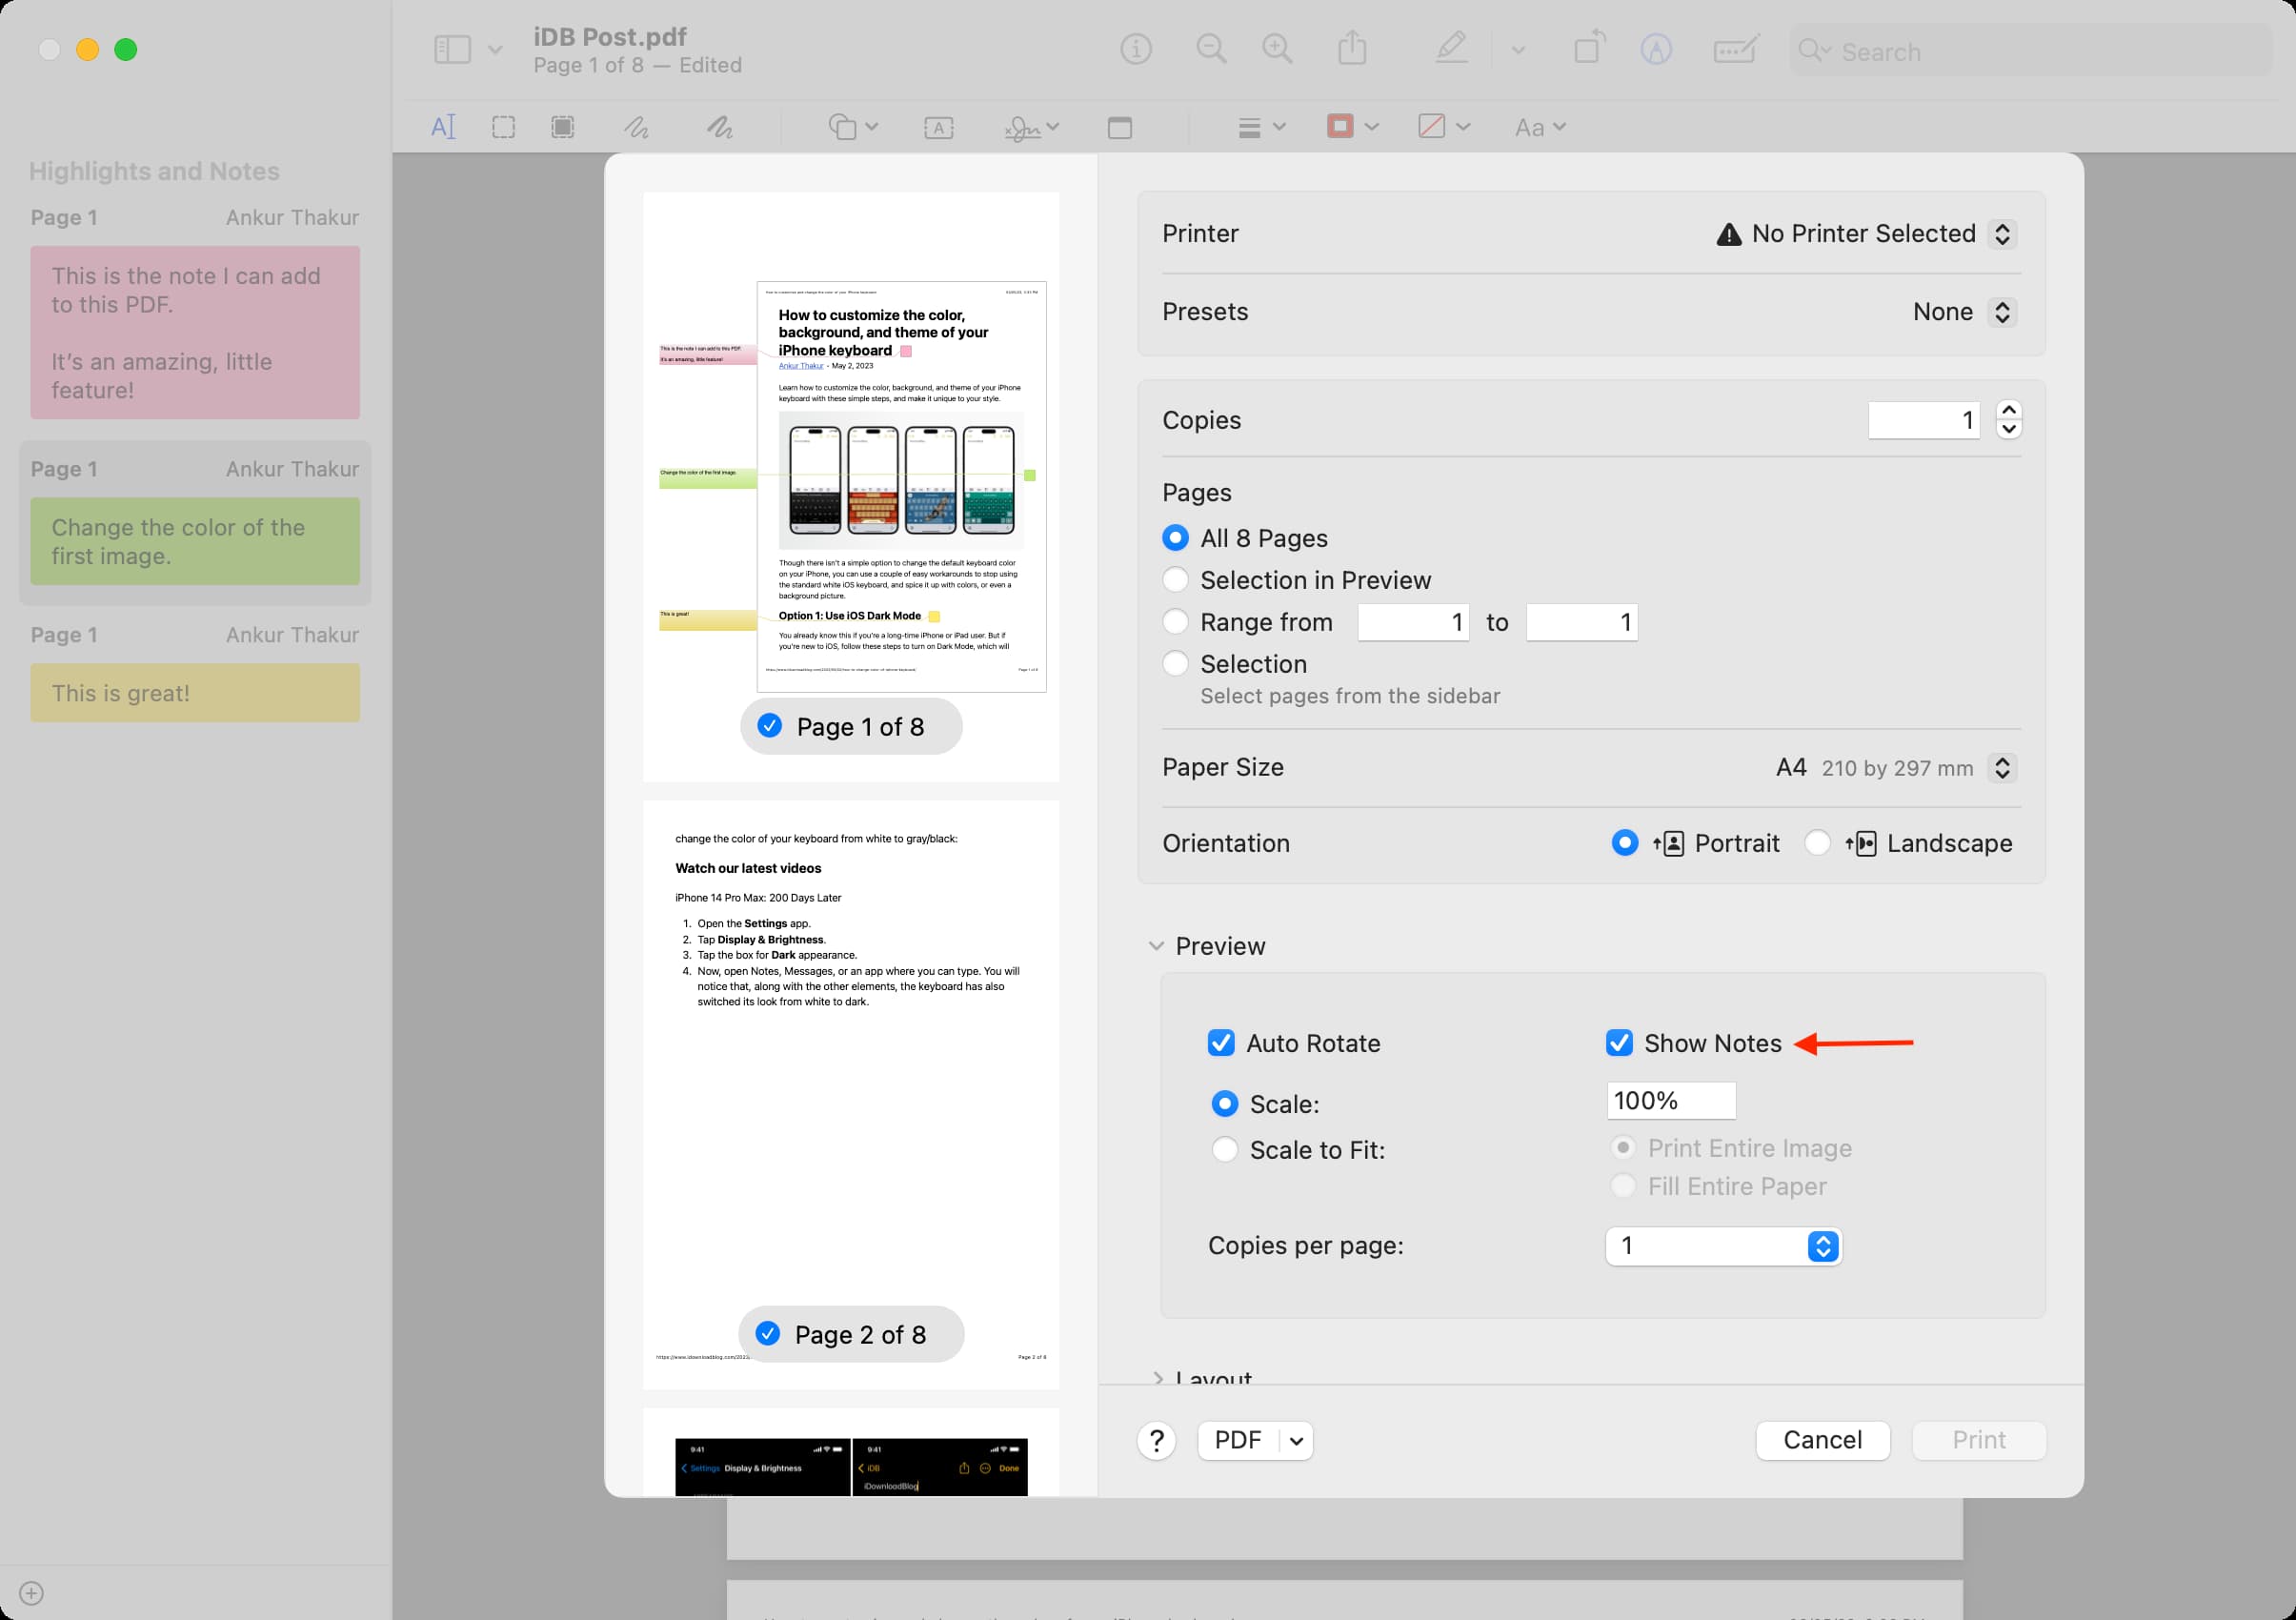
Print your PDF with added notes
- With PDF open in Preview, click on File > Print from the highest menu bar.
- On the print preview display screen, examine the field for Present Notes to incorporate the added notes within the printout.
- Lastly, hit Print or click on the arrow subsequent to PDF and select Save as PDF.
Associated: Methods to add a textual content or picture watermark to your PDF
Add speech bubble to PDF on Mac
1) Open the PDF in Preview on Mac.
2) Click on Instruments > Annotate > Speech Bubble from the highest menu bar. Alternatively, you’ll be able to click on the Markup button to see the toolbar, then click on the Shapes icon and select the speech bubble.
![]()
3) You will notice a speech bubble on the PDF. Click on OK if you happen to see a popup.
4) Now, click on contained in the bubble and kind what you need the textual content contained in the speech bubble to say.

Transfer the speech bubble
- Choose the speech bubble. Once you do this, you will notice blue and inexperienced dots on the border.
- Ensure that the pointer is on the border of the bubble and drag it to a brand new place on the PDF web page. The bubble, together with the textual content inside it, will transfer to the brand new spot.
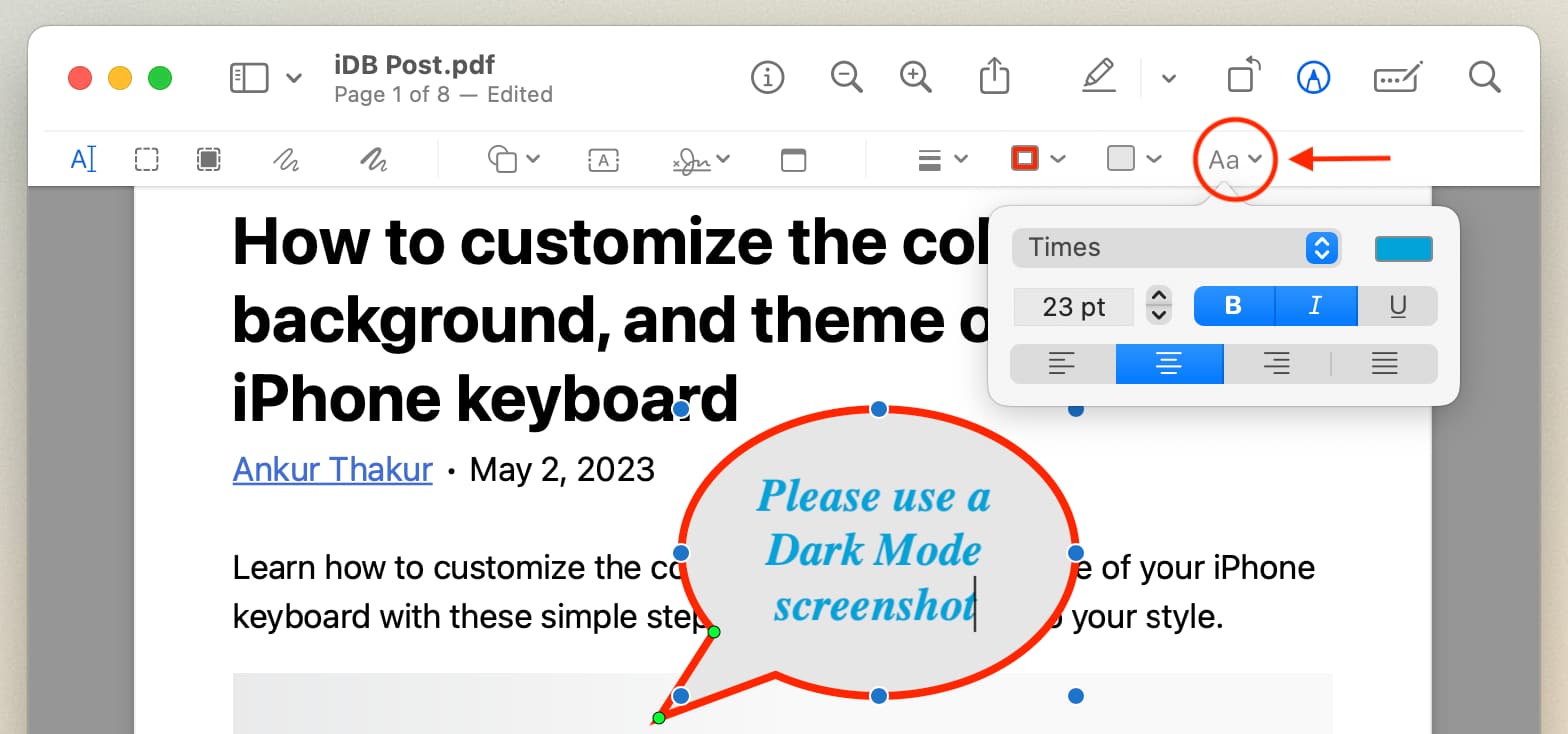
Customise the textual content within the speech bubble
- Choose the speech bubble.
- Click on the Aa Textual content Fashion icon from the highest proper of the Preview toolbar.
- From right here, you’ll be able to select the specified textual content font, shade, dimension, format (daring, italic, underline), and textual content alignment.
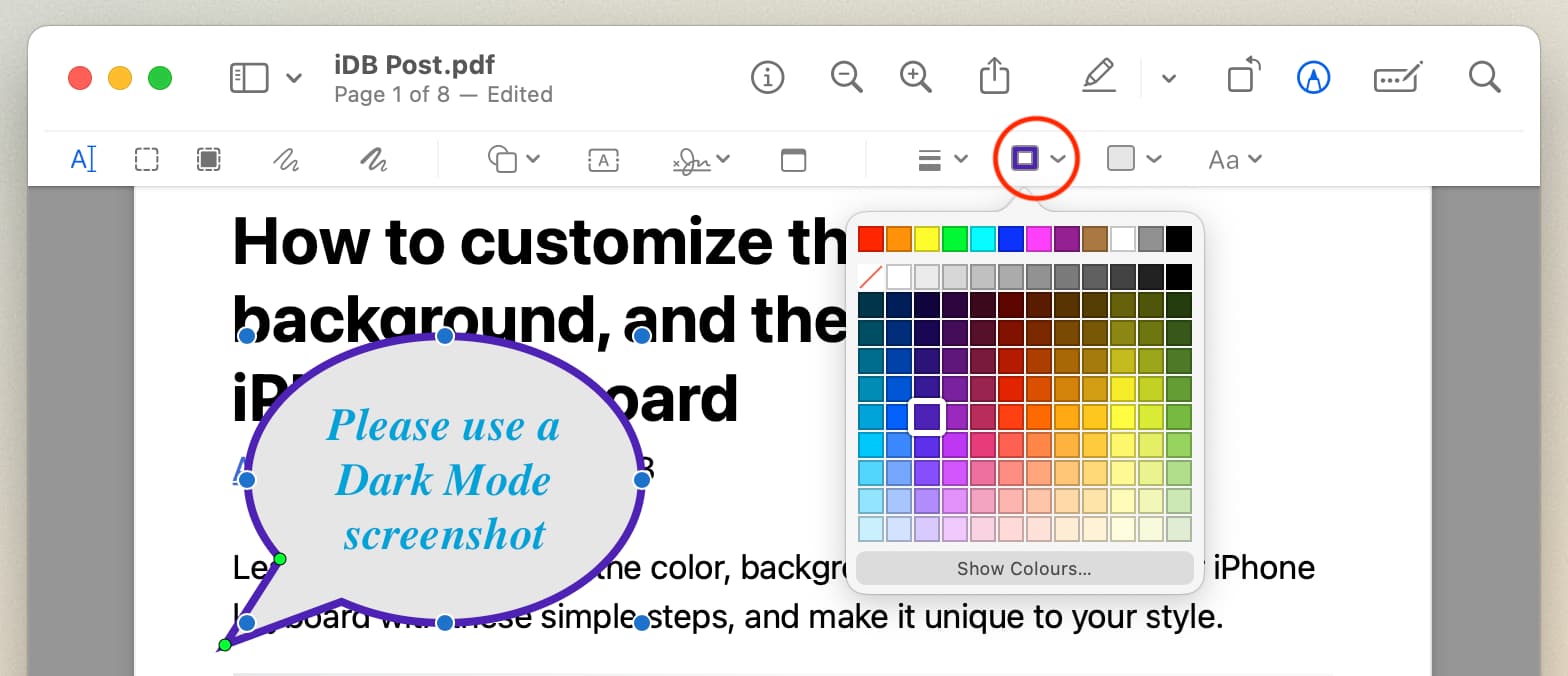
Change the speech bubble’s border shade
- Choose the speech bubble.
- Click on the Border Coloration icon within the Preview toolbar and select a special one.
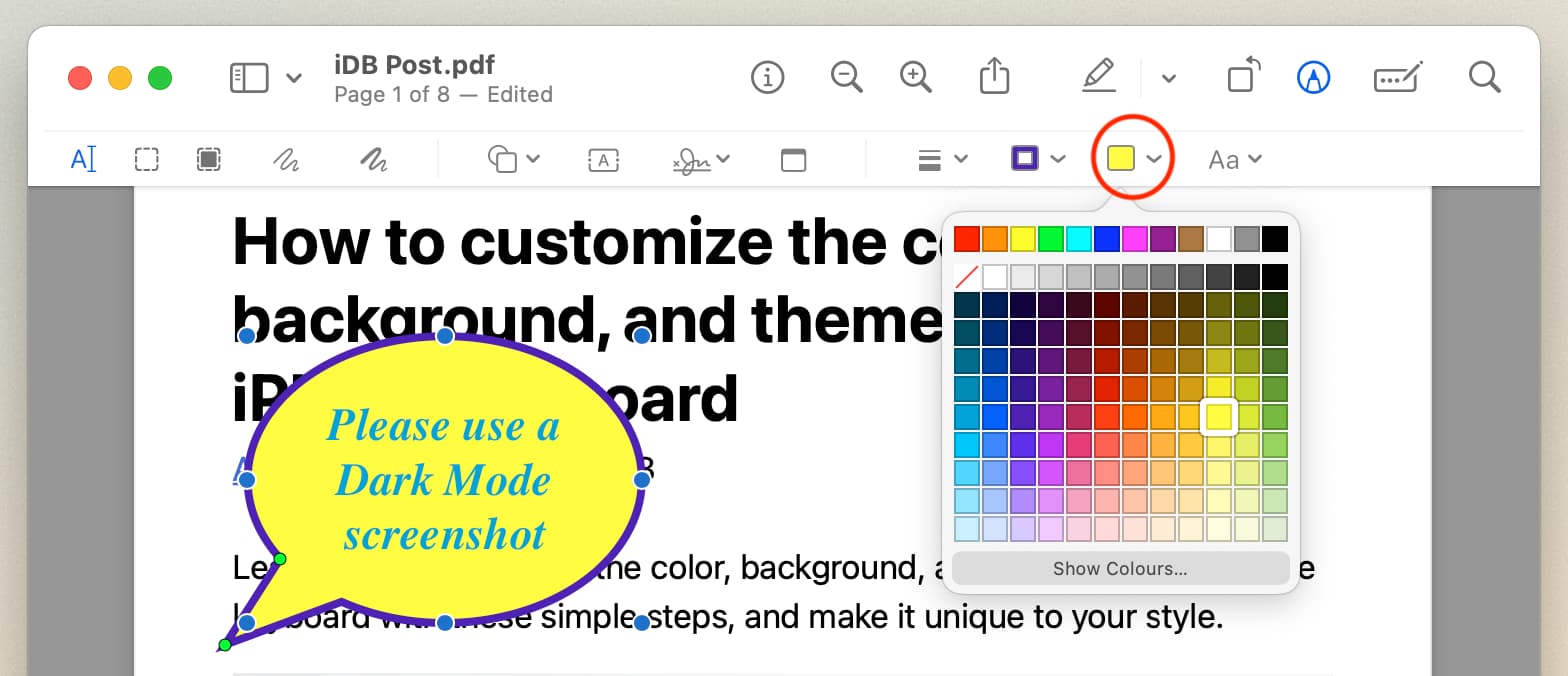
Change the bubble background or make it clear
- Choose the speech bubble.
- Click on the Fill Coloration icon and decide a special shade. To make the background clear, select the primary white icon with a crimson slash (/).
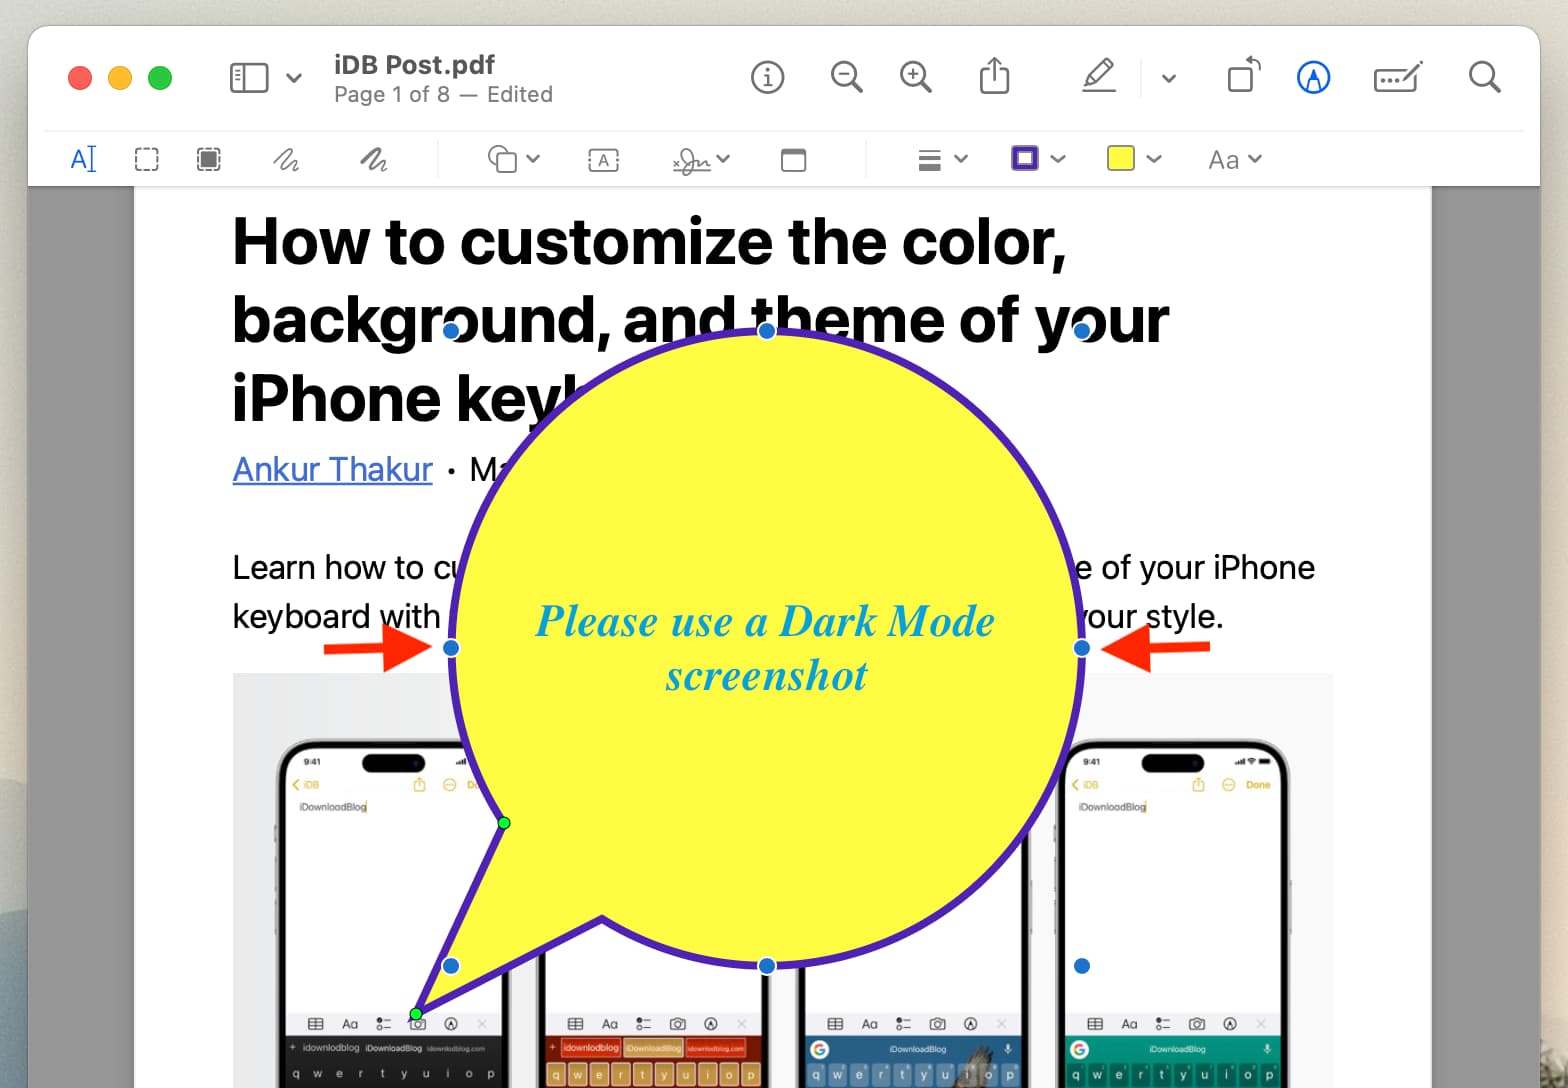
Change the form and dimension of the speech bubble
- Choose the speech bubble.
- Put the pointer over one of many blue dots and drag to alter the form and dimension. It might be greatest to make use of multiple blue dot to get the right form (round, oval, elongated, tall, and many others.) and dimension.
Customise the beak/arrow of the speech bubble
- Click on as soon as on the speech bubble to pick out it.
- Now, put the mouse pointer over the inexperienced dot that’s on the fatter aspect of the arrow and drag it to make the beak wider or narrower.
- Subsequent, drag the different inexperienced dot to make the arrow longer or shorter, in addition to change its place on the speech border. For instance, if the arrow is on the left aspect, you’ll be able to drag it to the appropriate.
![]()
Add notes to PDF on iPhone
The Markup function in iOS can be utilized so as to add a speech bubble (defined later on this publish), however you’ll be able to’t add notes utilizing it. You’ll have to use a third-party app to try this.
1) Obtain and open the Highlights app in your iPhone or iPad.
2) Choose the PDF from the Information app interface.
3) Choose textual content within the PDF, and it’ll present a skinny menu strip. Faucet the speech bubble icon.
4) Sort the textual content you wish to add.
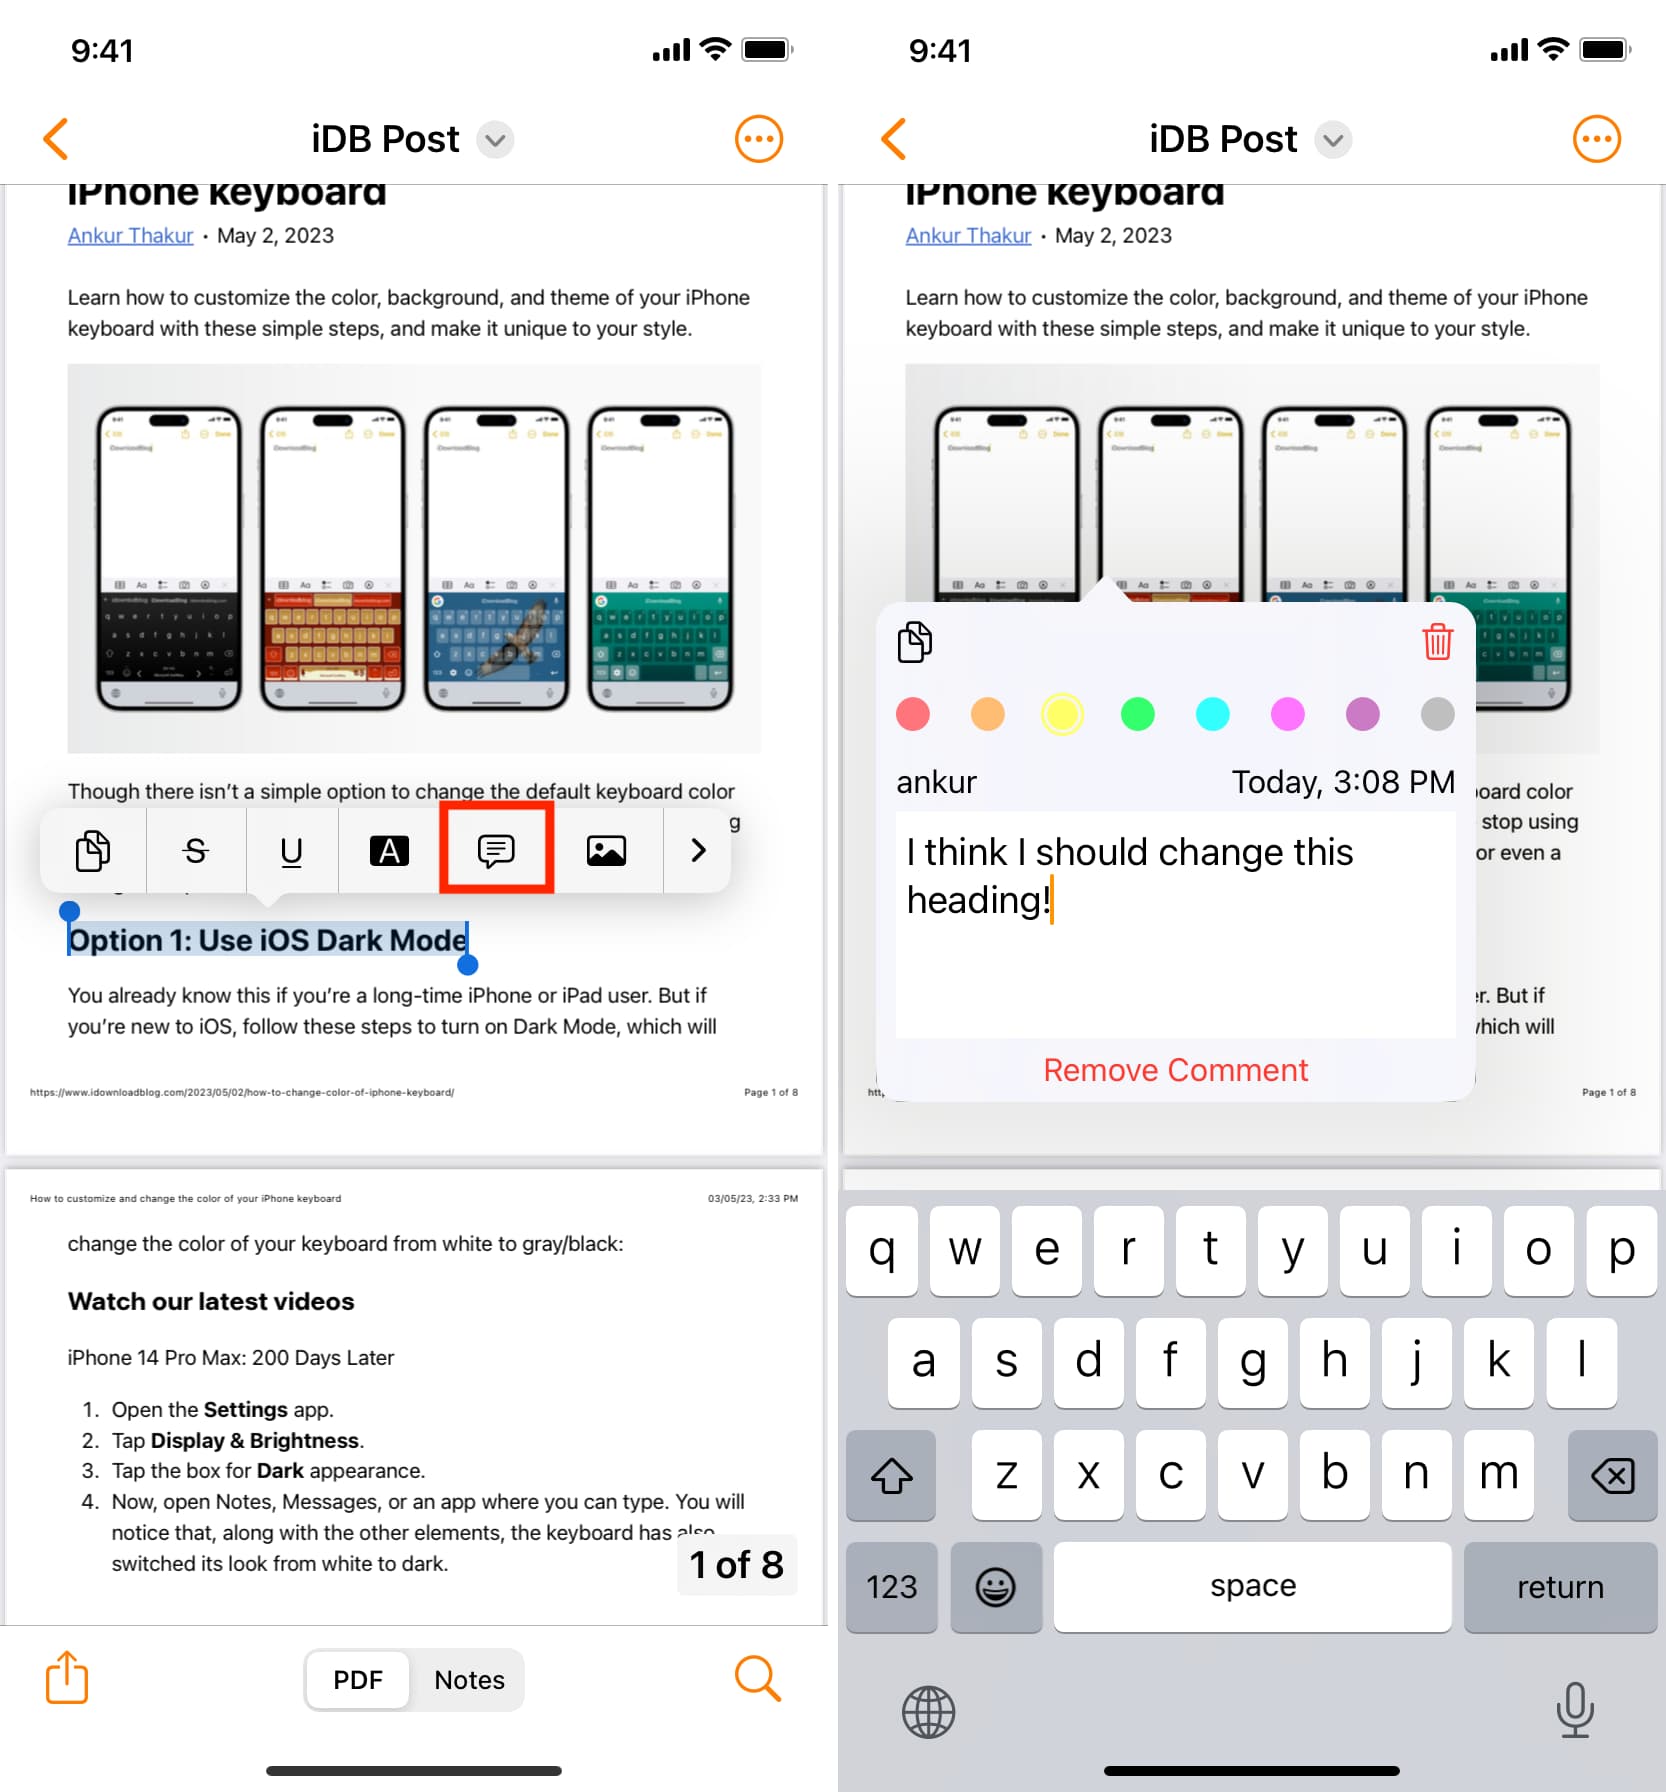
5) When you end, faucet anyplace exterior the word field.
6) To edit textual content, change shade, or take away the word, faucet the word icon on the PDF and make the required adjustments.
7) To save lots of the PDF, faucet the share icon > PDF (underneath the Share Doc heading) > Save to Information > Save.
You may open this saved PDF contained in the Highlights app and faucet the word icon to see the added remark. You may as well faucet that PDF within the iOS Information app and faucet the word icon, which ought to present the added remark (although it will not be as good because the Highlights app).
Add a speech bubble to PDFs on iPhone
1) Open the Apple Information app and faucet a PDF to open it.
2) Faucet the Markup button.
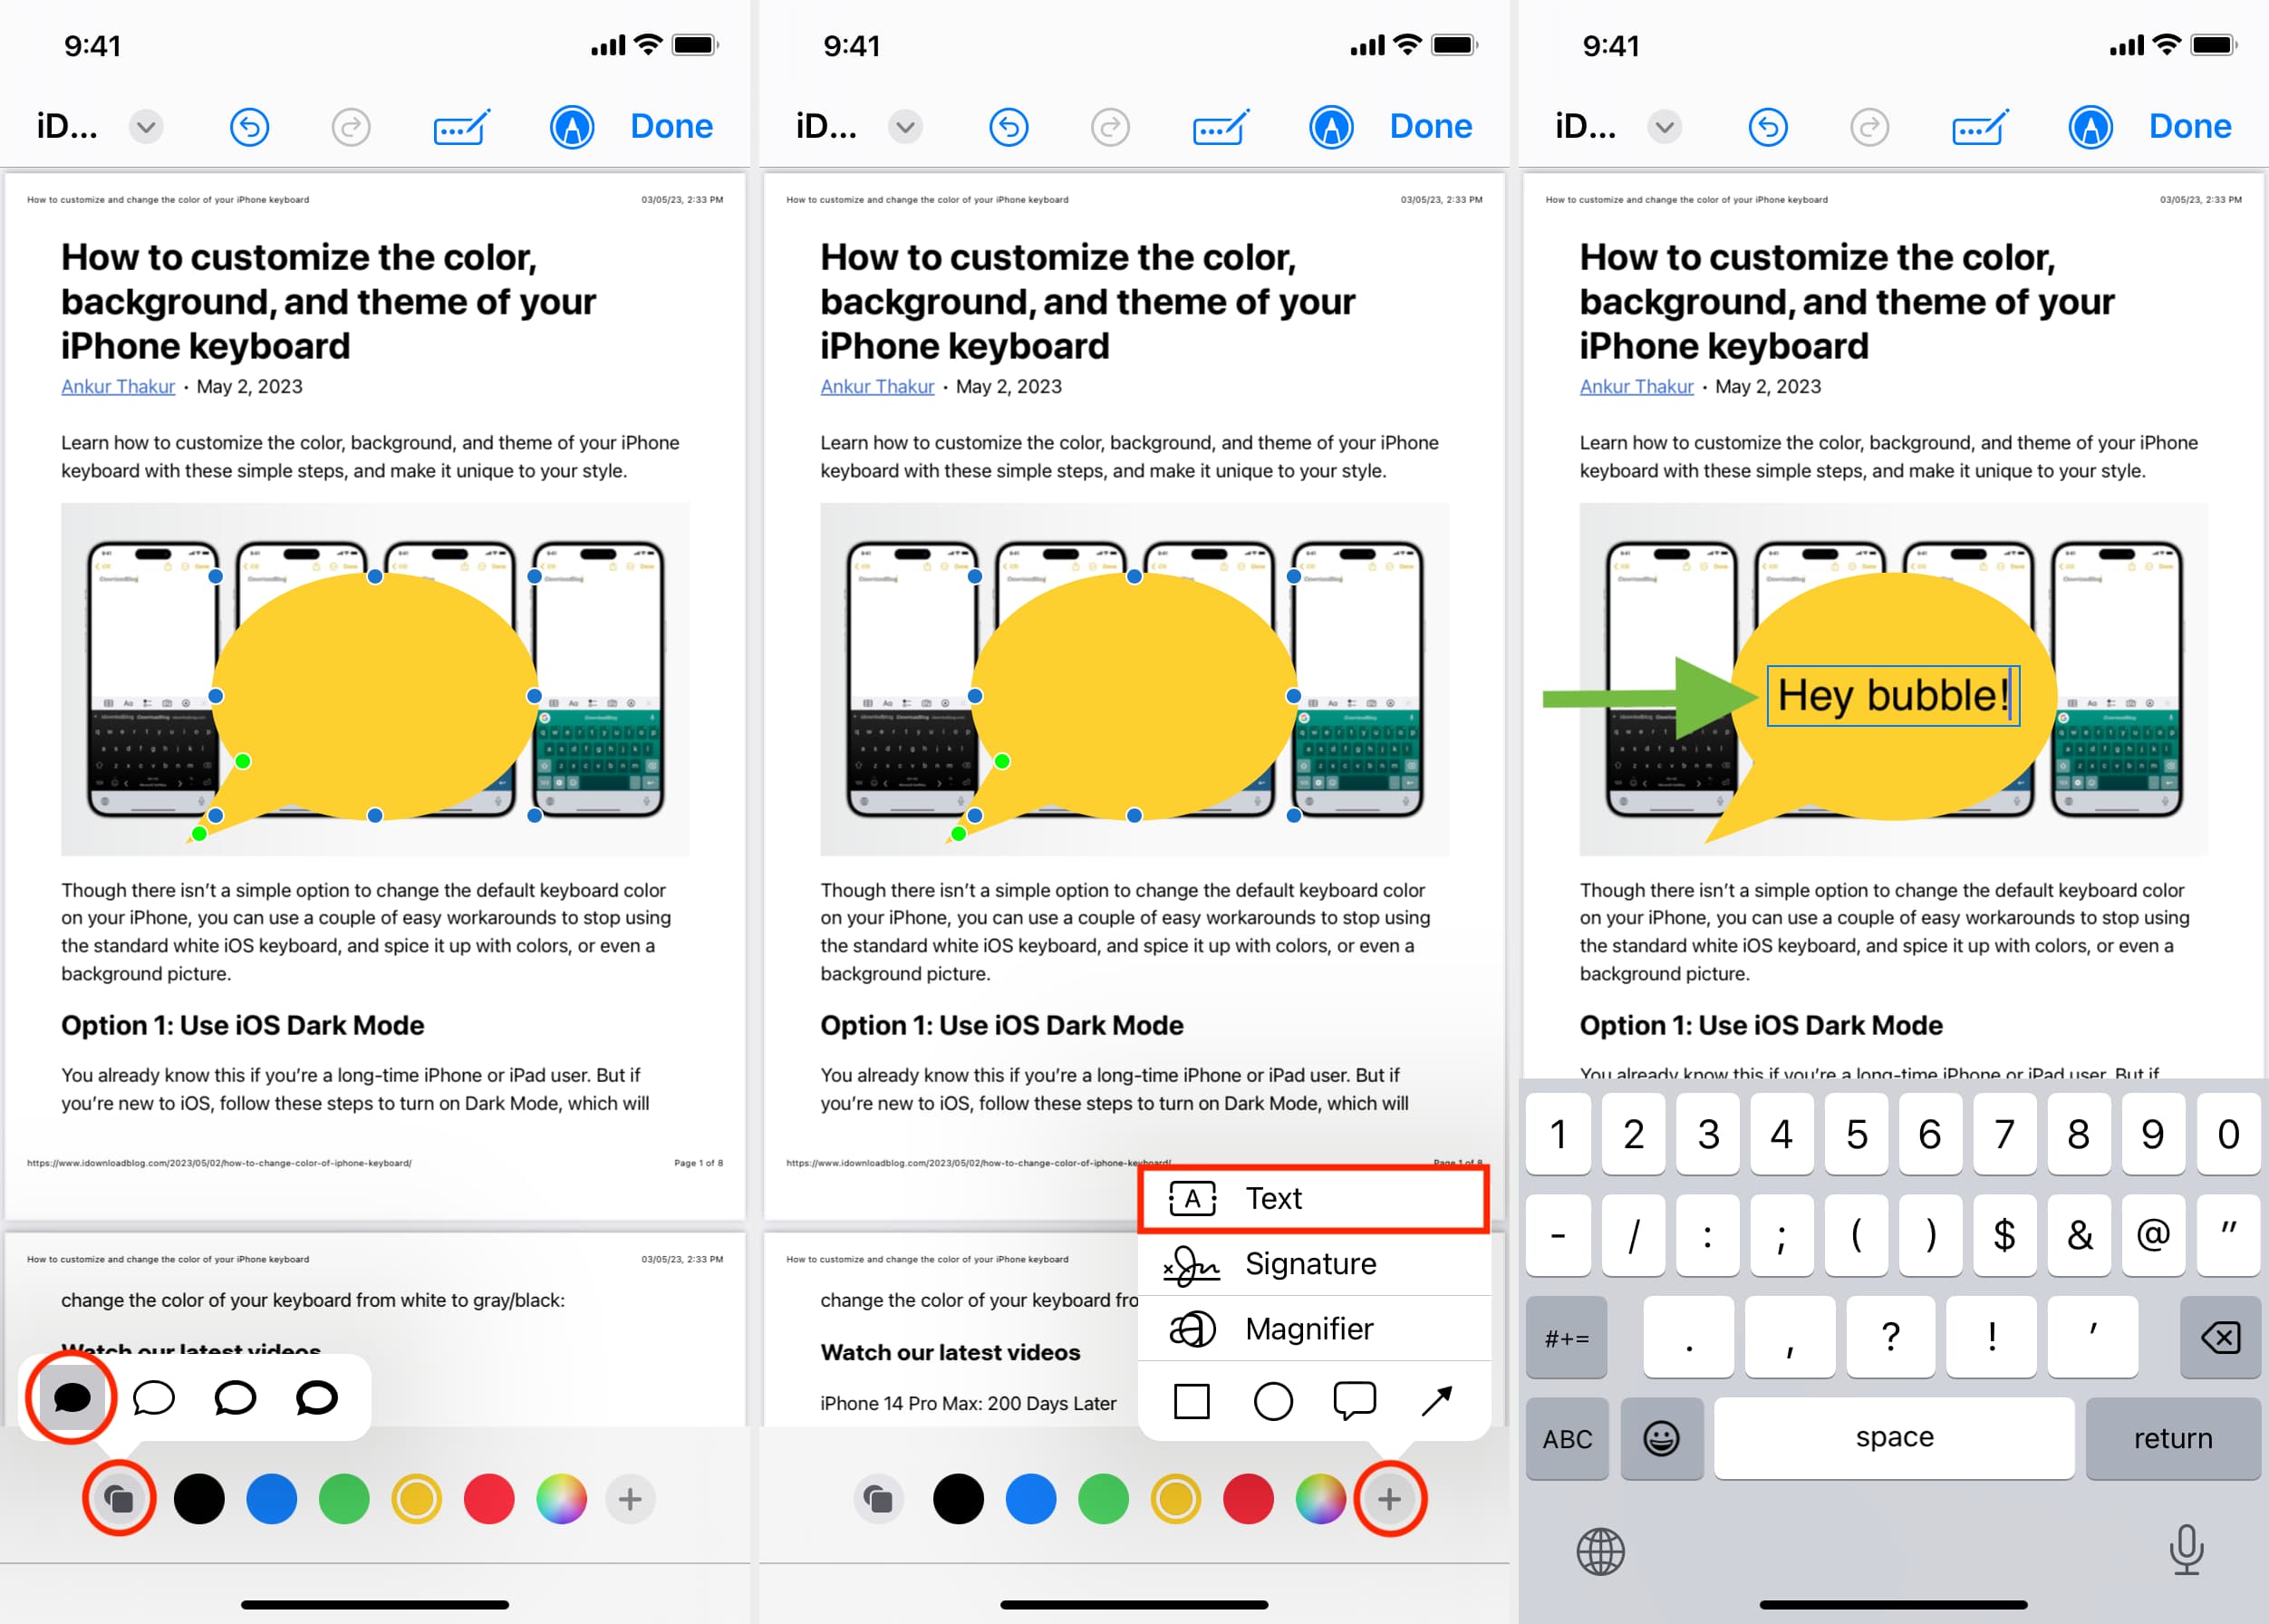
3) Faucet the plus icon (+) and select the Remark icon.
![]()
4) Subsequent, faucet the Fill Form icon and decide the first possibility to make the bubble strong. You may as well use the coloured dots to alter the bubble shade.
5) Faucet the plus icon (+) once more and decide Textual content.
6) Drag the textual content contained in the bubble and double-tap the phrase ‘Textual content‘ to switch it with anything you wish to say.
7) Lastly, faucet Carried out.
Take a look at subsequent: