
This tutorial covers methods to work with the PostgreSQL dblink extension. We are going to see methods to enable the distant connection to a PostgreSQL distant database and execute the queries on the consumer machine.
PostgreSQL Distant Database Connection
While you need to use the PostgreSQL dblink extension to hook up with a distant server, it’s essential to have the IP deal with of the PostgreSQL database. Nonetheless, it’s essential to know which port to permit a TCP connection via.
When you’ve gotten the distant IP for the PostgreSQL database, you possibly can try and verify the connection utilizing the next syntax:
$ psql -U postgres -h <postgres-server-ip>
By executing the command, we are able to see that the connection to the server failed.

The error implies that we didn’t enable the distant connection to the PostgreSQL database. Let’s shortly enable the distant entry to our Postgres server earlier than we are able to use the dblink extension on the Postgres consumer.
Entry the “postgresql.conf” file in your distant Postgres and edit it. You may open the configuration file with an editor of alternative. Run the next command. Right here, we run the PostgreSQL model 14. Change it with that in your case.
$ sudo nano /and so forth/postgresql/14/most important/pg_hba.conf
While you open the file, find the IPV4 native connection part as proven within the following:
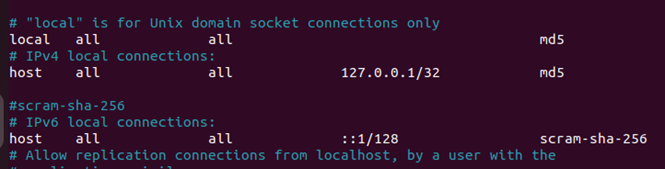
Modify the connection so as to add the next line and remark out the localhost connection by including a “#”:
host all all 0.0.0.0/0 md5
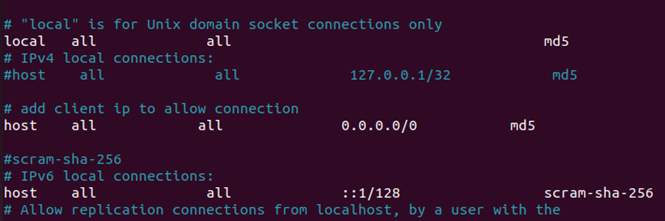
Your file ought to now seem like the next. Save the adjustments and exit the file:
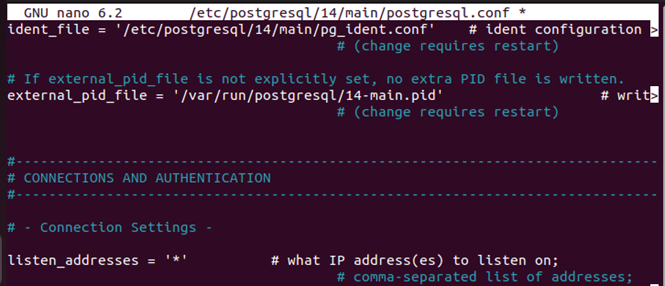
It’s essential to additionally open the “postgresql.conf” file and edit the connection supply. Open it with the next command:
$ sudo nano /and so forth/postgresql/14/most important/postgresql.conf
Find the road which accommodates the listen_addresses and uncomment it by eradicating the hashtag. Change the road to permit PostgreSQL to just accept the connections from all IP addresses by including an asterisk as a substitute of the “localhost”.
Your configuration file ought to appear as if within the following picture:
In case you don’t need to enable the connection from all obtainable IP addresses, you possibly can change the asterisk with the precise IP deal with that you simply need to enable. Save the adjustments and exit the file.
Postgres distant connection is made by way of TCP connection on port 5432. Therefore, it’s essential to create a firewall rule to permit the connection by way of 5432/tcp by executing the next command:
$ sudo ufw enable 5432/tcp

It’s best to get an output which confirms that the rule has been added. In our case, we get an output which confirms that we have already got the firewall rule.
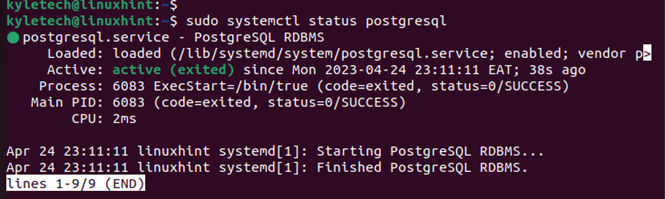
Subsequent, it’s essential to restart the Postgres service on the server for the change to take impact.
$ sudo systemctl restart postgresql

You may confirm that Postgres is working in your server by checking its standing. It ought to show an energetic standing.
Connecting to Distant PostgreSQL Database by way of the Dblink Extension
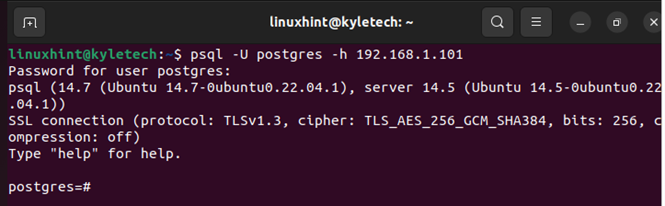
Earlier than creating our dblink extension, it’s clever to confirm which you could remotely hook up with the Postgres server.
Execute the earlier command in your Postgres consumer machine. If the Postgres server permits the distant connection, it’s essential to enter its Postgres database password for authentication.

We verified that we are able to remotely hook up with our PostgreSQL database on the consumer machine. Therefore, we’re assured that the dblink extension works.
Exit the distant Postgres shell by typing q or exit. We now must entry the consumer PostgreSQL database. For that, execute the next command to open up the Postgres shell:
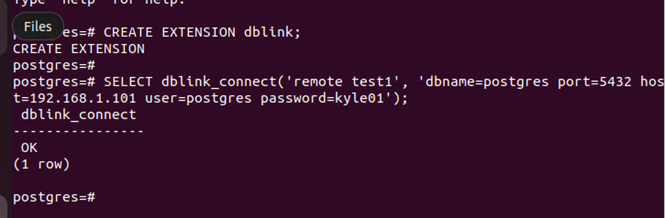
As soon as the Postgres shell opens, create the dblink extension by executing the next command:
# CREATE EXTENSION dblink;

As soon as the extension is created, hook up with the distant PostgreSQL database. It’s essential to have the port quantity, the IP deal with of the distant PostgreSQL database, and the username of the account that accesses the database and the password.
Use the next syntax and change it along with your values:
# SELECT dblink_connect(‘connect-name’, ‘dbname=remote-dbname port=5432 host=ip-address-of-server password=remote-db-password
The “connect-name” is any random title that you’ll use to hook up with the distant PostgreSQL database. For our case, we set it to “distant test1”.
The command ought to return an “Okay” output to verify that the connection is created efficiently.
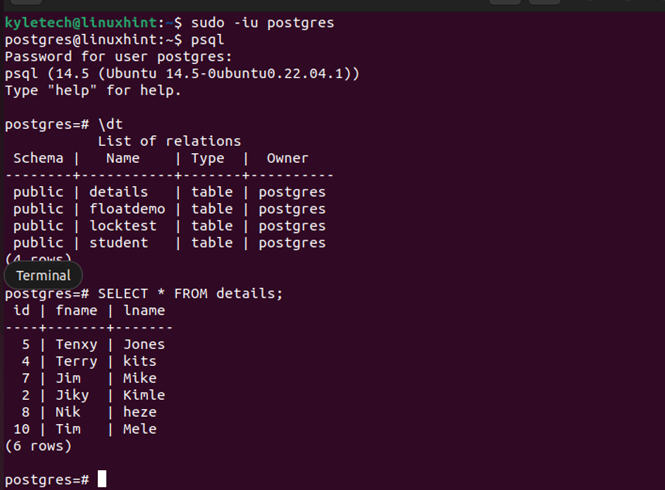
Within the consumer Postgres, we execute a question to show all of the desk contents within the Postgres server. The distant PostgreSQL database accommodates the main points desk which accommodates totally different values as proven within the following picture:
Let’s now execute a choose question to retrieve the desk parts from the consumer Postgres. We use the dblink extension that we created and run the next command for that:
# SELECT * FROM dblink(‘distant test1’, ‘SELECT * FROM particulars as test1(id1 INT, firstname VARCHAR(20), lastname VARCHAR(20));
Make sure that you change the values to match the values of your case and specify the desk that you simply need to execute the question on.
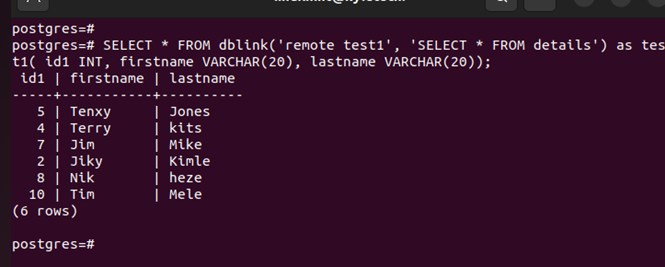
The earlier output confirms that our question has been efficiently executed and that we utilized the dblink extension to hook up with our Postgres server and execute totally different queries.
Conclusion
Postgres presents the dblink extension to facilitate the connection to a distant PostgreSQL database. This tutorial defined the steps to make use of the dblink extension, from permitting the distant connection to creating the dblink connection on the consumer machine. That’s it!