
On this Swift programming tutorial we’ll discover ways to implement Check in with Twitter account button utilizing Firebase Social Authentication and Swift. In case you are thinking about studying find out how to use Firebase Social Authentication to implement Signal-in with Google account or Fb, please verify the beneath two tutorials I’ve printed earlier:
Create New or Open Present Xcode Undertaking
In my earlier tutorial the place I shared find out how to implement SignIn with Google account, I’ve created a quite simple app with two views. One view with a login button and one other view is a protected web page which is able to open as soon as the consumer authentication is profitable. You possibly can create this Xcode challenge with two views your self of you’ll be able to discuss with my earlier tutorial to see how I created a brand new Xcode challenge.
Create New or Open Present Firebase App
Identical to with Xcode challenge, in my earlier tutorial I’ve create a brand new Firebase App for use for Social Authentication performance. On this tutorial I’m going to proceed utilizing that Firebase app. When you adopted my earlier tutorial on Google Signal, then I’m positive you want to proceed with current Firebase app. Different clever, please discuss with my earlier tutorial to discover ways to create a brand new Firebase app and find out how to add Firebase assist to your iOS challenge
Check in with Twitter Account
Earlier than we begin writing any Swift code to implement Check in with Twitter account performance for our cell app, let’s go to the Firebase Console and allow Twitter as an indication in methodology.
Take a look on the picture beneath:
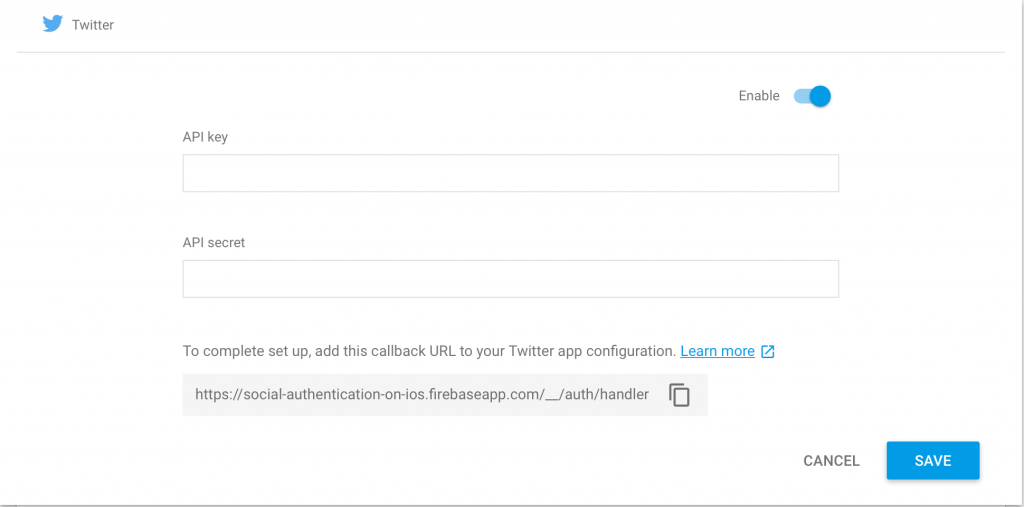
Earlier than it can save you the adjustments it’s important to present the API Key and the API Secret which must be copied from Twitter app. So, let’s change to https://apps.twitter.com, create a brand new app there and get API Key and API Secret.
- Open https://apps.twitter.com,
- Check in together with your Twitter account,
- Discover the button referred to as Create New App and click on on it to create a brand new app.
When creating a brand new Twitter app, your app kind ought to look just like the picture beneath:
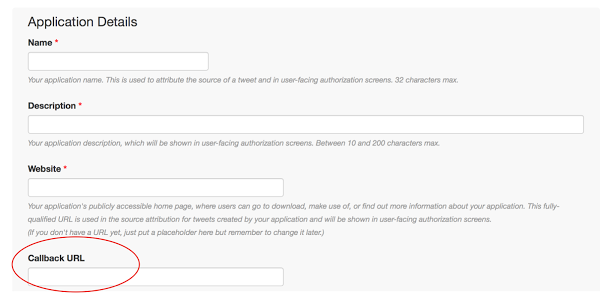
Copy the Callback URL from Firebase web page and paste in into the Callback URL textfield right here on Twitter App kind. The present App identify, description and web site URL and create a brand new Twitter app.
As soon as the Twitter app is created you need to see the values of Client Key (API Key) and Client Secret (API Secret). These values are below the Keys and Entry Tokens tab of your Twitter app.
Including Firebase and Twitter Dependencies to Xcode Undertaking
To let customers Signal-in with their Twitter account to our app we might want to add Twitter library dependency to our Xcode challenge. And since we’ve began utilizing Pods as dependency administration we’ll use Pods as soon as once more so as to add the pod ‘TwitterKit’ within the Podfile.
My Podfile with Firebase, Google, Fb and Twitter dependencies now appears just like the one beneath:
# Uncomment the subsequent line to outline a worldwide platform to your challenge
# platform :ios, '9.0'

goal 'SocialAuthentication' do
  # Remark the subsequent line should you're not utilizing Swift and do not need to use dynamic frameworks
  use_frameworks!

  # Pods for SocialAuthentication

pod 'Firebase/Auth'
pod 'GoogleSignIn'
pod 'FBSDKCoreKit'
pod 'FBSDKShareKit'
pod 'FBSDKLoginKit'
pod 'TwitterKit'

finish
Add Twitter Check in Button Swift Code.
Let’s open our ViewController that accommodates Check in buttons and import the Twitter library first. After importing Twitter library to my ViewController, the whole listing of my imports appears like this:
import UIKit
import GoogleSignIn
import FBSDKLoginKit
import TwitterKit
import Firebase
Then add the next code so as to add the Twitter Check in button to our ViewController and make it work:
//creating the Twitter register button
  fileprivate func configureTwitterSignInButton() {
      let twitterSignInButton = TWTRLogInButton(logInCompletion: { session, error in
          if (error != nil) {
              print("Twitter authentication failed")
          } else {
              guard let token = session?.authToken else {return}
              guard let secret = session?.authTokenSecret else {return}
              let credential = TwitterAuthProvider.credential(withToken: token, secret: secret)
              Auth.auth().signIn(with: credential, completion: { (consumer, error) in
                  if error == nil {
                      print("Twitter authentication succeed")
                  } else {
                      print("Twitter authentication failed")
                  }
              })
          }
      })

      twitterSignInButton.body = CGRect(x: 120, y: 400, width: view.body.width - 240, top: 40)
      self.view.addSubview(twitterSignInButton)
  }
After including the above operate to the view controller that additionally accommodates Fb register and Google register buttons, it appears like this:
//
//  ViewController.swift
//  SocialAuthentication
//
//  Created by com.swiftdeveloperblog on 20/11/2017.
//  Copyright © 2017 com.swiftdeveloperblog. All rights reserved.
//

import UIKit
import GoogleSignIn
import FBSDKLoginKit
import TwitterKit
import Firebase


class ViewController: UIViewController, GIDSignInUIDelegate, FBSDKLoginButtonDelegate {

    override func viewDidLoad() {
        tremendous.viewDidLoad()

        configureGoogleSignInButton()
        configureFacebookSignInButton()
        configureTwitterSignInButton()
    }

    //creating the Google register button
    fileprivate func configureGoogleSignInButton() {
        let googleSignInButton = GIDSignInButton()
        googleSignInButton.body = CGRect(x: 120, y: 200, width: view.body.width - 240, top: 50)
        view.addSubview(googleSignInButton)
        GIDSignIn.sharedInstance().uiDelegate = self
        //GIDSignIn.sharedInstance().signIn()
    }

    //creating the Fb register button
    fileprivate func configureFacebookSignInButton() {
        let facebookSignInButton = FBSDKLoginButton()
        facebookSignInButton.body = CGRect(x: 120, y: 200 + 100, width: view.body.width - 240, top: 40)
        view.addSubview(facebookSignInButton)
        facebookSignInButton.delegate = self
    }

    //FBSDKLoginButton delegate strategies
    func loginButton(_ loginButton: FBSDKLoginButton!, didCompleteWith end result: FBSDKLoginManagerLoginResult!, error: Error!) {
        if error == nil {
            print("Person simply logged in through Fb")
            let credential = FacebookAuthProvider.credential(withAccessToken: FBSDKAccessToken.present().tokenString)
            Auth.auth().signIn(with: credential, completion: { (consumer, error) in
                if (error != nil) {
                    print("Fb authentication failed")
                } else {
                    print("Fb authentication succeed")
                }
            })
        } else {
            print("An error occured the consumer could not log in")
        }
    }

    func loginButtonDidLogOut(_ loginButton: FBSDKLoginButton!) {
        print("Person simply logged out from his Fb account")
    }

    //creating the Twitter register button
    fileprivate func configureTwitterSignInButton() {
        let twitterSignInButton = TWTRLogInButton(logInCompletion: { session, error in
            if (error != nil) {
                print("Twitter authentication failed")
            } else {
                guard let token = session?.authToken else {return}
                guard let secret = session?.authTokenSecret else {return}
                let credential = TwitterAuthProvider.credential(withToken: token, secret: secret)
                Auth.auth().signIn(with: credential, completion: { (consumer, error) in
                    if error == nil {
                        print("Twitter authentication succeed")
                    } else {
                        print("Twitter authentication failed")
                    }
                })
            }
        })

        twitterSignInButton.body = CGRect(x: 120, y: 400, width: view.body.width - 240, top: 40)
        self.view.addSubview(twitterSignInButton)
    }
}
Now, let’s:
- change to AppDelegate file,
- import the TwitterKit and
- instantiate Twitter with the buyer key and the buyer secret you bought from the Twitter apps web page and
- then you should instantiate the Twitter authentication.
The listing of imports in my AppDelegate file after including TwitterKit appears like this:
import UIKit
import Firebase
import GoogleSignIn
import FBSDKCoreKit
import TwitterKit
The didFinishLaunchingWithOptions operate after including Twitter code appears like this:
func software(_ software: UIApplication, didFinishLaunchingWithOptions launchOptions: [UIApplicationLaunchOptionsKey: Any]?) -> Bool {

    FirebaseApp.configure()

    FBSDKApplicationDelegate.sharedInstance().software(software, didFinishLaunchingWithOptions: launchOptions)

    GIDSignIn.sharedInstance().clientID = FirebaseApp.app()?.choices.clientID
    GIDSignIn.sharedInstance().delegate = self

    Twitter.sharedInstance().begin(withConsumerKey: "client key right here", consumerSecret: "secret key right here")

    return true
}
we additionally have to edit the next operate in AppDelegate file so as to add the assist for Twitter Check in button. Please word, that the operate beneath additionally accommodates assist for Fb Check in and Google Check in buttons.
func software(_ app: UIApplication, open url: URL, choices: [UIApplicationOpenURLOptionsKey : Any] = [:]) -> Bool
and the whole AppDelegate file now appears like this:
//
//  AppDelegate.swift
//  SocialAuthentication
//
//  Created by com.swiftdeveloperblog on 20/11/2017.
//  Copyright © 2017 com.swiftdeveloperblog. All rights reserved.
//

import UIKit
import Firebase
import GoogleSignIn
import FBSDKCoreKit
import TwitterKit

@UIApplicationMain
class AppDelegate: UIResponder, UIApplicationDelegate, GIDSignInDelegate {

    var window: UIWindow?

    func software(_ software: UIApplication, didFinishLaunchingWithOptions launchOptions: [UIApplicationLaunchOptionsKey: Any]?) -> Bool {

        FirebaseApp.configure()

        FBSDKApplicationDelegate.sharedInstance().software(software, didFinishLaunchingWithOptions: launchOptions)

        GIDSignIn.sharedInstance().clientID = FirebaseApp.app()?.choices.clientID
        GIDSignIn.sharedInstance().delegate = self

        Twitter.sharedInstance().begin(withConsumerKey: "Client key right here", consumerSecret: "secret key right here")

        return true
    }

    func software(_ app: UIApplication, open url: URL, choices: [UIApplicationOpenURLOptionsKey : Any] = [:]) -> Bool

    func applicationWillResignActive(_ software: UIApplication) {
        // Despatched when the applying is about to maneuver from lively to inactive state. This will happen for sure varieties of non permanent interruptions (similar to an incoming cellphone name or SMS message) or when the consumer quits the applying and it begins the transition to the background state.
        // Use this methodology to pause ongoing duties, disable timers, and invalidate graphics rendering callbacks. Video games ought to use this methodology to pause the sport.
    }

    func applicationDidEnterBackground(_ software: UIApplication) {
        // Use this methodology to launch shared assets, save consumer knowledge, invalidate timers, and retailer sufficient software state info to revive your software to its present state in case it's terminated later.
        // In case your software helps background execution, this methodology is known as as a substitute of applicationWillTerminate: when the consumer quits.
    }

    func applicationWillEnterForeground(_ software: UIApplication) {
        // Known as as a part of the transition from the background to the lively state; right here you'll be able to undo most of the adjustments made on coming into the background.
    }

    func applicationDidBecomeActive(_ software: UIApplication) {
        // Restart any duties that have been paused (or not but began) whereas the applying was inactive. If the applying was beforehand within the background, optionally refresh the consumer interface.
    }

    func applicationWillTerminate(_ software: UIApplication) {
        // Known as when the applying is about to terminate. Save knowledge if acceptable. See additionally applicationDidEnterBackground:.
    }

    // Google Signal In
    func signal(_ signIn: GIDSignIn!, didSignInFor consumer: GIDGoogleUser!, withError error: Error!) {
        if (error) != nil {
            print("An error occured throughout Google Authentication")
            return
        }

        guard let authentication = consumer.authentication else { return }
        let credential = GoogleAuthProvider.credential(withIDToken: authentication.idToken,
                                                       accessToken: authentication.accessToken)
        Auth.auth().signIn(with: credential) { (consumer, error) in
            if (error) != nil {
                print("Google Authentification Fail")
            } else {
                print("Google Authentification Success")

                let mainStoryBoard: UIStoryboard = UIStoryboard(identify:"Foremost", bundle:nil)
                let signInPage = mainStoryBoard.instantiateViewController(withIdentifier: "ProtectedPageViewController") as! ProtectedPageViewController
                let appDelegate = UIApplication.shared.delegate
                appDelegate?.window??.rootViewController = signInPage
            }
        }
    }

    func signal(_ signIn: GIDSignIn!, didDisconnectWith consumer: GIDGoogleUser!, withError error: Error!) {
        let firebaseAuth = Auth.auth()
        do {
            attempt firebaseAuth.signOut()
        } catch let signOutError as NSError {
            print ("Error signing out: %@", signOutError)
        }
    }
}
And that is it! When you run this software you need to get your Twitter Check in button working.
I hope that this brief Swift programming tutorial was useful for you. There may be rather more to study Firebase and I hope that the video programs beneath will even be of some worth to you. Test them out and could also be considered one of them shall be simply what you want.
Constructing Cell Apps for iOS with Swift – Books
Pleased studying!