
Yii is an open-source, high-performance, versatile, environment friendly, and safe PHP framework for quickly constructing fashionable Internet purposes. It’s a generic and full-stack net programming framework for writing code in an object-oriented style and offers many confirmed and ready-to-use options. It comes with a variety of affordable defaults and built-in instruments that make it easier to write strong and safe code.
Yii Options
Listed here are a few of Yii’s key options:
- A pure OOP-based framework.
- A component-based structure.
- Implements the MVC (Mannequin-View-Controller) architectural sample.
- Helps question builders and ActiveRecord for each relational and NoSQL databases.
- Multi-tier caching assist.
- RESTful API improvement assist.
- It’s extraordinarily extensible permitting customers to customise or change any piece of code proper from the core. Moreover, customers can use or develop redistributable extensions.
Yii 2.0 is the present technology of the framework (on the time of writing) which requires PHP 5.4.0 or above however runs greatest with the most recent model of PHP 8. It helps a few of the newest Internet applied sciences and protocols, together with Composer, PSR, namespaces, traits, and others.
Being a generic Internet improvement framework along with its important options, Yii can be utilized to develop almost any form of Internet utility from consumer/admin portals, boards, and content material administration programs (CMS), to e-commerce tasks, RESTful Internet providers, and way more at massive scale.
Necessities
On this article, we are going to present you how one can set up the Yii PHP Framework on an RHEL-based distribution to begin creating PHP purposes utilizing Yii.
Set up LAMP or LEMP Stack
Yii requires PHP 5.4 or above with Apache or Nginx net server put in on the server as proven.
--------- Set up LAMP Stack ---------
# yum set up httpd php php-mysqlnd php-pdo php-gd php-mbstring zip git

--------- Set up LEMP Stack ---------
# yum set up nginx php php-mysqlnd php-pdo php-gd php-mbstring zip git
As soon as put in, you can begin and allow the Apache or Nginx net server.
# systemctl begin httpd
# systemctl allow httpd
OR
# systemctl begin nginx
# systemctl allow nginx
Putting in Yii Utilizing Composer
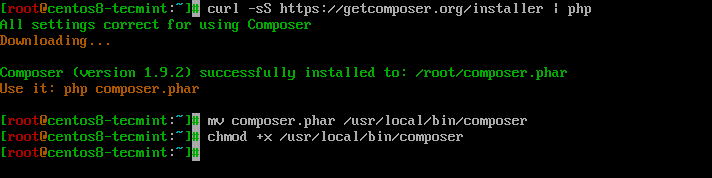
There are a number of methods to put in Yii, however the really useful technique to set up Yii is utilizing Composer package deal supervisor, because it lets you replace Yii with a single command and likewise allows you to set up new extensions.
If you don’t have already got Composer put in in your server, you’ll be able to set up it by working the next instructions.
# curl -sS https://getcomposer.org/installer | php
# mv composer.phar /usr/native/bin/composer
# chmod +x /usr/native/bin/composer
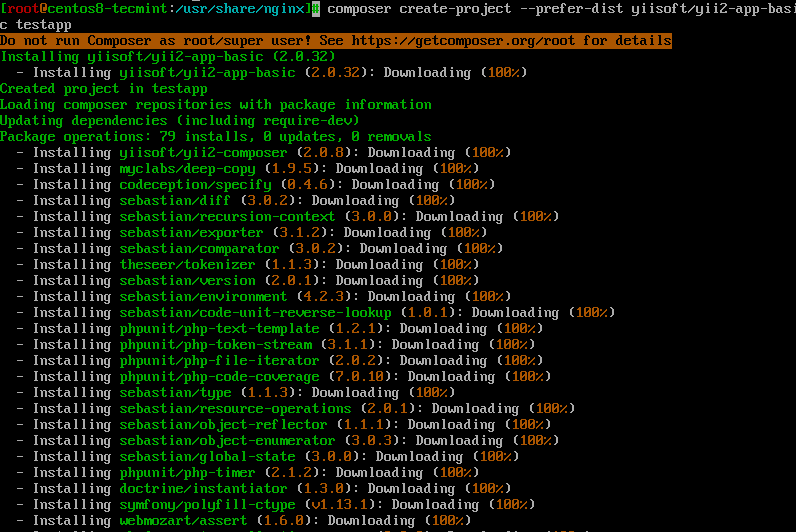
With Composer put in, you’ll be able to set up the most recent secure model of the Yii utility template underneath an Apache or Nginx Internet-accessible listing referred to as testapp. You may choose a distinct listing identify in order for you.
# cd /var/www/html/      [Apache Root Directory]
OR
# cd /usr/share/nginx/html/   [Nginx Root Directory]
# composer create-project --prefer-dist yiisoft/yii2-app-basic testapp
After set up is full, both configure your net server (see subsequent part) or use the built-in PHP net server by executing the next command within the testapp challenge root listing.
# cd testapp
# php yii serve
Observe: By default, the HTTP server will hearken to port 8080. Nonetheless, if that port is already in use, you should utilize a distinct port by including --port the argument as proven.
# php yii serve --port=8888
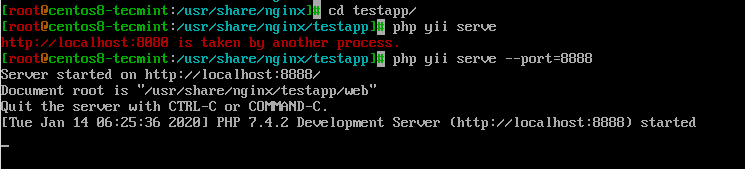
Now, open your browser and kind the next URL to entry the put in Yii utility.
http://localhost:8888
Configuring Internet Servers for Yii
On a manufacturing server, you may wish to configure your webserver to serve the Yii net utility by way of the URL http://www.instance.com/index.php as a substitute of http://www.instance.com/primary/testapp/index.php. In that case, it’s essential to level your net server doc root to the testapp/net listing.
Beneficial Nginx Configuration
Create a configuration file referred to as /and many others/nginx/conf.d/testapp.conf.
# vi /and many others/nginx/conf.d/testapp.conf
Subsequent, copy and paste the next configuration into it. Bear in mind to interchange tecmintapp.lan together with your area identify and /usr/share/nginx/html/testapp/net with the trail the place your app information are positioned.
server {
    charset utf-8;
    client_max_body_size 128M;

    pay attention 80; ## pay attention for ipv4
    #pay attention [::]:80 default_server ipv6only=on; ## pay attention for ipv6

    server_name tecmintapp.lan;
    root        /usr/share/nginx/html/testapp/net;
    index       index.php;

    access_log  /var/log/nginx/entry.log;
    error_log   /var/log/nginx/error.log;

    location / {
        # Redirect every thing that is not an actual file to index.php
        try_files $uri $uri/ /index.php$is_args$args;
    }

    # uncomment to keep away from processing of calls to non-existing static information by Yii
    #location ~ .(js|css|png|jpg|gif|swf|ico|pdf|mov|fla|zip|rar)$ {
    #    try_files $uri =404;
    #}
    #error_page 404 /404.html;

    # deny accessing php information for the /belongings listing
    location ~ ^/belongings/.*.php$ {
        deny all;
    }

    location ~ .php$ {
        embody fastcgi_params;
        fastcgi_param SCRIPT_FILENAME $document_root$fastcgi_script_name;
        #fastcgi_pass 127.0.0.1:9000;
        fastcgi_pass unix:/run/php-fpm/www.sock;
        try_files $uri =404;
    }

    location ~* /. {
        deny all;
    }
}
Save the file and restart the Nginx to impact the current adjustments.
# systemctl restart nginx
Beneficial Apache Configuration
Use the next configuration in Apache’s httpd.conf file or inside a digital host configuration.
# Set doc root to be "testapp/net"
DocumentRoot "/var/www/html/testapp/net"

<Listing "/var/www/html/testapp/net">
    # use mod_rewrite for fairly URL assist
    RewriteEngine on

    # if $showScriptName is fake in UrlManager, don't permit accessing URLs with script identify
    RewriteRule ^index.php/ - [L,R=404]

    # If a listing or a file exists, use the request immediately
    RewriteCond %{REQUEST_FILENAME} !-f
    RewriteCond %{REQUEST_FILENAME} !-d

    # In any other case ahead the request to index.php
    RewriteRule . index.php

    # ...different settings...
</Listing>
Save the file and restart the Apache to impact the current adjustments.
# systemctl restart httpd
Testing Yii Internet Software By way of a Browser
Earlier than testing our Yii net utility make certain to replace the safety context of the /net/belongings/ listing to make it writable to the online course of, by working the next command.
# chcon -R -t httpd_sys_content_rw_t '/usr/share/nginx/html/testapp/net/belongings/' [for Nginx]
# chcon -R -t httpd_sys_content_rw_t '/var/www/html/testapp/net/belongings/'         [for Apache]
Subsequent, replace your firewalld guidelines to permit HTTP and HTTPS requests by means of the firewall to the Nginx server.
# firewall-cmd --zone=public --add-service=http --permanent
# firewall-cmd --zone=public --add-service=https --permanent
# firewall-cmd --reload
Lastly, check in case your net utility working positive and is being served by Nginx or Apache. Open an online browser and level it to the next tackle:
http://tecmintapp.lan
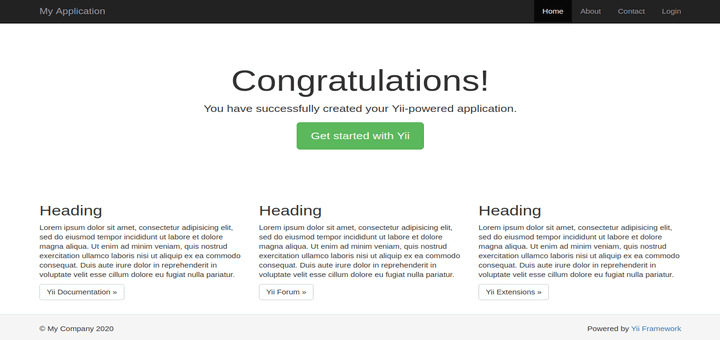
The default Yii utility net web page ought to show as proven within the following screenshot.
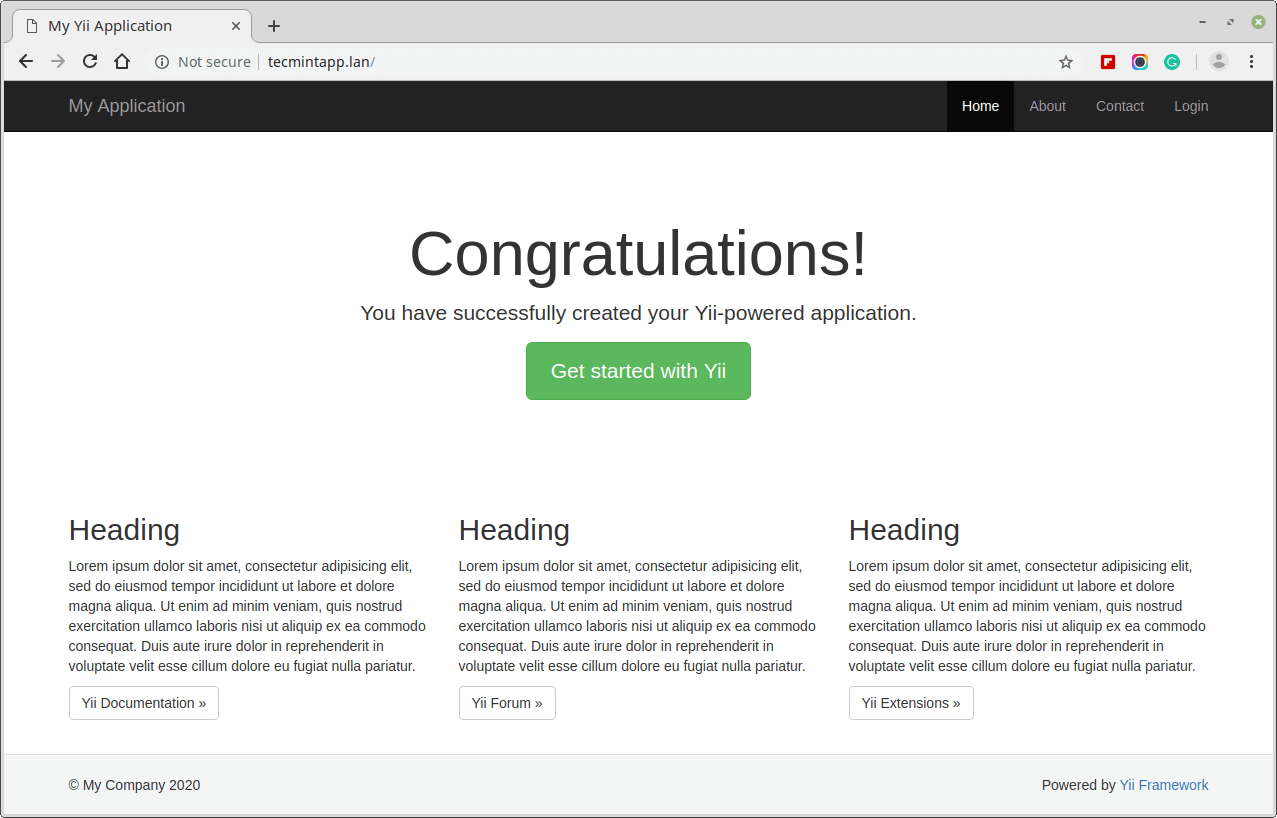
Congratulations! You might have efficiently put in the most recent technology of the Yii PHP framework and configured it to work with Nginx or Apache on RHEL programs.
For extra data and how one can begin utilizing Yii for constructing your net utility, see the Yii definitive information.
If You Admire What We Do Right here On TecMint, You Ought to Think about:
TecMint is the quickest rising and most trusted group web site for any form of Linux Articles, Guides and Books on the internet. Thousands and thousands of individuals go to TecMint! to go looking or browse the hundreds of revealed articles obtainable FREELY to all.
For those who like what you’re studying, please take into account shopping for us a espresso ( or 2 ) as a token of appreciation.

We’re grateful on your by no means ending assist.