

This easy Google Map app relies on the simplified model of pattern app from this Google Map compose library. As well as, I added the next options into this pattern app:
- Location Permission Request
- System Location Setting Request
Setup Google Cloud Undertaking
The very first thing it is advisable to do is establishing a Google cloud challenge to generate an API key which lets you use the Google Maps SDK API.
- Setup New Undertaking in console.cloud.google.com
- In your challenge dashboard, go to APIs overview
- In API & Providers web page, go to Library
- Seek for Maps SDK for Android and allow it
- Again to the API & Providers web page, go to Credentials
- Choose + CREATE CREDENTIALS, then choose API key
- The API key’s now generated. Click on on the API Key 1 to edit it. You possibly can rename the API key title to no matter you want. For this pattern app function, you don’t want to set any restrictions on this API key.
- Choose None for Utility restrictions
- Choose Do not prohibit key for API restrictions
These are simply temporary directions. For detailed official directions, see under:
Please word I have not setup any billing account or allow billing and it nonetheless works.
After you have the API key, it’s time to implement the code.
1. Add dependencies in construct.gradle
These are the libraries wanted to make use of Google Map compose library.
implementation 'com.google.maps.android:maps-compose:2.1.1'
implementation 'com.google.android.gms:play-services-maps:18.0.2'
implementation "androidx.compose.basis:basis:1.2.0-beta02"
2. Setup Secrets and techniques Gradle Plugin
Secrets and techniques Gradle Plugin is mainly a library that can assist you conceal your API key with out committing it to the model management system.
It lets you outline your variable (e.g. API key) within the native.properties file (which isn’t checked into model management) and retrieve the variable. For instance, you’ll be able to retrieve the variable within the AndroidManifest.xml file.
These are the steps so as to add the Secrets and techniques Gradle plugin.
In challenge degree construct.gradle:
buildscript {
  ...
  dependencies {
    classpath "com.google.android.libraries.mapsplatform.secrets-gradle-plugin:secrets-gradle-plugin:2.0.1"
  }
}
In app degree construct.gradle:
plugins {
  ...
  id 'com.google.android.libraries.mapsplatform.secrets-gradle-plugin'
}
3. Add MAPS_API_KEY in native.properties
In native.properties file, copy the API key you get from Setup Google Cloud Undertaking steps above and paste it right here.
MAPS_API_KEY=Your API Key right here
In an effort to learn the MAPS_API_KEY variable that you simply outlined in native.properties, it is advisable to add the <meta-data> within the AndroidManifext.xml.
Add this <meta-data> tag throughout the <software> tag.
<software
  ...
  <meta-data  android:title="com.google.android.geo.API_KEY"
  android:worth="${MAPS_API_KEY}" />
  ...
</software>
If you don’t Setup Secrets and techniques Gradle Plugin above, you’ll get this error:
Attribute meta-data#com.google.android.geo.API_KEY@worth at AndroidManifest.xml:14:13-44 requires a placeholder substitution however no worth for <MAPS_API_KEY> is supplied.
5. Add Web and Location Permissions
Because the app must entry web and placement permissions, we add these permissions within the AndroidManifest.xml.
<manifest xmlns:android="http://schemas.android.com/apk/res/android">

    <uses-permission android:title="android.permission.INTERNET" />
    <uses-permission android:title="android.permission.ACCESS_FINE_LOCATION" />
    <uses-permission android:title="android.permission.ACCESS_COARSE_LOCATION" />

    ...
</manifest>
6. Implement GoogleMap() and Marker()
GoogleMap() and Marker() are the composable features from the library that we will name to point out the map and the markers on the map.
The map reveals the present place if accessible, and it’s defaulted to Sydney.
@Composable
personal enjoyable MyGoogleMap(
    currentLocation: Location,
    cameraPositionState: CameraPositionState,
    onGpsIconClick: () -> Unit) {

    val mapUiSettings by keep in mind {
        mutableStateOf(
            MapUiSettings(zoomControlsEnabled = false)
        )
    }

    GoogleMap(
        modifier = Modifier.fillMaxSize(),
        cameraPositionState = cameraPositionState,
        uiSettings = mapUiSettings,
    ){
        Marker(
            state = MarkerState(
                place = LocationUtils.getPosition(currentLocation)),
            title = "Present Place"
       )
    }

    GpsIconButton(onIconClick = onGpsIconClick)

    DebugOverlay(cameraPositionState)
}
By default, the zoom management is on. To show it off, you create a brand new MapUiSettings and go that into the GoogleMap() as parameter.
The map even have GPS icon. Once you click on on it, it strikes the digicam to the present location. It additionally requests location permission and to allow gadget location setting if these requests haven’t been granted earlier than.
DebugOverlay simply an overlay display to point out the present digicam standing and place.
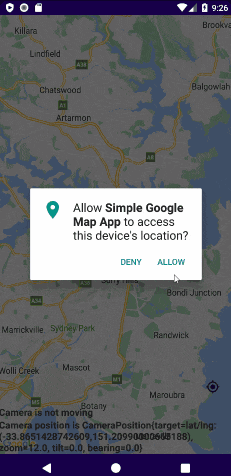
7. Request Location Permission
To verify whether or not the placement permission has already been granted, you utilize ContextCompat.checkSelfPermission() API.
enjoyable isLocationPermissionGranted(context: Context) : Boolean {
    return (ContextCompat.checkSelfPermission(
        context,
        Manifest.permission.ACCESS_FINE_LOCATION) == PackageManager.PERMISSION_GRANTED)
}
If the placement permission will not be granted, you setup the callback whether or not the permission is granted or denied utilizing rememberLauncherForActivityResult() with ActivityResultContracts.RequestPermission().
To request the placement permission utilizing, you name the ActivityResultLauncher.launch().
@Composable
enjoyable LocationPermissionsDialog(
    onPermissionGranted: () -> Unit,
    onPermissionDenied: () -> Unit,
) {
    val requestLocationPermissionLauncher = rememberLauncherForActivityResult(
        ActivityResultContracts.RequestPermission()) { isGranted: Boolean ->

        if (isGranted) {
            onPermissionGranted()
        } else {
            onPermissionDenied()
        }
    }

    SideEffect {
        requestLocationPermissionLauncher.launch(Manifest.permission.ACCESS_FINE_LOCATION)
    }
}
Word: Inititally I used the permissions library from accompanist. It labored provided that the permission is granted,. It didn’t work properly when the permission denied and I wish to request the permission once more. So I made a decision to make use of
rememberLauncherForActivityResultas a substitute.
8. Allow Location Setting
When the placement permission has already granted, you wish to ensure that the placement setting is turned on. Whether it is off, you wish to request the person to show it on.
Much like request location permission above, you utilize rememberLauncherForActivityResult() to register allow location setting request callback.
val enableLocationSettingLauncher = rememberLauncherForActivityResult(
    contract = ActivityResultContracts.StartIntentSenderForResult()
) { activityResult ->
  if (activityResult.resultCode == Exercise.RESULT_OK)
        onSuccess()

    else {
        onFailure()
    }
}
To verify whether or not the placement setting is turned on, you name
SettingsClient.checkLocationSettings() API which returns the Job<LocationSettingsResponse> which lets you arrange the failure and success callbacks.
If the callback is failed, it means the gadget location setting is off. In that case, you wish to request person to allow it (whether it is resolvable – exception is ResolvableApiException). To try this, you name ActivityResultLauncher.launch() API with the decision PendingIntent that you simply get from the exception.
val locationRequest = LocationRequest.create().apply {
  precedence = Precedence.PRIORITY_HIGH_ACCURACY
}
val locationRequestBuilder = LocationSettingsRequest.Builder()
    .addLocationRequest(locationRequest)
val locationSettingsResponseTask = LocationServices.getSettingsClient(context)
    .checkLocationSettings(locationRequestBuilder.construct())

locationSettingsResponseTask.addOnSuccessListener {
  onSuccess()
}

locationSettingsResponseTask.addOnFailureListener { exception ->
  if (exception is ResolvableApiException){
        strive {
            val intentSenderRequest =
                IntentSenderRequest.Builder(exception.decision).construct()
            enableLocationSettingLauncher.launch(intentSenderRequest)

        } catch (sendEx: IntentSender.SendIntentException) {
            sendEx.printStackTrace()
        }
    } else {
        onFailure()
    }
}
Confer with
LocationSettingDialog()within the supply code.
8. Get the final recognized location
Lastly, you wish to get the final recognized location, which can also be a present location if the gadget location setting is turned on.
First, you arrange the LocationCallback() to obtain the LocationResult which has the final recognized location info. The callback is then eliminated to save lots of energy.
To request the placement replace, you name FusedLocationProviderClient.requestLocationUpdates() API by passing within the LocationRequest, LocationCallback and Looper.
@SuppressLint("MissingPermission")
enjoyable requestLocationResultCallback(
    fusedLocationProviderClient: FusedLocationProviderClient,
    locationResultCallback: (LocationResult) -> Unit
) {

    val locationCallback = object : LocationCallback() {
        override enjoyable onLocationResult(locationResult: LocationResult) {
            tremendous.onLocationResult(locationResult)

            locationResultCallback(locationResult)
            fusedLocationProviderClient.removeLocationUpdates(this)
        }
    }

    val locationRequest = LocationRequest.create().apply {
      interval = 0
      fastestInterval = 0
      precedence = Precedence.PRIORITY_HIGH_ACCURACY
    }
    Looper.myLooper()?.let { looper ->
    fusedLocationProviderClient.requestLocationUpdates(
        locationRequest,
        locationCallback,
        looper
        )
    }
}
Conclusion
The app requests the placement permission and request to allow location setting throughout begin up. It requests once more when the person click on within the GPS icon (if requests have not been granted). It additionally strikes the digicam again to present place when the GPS icon is clicked.
For particulars and if you wish to mess around with the app, check with the next supply code.
Supply Code
GitHub Repository: Demo_SimpleGoogleMap