

Assume for a second about what occurred if you browsed to the present web page. You both clicked on a hyperlink that you just obtained by way of a e-newsletter, or on the hyperlink on the homepage of Tecmint.com after which have been taken to this text.
In a number of phrases, you (or really your browser) despatched an HTTP request to the online server that hosts this website, and the server despatched again an HTTP response.
So simple as this sounds, this course of includes way more than that. Lots of processing needed to be carried out server-side with a view to current the properly formatted web page which you could see with all of the assets in it – static and dynamic.
With out digging a lot deeper, you’ll be able to think about that if the online server has to answer many requests like this concurrently (make it just a few hundred for starters), it might probably both deliver itself or the entire system to a crawl earlier than lengthy.
And that’s the place Varnish, a high-performance HTTP accelerator and reverse proxy, can save the day. On this article, I’ll clarify the right way to set up and use Varnish as a front-end to Apache or Nginx with a view to cache HTTP responses quicker and with out inserting an extra load on the net server.
Nonetheless, since Varnish usually shops its cache in reminiscence as a substitute of on disk we are going to must be cautious and restrict the RAM area allotted for caching. We are going to focus on how to do that in a minute.
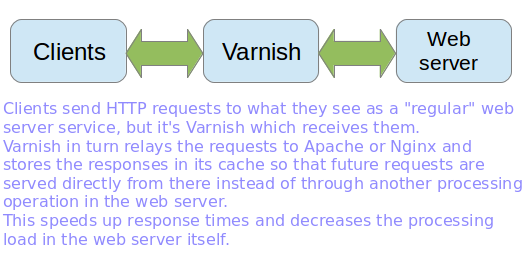
How Varnish Works
Putting in Varnish Cache in Linux Server
This publish assumes that you’ve got put in a LAMP or LEMP server. If not, please set up a kind of stacks earlier than continuing.
The official documentation recommends putting in Varnish from the developer’s personal repository as a result of they all the time present the most recent model. You too can select to put in the bundle out of your distribution’s official repositories, though it might be just a little outdated.
Additionally, please word that the undertaking’s repositories solely present help for 64-bit techniques, whereas for 32-bit machines, you’ll need to resort to your distribution’s formally maintained repositories.
On this article, we are going to set up Varnish from the repositories formally supported by every distribution. The primary cause behind this determination is to supply uniformity within the set up methodology and guarantee automated dependency decision for all architectures.
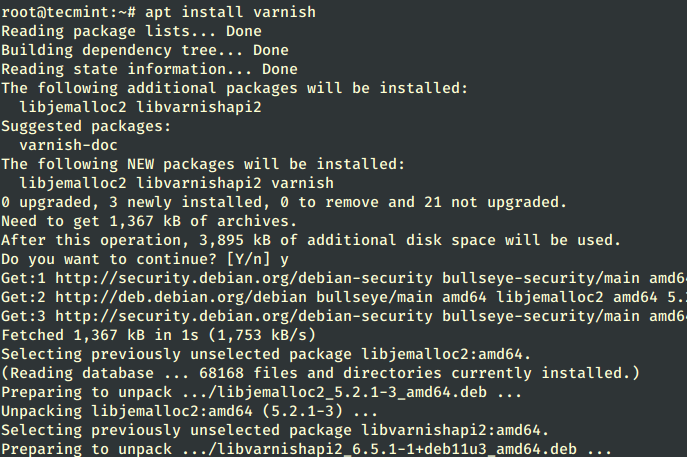
Set up Varnish in Debian-based Linux
On Debian-based distributions, you’ll be able to set up Varnish utilizing the apt command as proven.
# apt replace
# apt set up varnish
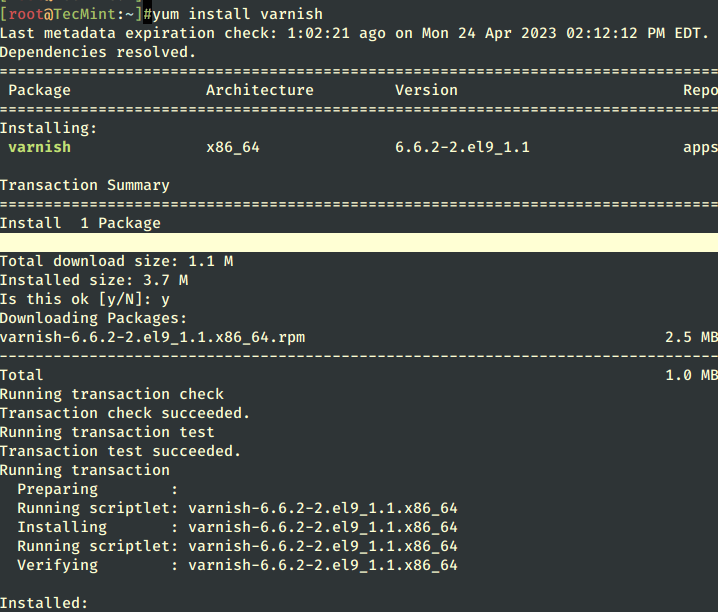
Set up Varnish in RHEL-based Linux
On RHEL-based distributions resembling CentOS, Rocky, and AlmaLinux, you will have to allow the EPEL repository earlier than putting in Varnish utilizing the yum command as proven.
# yum set up epel-release
# yum replace
# yum set up varnish
If the set up completes efficiently, you’ll have one of many following varnish variations relying in your distribution:
# varnishd -V

varnishd (varnish-6.5.1 revision 1dae23376bb5ea7a6b8e9e4b9ed95cdc9469fb64)
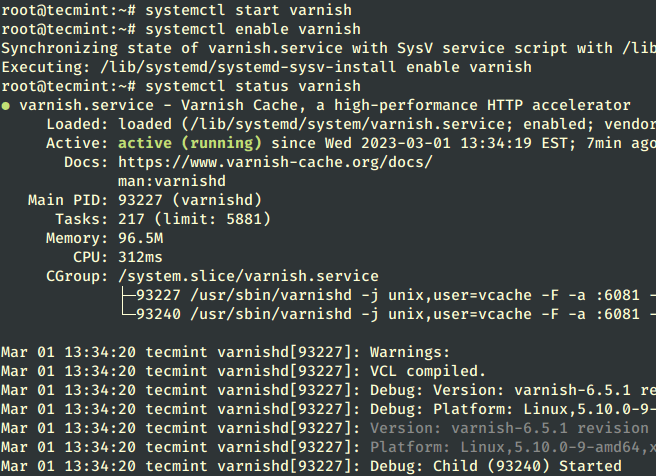
Lastly, you must begin Varnish manually if the set up course of didn’t do it for you and allow it to begin on boot.
# systemctl begin varnish
# systemctl allow varnish
# systemctl standing varnish
By default port 6081 is utilized by the varnish service and also you affirm it by operating the next netstat command.
# netstat -tunlp | grep 6081

Configuring Varnish Cache in Linux
As we stated earlier, Varnish stands in the midst of exterior shoppers and the online server. For that cause, and to ensure that the caching to develop into clear to finish customers, we might want to:
- Change the default port 6081 the place Varnish listens on to 80.
- Change the default port the place the Net server listens to 8080 as a substitute of the default 80.
- Redirect incoming site visitors from Varnish to the online server. Thankfully, Varnish does this robotically after we now have accomplished 1) and 2) steps.
Change Varnish Port
The varnishd course of is managed by systemd and has its unit file in /usr/lib/systemd/system/varnish.service, which holds the default Varnish runtime configuration.
Right here, we have to change the default varnish port from 6081 to port 80 and the cache dimension to 1GB as proven by operating the next command, which is able to open the unit file within the editor as proven.
Notice: You may change the quantity of reminiscence as per your {hardware} assets or alternatively select to save lots of cached information to disk.
$ sudo systemctl edit --full varnish
OR
# systemctl edit --full varnish
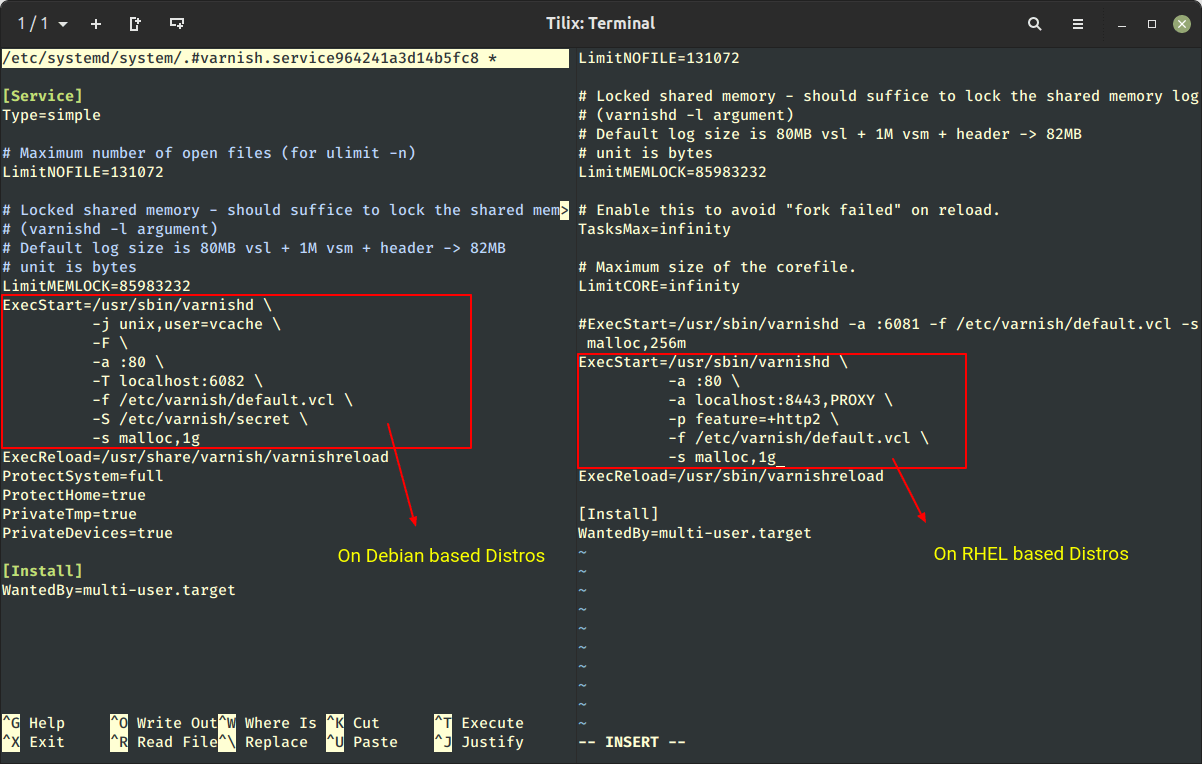
After making adjustments to /and many others/systemd/system/varnish.service file, you must reload the Systemd daemon by operating the next command:
# systemctl daemon-reload
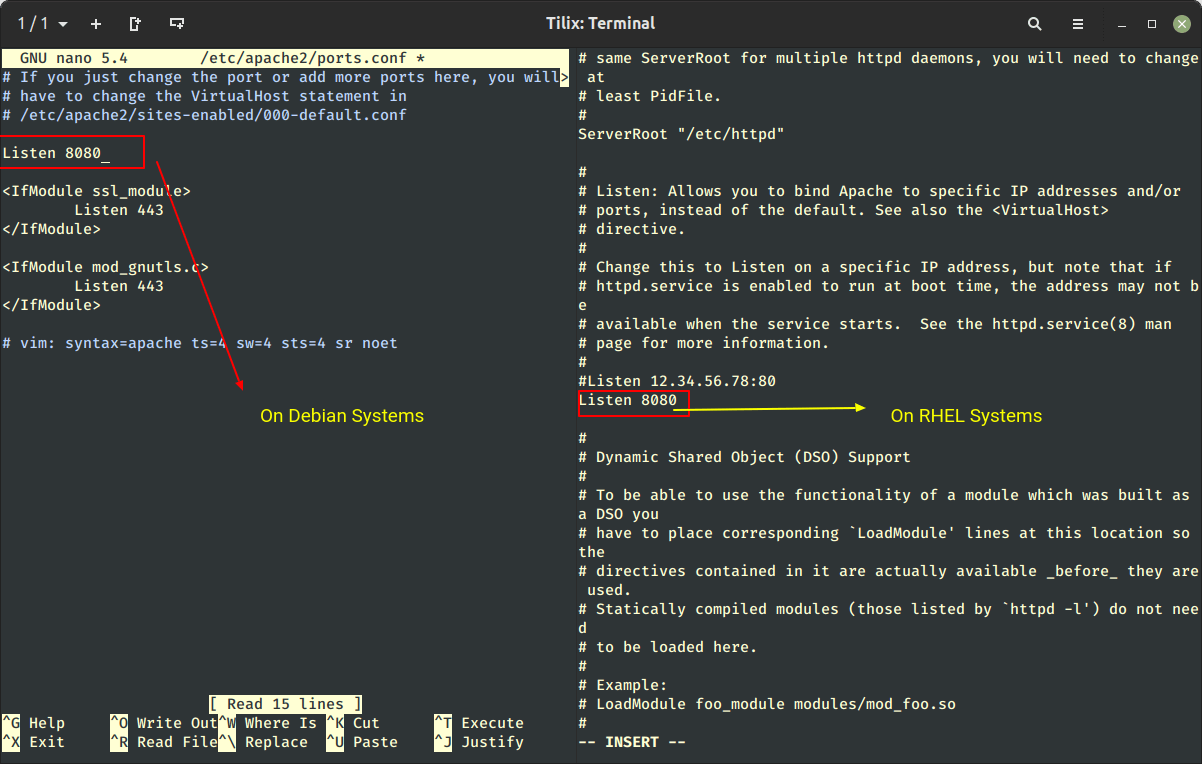
Change Apache or Nginx Port
After altering the Varnish port, now you must change your Apache or Nginx internet server port from default 80 to the commonest networking port i.e. 8080.
---------- On Debian-based Programs ----------
# nano /and many others/apache2/ports.conf      [On Apache]
# /and many others/nginx/sites-enabled/default  [On Nginx]

---------- On RHEL-based Programs ----------
# vi /and many others/httpd/conf/httpd.conf   [On Apache]
# vi /and many others/nginx/nginx.conf        [On Nginx]
After getting carried out adjustments, don’t neglect to restart Varnish and the online server.
# systemctl restart varnish

---------- On Debian-based Programs ----------
# systemctl restart apache2
# systemctl restart nginx

---------- On RHEL-based Programs ----------
# systemctl restart httpd
# systemctl restart nginx
Testing Varnish Cache in Linux
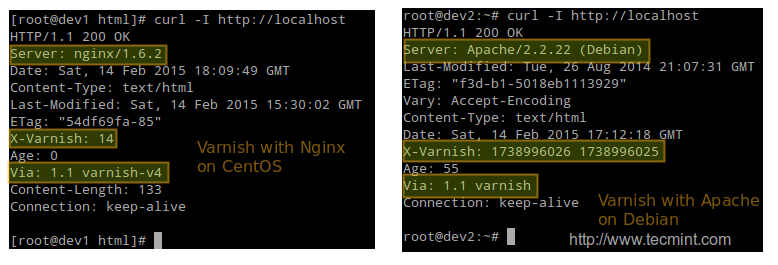
The primary take a look at consists in making an HTTP request by way of the curl command and verifying that it’s dealt with by Varnish:
# curl -I http://localhost
Varnish additionally consists of two helpful instruments too:
- View in real-time Varnish logs, intuitively known as varnishlog.
- Show Varnish cache statistics, known as varnishstat.
As a second take a look at, within the following screencast, we are going to show each the logs and the statistics on a CentOS server (dev1, higher half of the display) and on a Debian server (dev2, decrease half of the display) as HTTP requests are despatched and responses obtained.
Take a look at Net Server Efficiency Benchmark
Our third and ultimate take a look at will consist in benchmarking each the online server and Varnish with the ab benchmarking device and evaluating the response occasions and the CPU load in every case.
On this explicit instance, we are going to use the CentOS server, however you need to use any distribution and acquire comparable outcomes. Watch the load common on the high and the Requests per second line within the output of ab.
With ab, we might be despatched 50 (-c 50) concurrent requests on the similar time and repeat the take a look at 1000000 occasions (indicated by -n 1000000). Varnish will return a better variety of requests per second and a a lot decrease load common.
Essential: Please keep in mind that Varnish is listening on port 80 (the default HTTP port), whereas Apache is listening on port 8080. You too can be aware of the period of time required to finish every take a look at.
# ab -c 50 -n 100000 http://localhost/index.html
Conclusion
On this article, we now have mentioned the right way to arrange a Varnish cache in entrance of an online server, Apache, or Nginx. Notice that we now have not dug deep into the default.vcl configuration file, which permits us to customise the caching coverage additional.
You could now wish to check with the official documentation for additional configuration examples or go away a remark utilizing the shape beneath.