

For these utilizing macOS Ventura, they could be curious learn how to set most popular networks inside the working system. Sadly, I’ve some unhealthy information for them, because the tried and true strategies have been eliminated inside the working system. Whereas there’s a repair, many customers are possible not going to be pleased with this resolution. Hold studying to search out out extra.
Previous to macOS Ventura, customers could have been accustomed to going to their Superior Community Preferences and easily dragging and dropping their most popular networks in an order that works for them. Sadly, the latest modifications to macOS Ventura not permits for this. When you’re utilizing an older variations of macOS, you’re nonetheless ready to do that, however with Ventura, you’re going to should take a unique route.
How Does macOS Ventura Select a Most well-liked Community?
As talked about, Ventura not has a method of prioritizing networks manually, macOS Ventura does it robotically. In fact, in the case of auto-joining networks, macOS Ventura sometimes chooses most popular networks proper from the beginning. After that, it should prioritize by non-public networks, after which public.
Primarily, your Mac will prioritize networks on this order:
- “Most Most well-liked” networks. Regarding this route, macOS Ventura scores probably the most identified networks and it’s decided by your actions. For instance, should you manually change to a sure community typically, that can improve the ‘rating’ of the community. Disconnecting from the community will lower the rating. The very best scoring community would be the most most popular.
- Non-public networks: This sometimes consists of networks which might be setup in houses and workplaces. This could additionally embrace Private Hotspots. Regarding precedence, macOS Ventura will reconnect to identified non-public networks within the order they have been most just lately joined.
- Public Networks: These networks are often hooked up to a public space, akin to one from an airport or a espresso store. Moreover, this checklist additionally consists of networks akin to Hotspot 2.0, EAP-SIM, Passport, or a Wi-Fi community {that a} mobile provider or community entry supplier could provide.
In fact, if macOS Ventura finds a number of public or non-public networks, it should prioritize networks and decide which one is finest based mostly on safety stage.
Therefor, Ventura will select a community based mostly on the next order:
- EAP
- WPA3
- WPA2/WPA
- WEP
- Unsecured / Open
Customers ought to notice that macOS Ventura is not going to auto-join an unsecured or open community except it has been linked inside the previous two weeks. It’s also vital to notice that if Ventura finds a number of networks inside an equivalent class and safety stage, the OS will choose the SSID that has the stronger obtained sign energy indication, or RSSI. Lastly, customers ought to know that after restarting their Mac, if FireVault is enabled, Wi-Fi credentials will solely be out there after you unlock your system.
Find out how to Set Most well-liked Networks in macOS Ventura. . . Kinda
For some Ventura customers, this may be extremely annoying. For instance, let’s say you will have a break up community. One could also be sooner, however the different could have extra vary. Chances are you’ll discover that Ventura insists on connecting to the slower community. There’s a resolution to this subject, nonetheless, remember that it isn’t fairly.
Primarily, what plenty of customers are suggesting is to undergo close by linked networks, and disabling auto-join. Primarily, if you wish to “prioritize” a sure community in your space, you’re going to want to shut-off the auto-join function for the entire different networks that you’ve the choice of becoming a member of. Like I mentioned, I warned this feature isn’t going to be fairly.
Find out how to Cease Ventura from Auto-Becoming a member of Networks
To do that, you’ll have to observe these steps for each community you don’t wish to “prioritize”. To do that, observe these directions:
Time wanted: 1 minute.
Find out how to cease a community from auto-joining on Ventura.
- Go to Apple > System Settings within the Menu Bar.
- Choose Community and go to Wi-Fi.
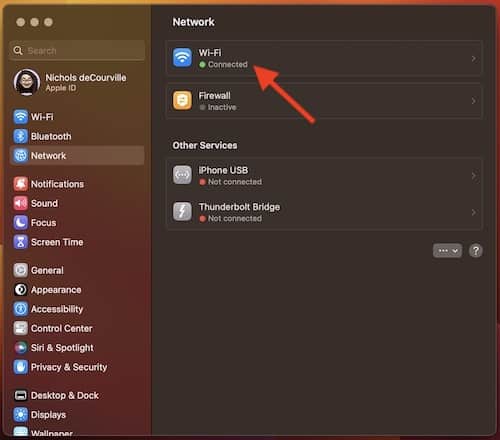
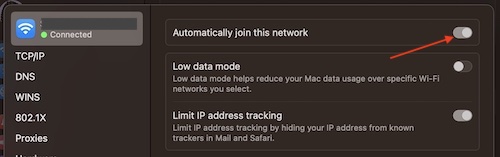
- Subsequent to the community you don’t want to auto-join, hit Particulars.

- Flip off Robotically Be a part of this Community.
Repeat this step till you’re prioritizing the community you need. You’ll then want to hitch a unique community manually from the Wi-Fi icon within the Menu Bar.
Out with the Outdated, in with the New
Whereas some is probably not pleased that macOS Ventura not incorporates a solution to prioritize networks, there may be form of a solution to get it again the way you need, although I think many is probably not pleased with this technique both. Hopefully for those who really benefit from the outdated methods of doing issues, Apple will right this in a future replace.
Whereas having the ability to prioritize your networks is crucial for some, understanding how Apple chooses to prioritize networks can at the least result in an understanding to the strategies. Whereas macOS Ventura customers are not capable of modify and set community preferences, there may be technically a piece round. For those who actually must be choosy with their networks, they’ll merely should hope Apple brings the function again in a future replace.