
Listed here are 18 easy but necessary tricks to defend your Mac so that every one your information, paperwork, and delicate knowledge stay protected and don’t fall into the dangerous fingers.
Associated: The way to safe your iPhone
1. Set a novel password
An important, primary, and apparent approach to stop undesirable entry to your Mac is by locking it with a passcode and never sharing it with anybody. When you do that, macOS will ask for the password when Mac boots or wakes up after sleep, or locking it.
You probably have already set a password, however in case you haven’t, go to System Settings > Contact ID & Password > Password. From right here, you too can change the password for those who imagine another person is aware of it. This password setting can also be obtainable within the Customers & Teams part.
2. Ask for the password instantly
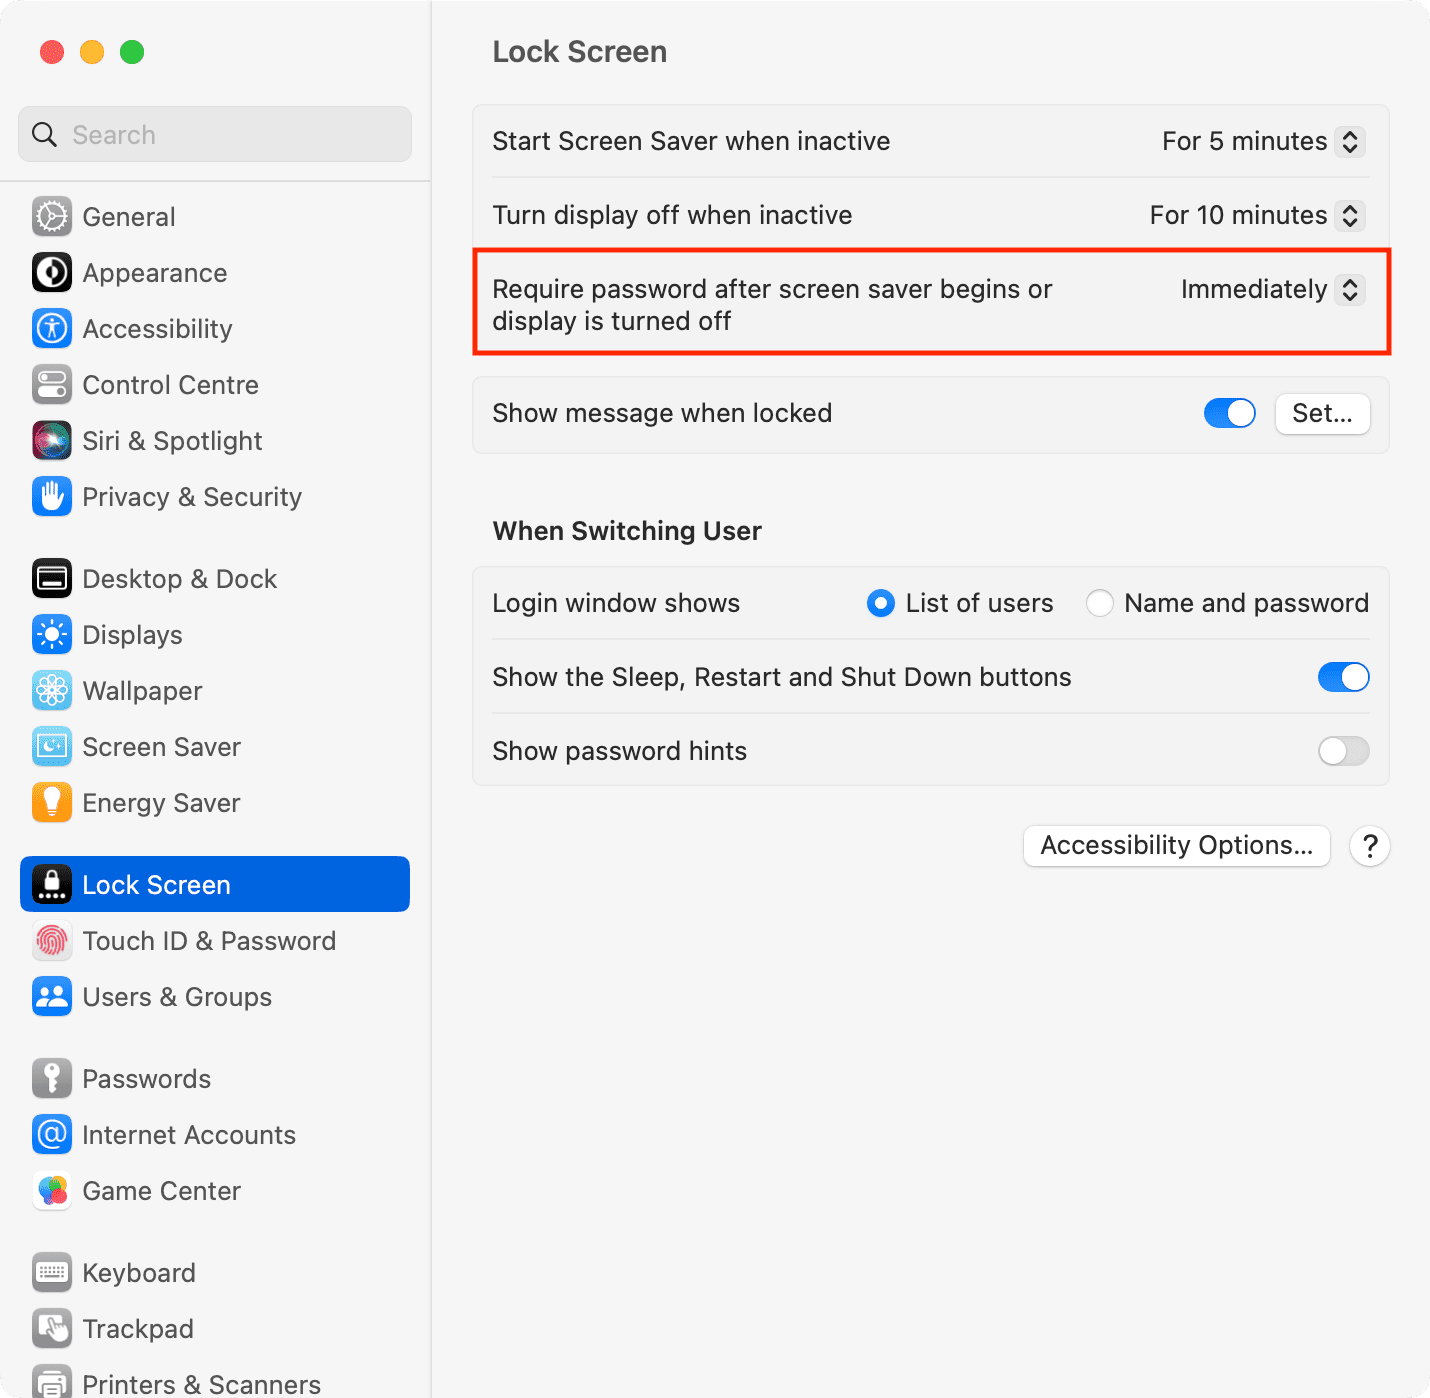
For optimum safety, you must set your Mac to ask for the password instantly after the show is turned off (put to sleep), or the display screen saver has been activated:
- Go to System Settings > Lock Display.
- Click on the drop-down menu subsequent to ‘Require password after display screen saver begins or show is turned off’ and choose Instantly.
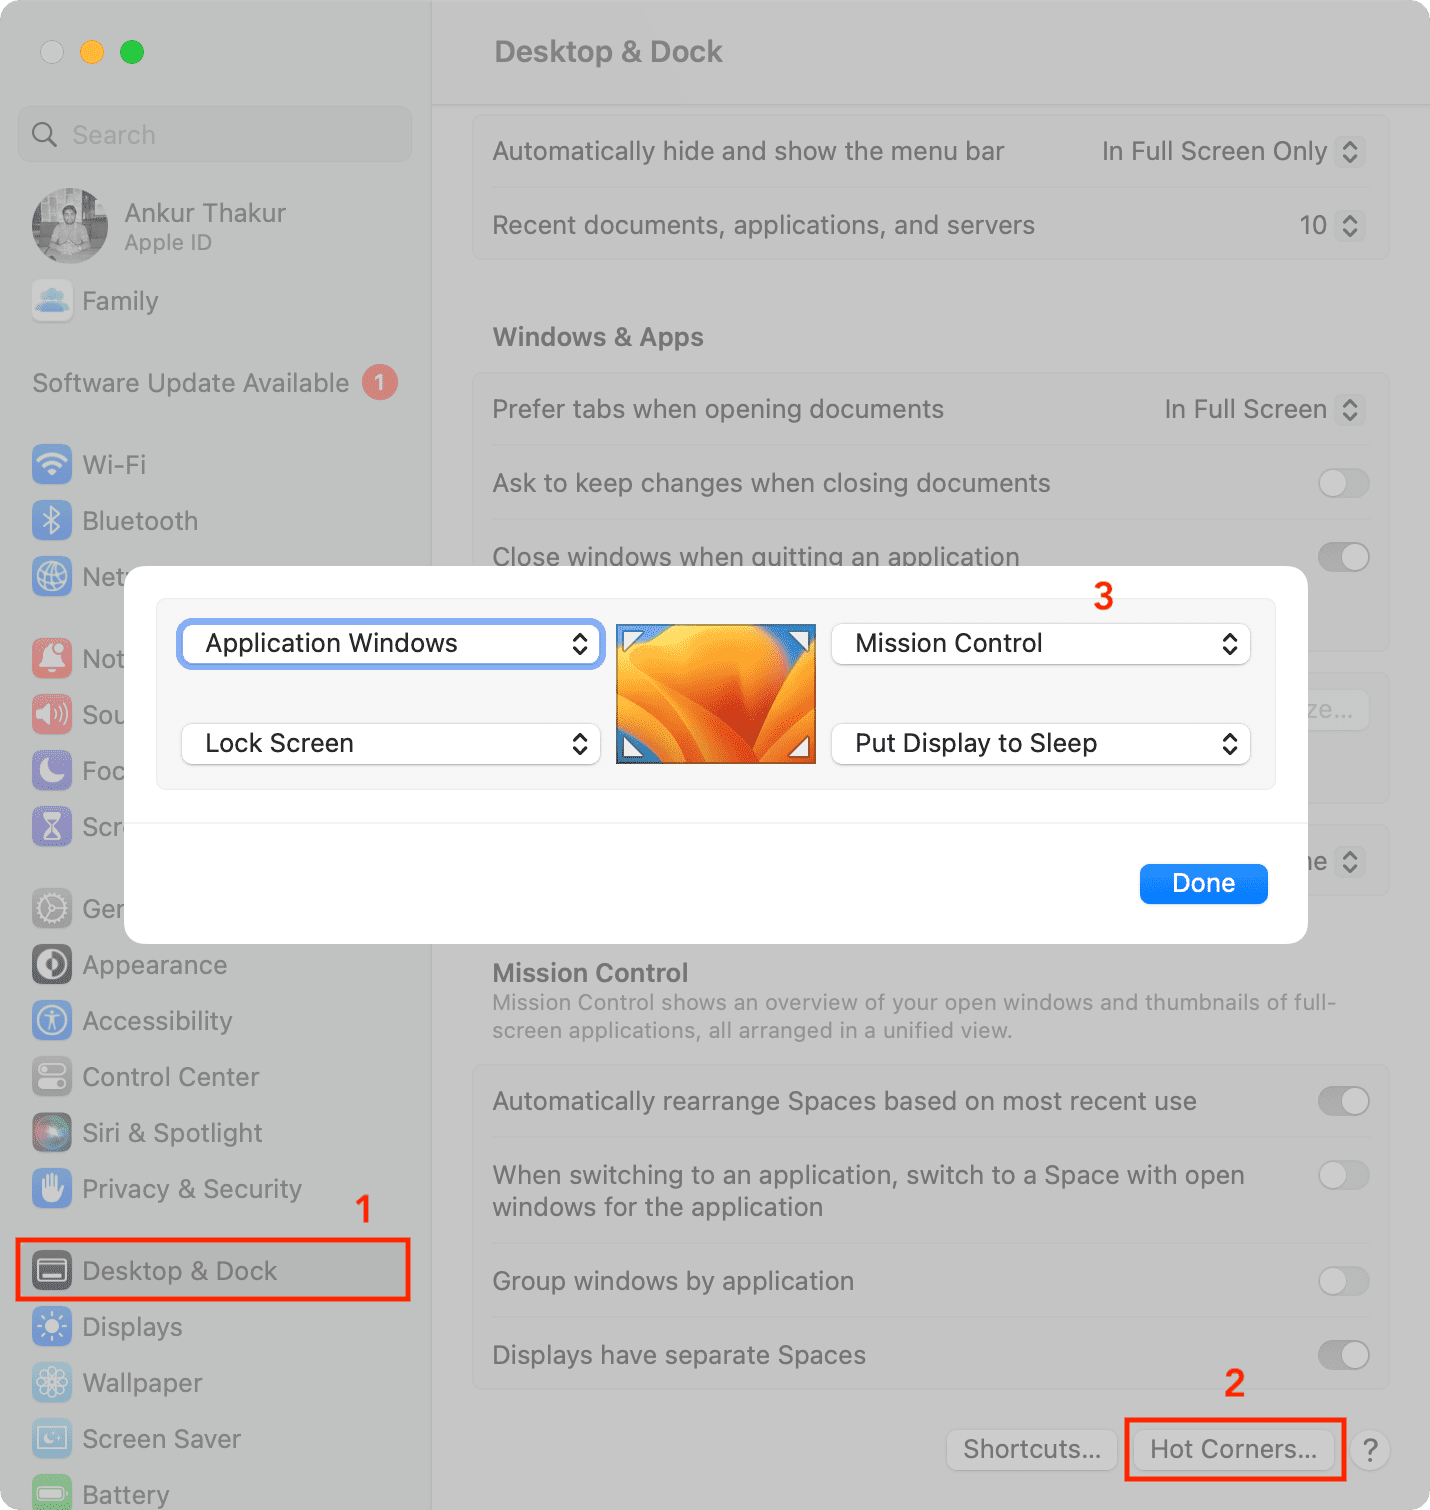
3. Use Scorching Corners to immediately lock your Mac
It’s simple to lock your Mac by clicking the Apple icon and selecting Lock Display or by urgent the Management + Command + Q keys collectively.
Nevertheless, an excellent sooner methodology that I take advantage of is by configuring Scorching Corners. Doing so, each time I drag my mouse/trackpad pointer to one of many chosen corners of my Mac’s display screen, my pc is locked immediately. It’s very fast and handy.
4. Set your Mac to log off after inactivity
Do you typically stroll away out of your desk along with your iMac, Mac mini, or Mac Studio or go away your MacBook unattended? In that case, you need to lock it utilizing the strategies talked about above. In case you haven’t, set your Mac to mechanically log off the person after a interval of inactivity. Doing this ensures your information are safe and inaccessible in case your Mac is left unattended:
- Go to System Settings > Privateness & Safety.
- Scroll down and click on Superior.
- Allow the swap subsequent to Sign off mechanically after inactivity.
- By default, the Sign off after time is ready to 60 minutes, however you may change it to a shorter interval, like half-hour or 5 minutes.
- Whilst you’re right here, you too can allow ‘Require an administrator password to entry systemwide settings‘ to forestall undesirable modifications to your settings.

5. Save your work earlier than locking your Mac
Even after you might have locked your Mac, anybody can press and maintain your Mac’s energy button to show it off after which press the ability button to show it again on.
Now, since you set a password, that individual can’t get inside your pc and do any harm. Nevertheless, all unsaved work will likely be misplaced when the intruder forcefully powers off your Mac.
Should you’re about to depart your Mac unattended throughout a piece lunch break as an illustration, bear in mind to save lots of any ongoing work to forestall the chance of shedding it earlier than locking the gadget.
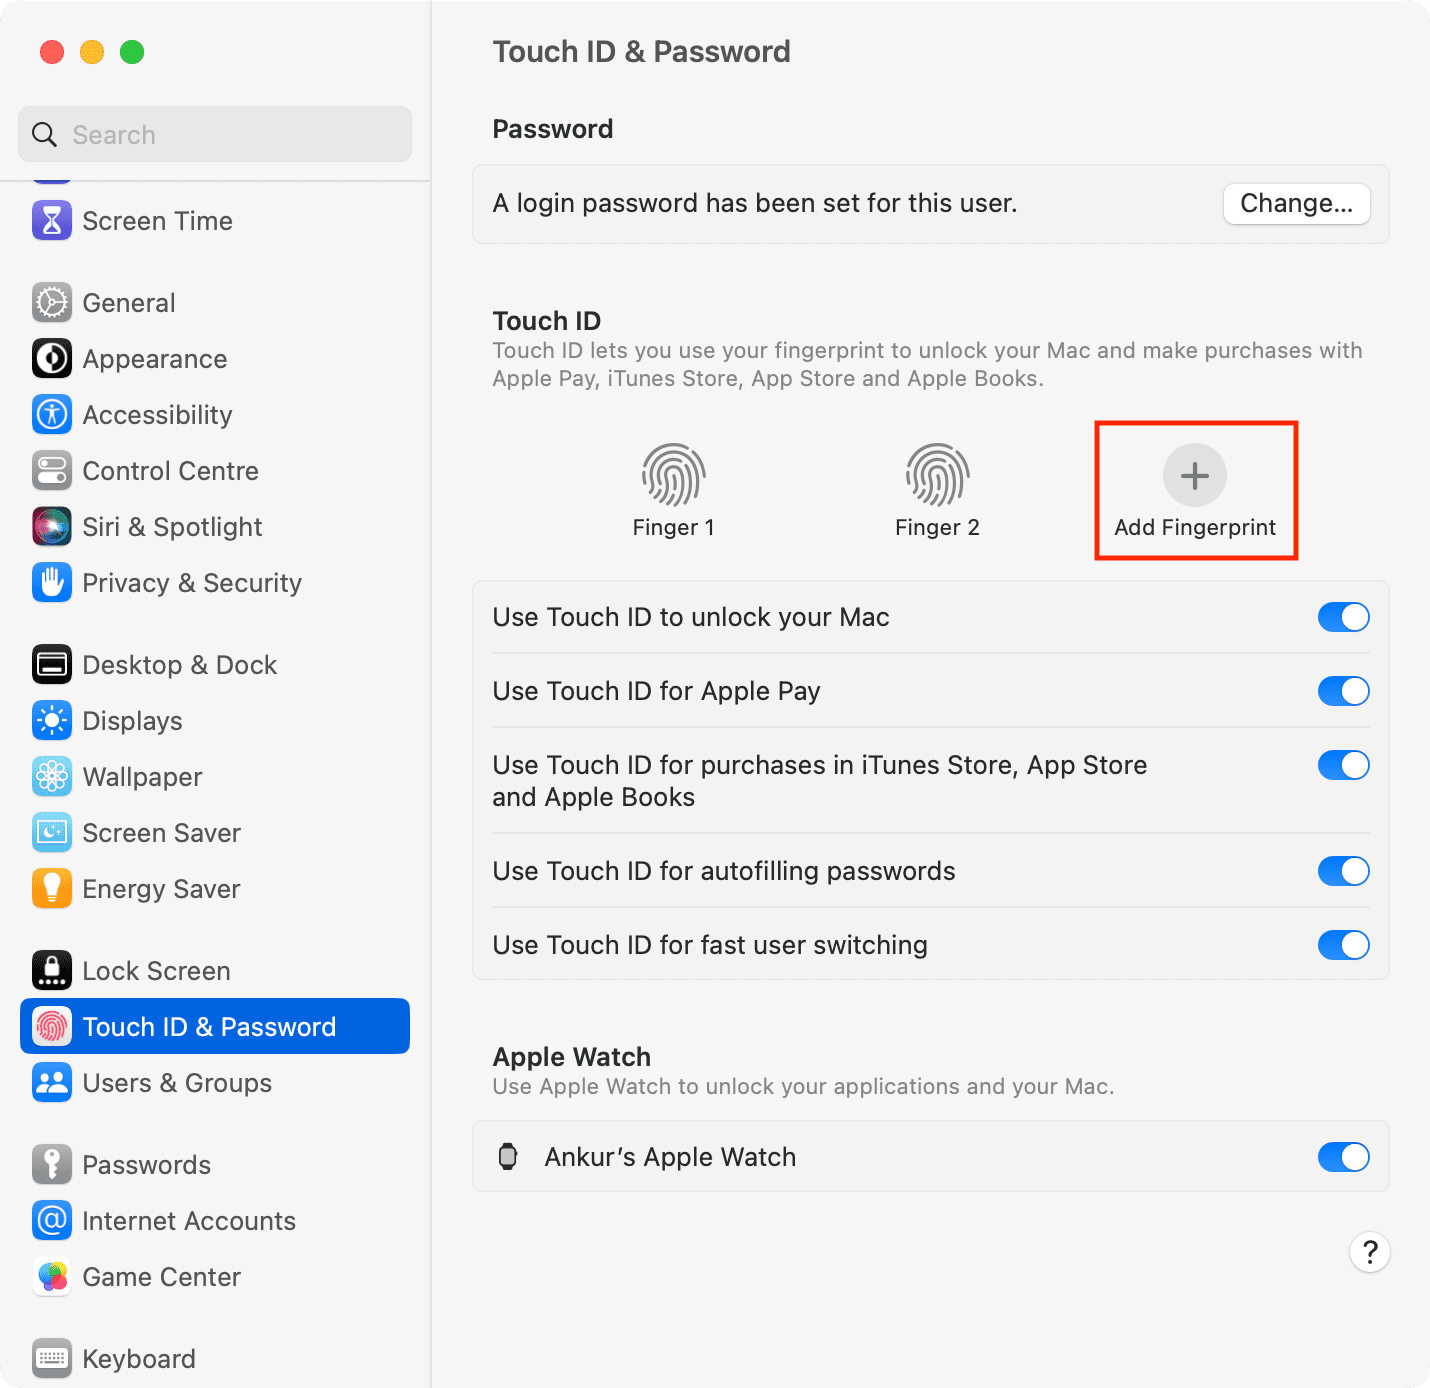
6. Kind your Mac’s password discreetly or use Contact ID or your Apple Watch
WSJ did a few movies on the weak safety of iPhone passcodes, the place the thief would see or document an individual manually coming into the gadget passcode in a public place. Later, the thief steals the iPhone and makes use of the gadget passcode to vary the Apple ID password, which might probably locks out the sufferer from their iPhone in addition to their Apple ID ceaselessly.
Should you use your MacBook in public locations, watch out when manually coming into your system password. And for many secrecy, use Contact ID in your Mac to unlock it. Moreover that, you too can auto-unlock your Mac along with your Apple Watch. Each these strategies eradicate the necessity to sort your password manually.
Associated: Apple needs to exchange passwords with passkeys secured by Face ID and Contact ID
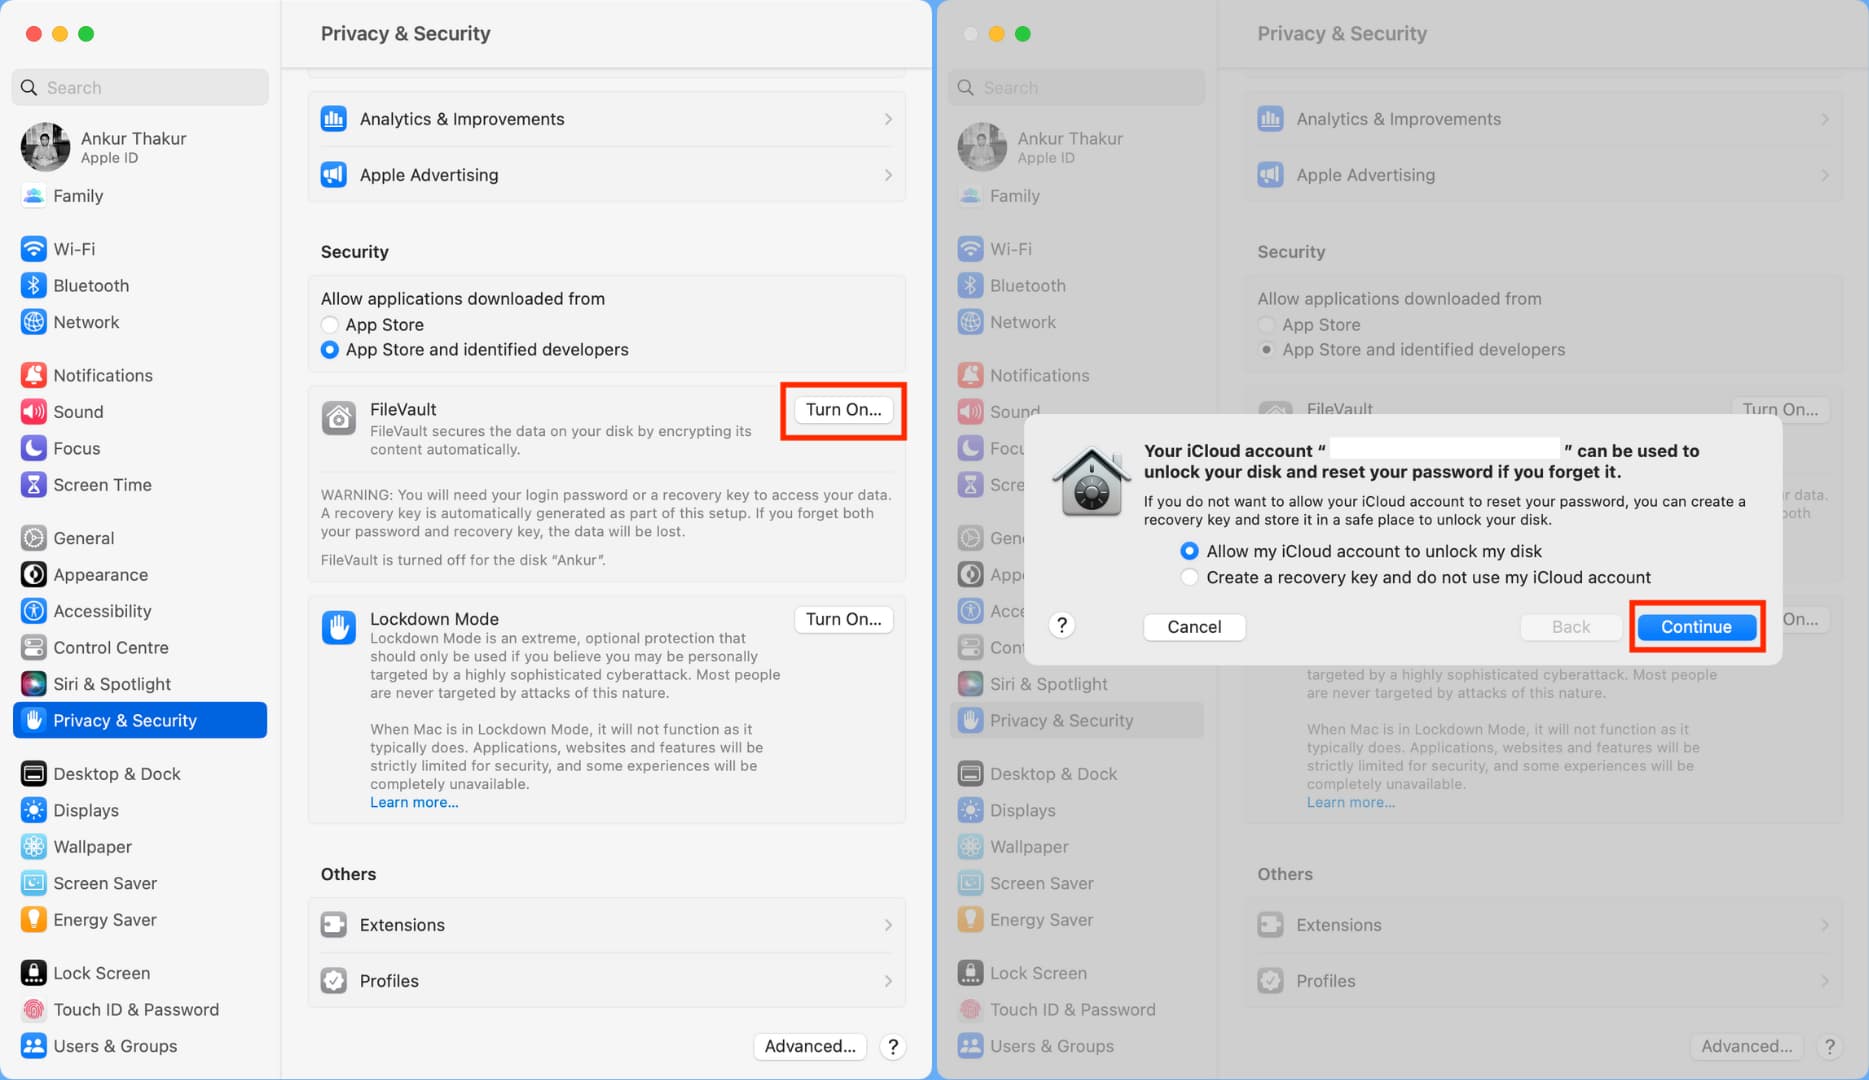
7. Activate FileVault
Mac’s FileVault encryption encodes your information and ensures nobody can see or copy them with out the login password. When you have delicate information in your MacBook or concern that your Mac mini or Mac Studio will be stolen and its information misused, you need to allow FileVault to encrypt and defend the data in your pc:
- Open System Settings and click on Privateness & Safety.
- Scroll down and click on Flip On subsequent to FileVault.
- Enter your Mac’s admin password and click on Unlock.
- Now, you may set a restoration key (that you need to by no means lose) or just permit your iCloud account to unlock the disk. I’m choosing the iCloud possibility. After that, click on Proceed.
- Relying on what number of information you might have in your Mac, it could take a very long time for encryption to complete. Nevertheless, in case your Mac has Apple silicon (M1, M2, and its successors), or it’s an Intel Mac with Apple T2 Safety Chip, or if it’s an iMac Professional, then information in your drive are already encrypted mechanically, and thus it ought to take simply a short while for FileVault encryption to complete. You can be taught extra about all of it.
8. Block distant entry and additional sharing connections
In case distant login & administration and different sharing choices like Bluetooth file sharing from an Android gadget or display screen sharing aren’t needed, you may flip them off to make your Mac safer:
- Open System Settings and click on Common > Sharing.
- Flip off all of the choices you don’t use.

9. Activate Firewall
As soon as Firewall is enabled in your Mac, it acts as a protect in opposition to any undesirable incoming community connections from different gadgets or the web.
- Open System Settings and click on Community.
- Click on Firewall.
- Allow the swap for Firewall.
- You’ll be able to click on the Choices button to additional customise it or block all incoming connections or activate stealth mode. This Apple Assist tutorial tells you all about it.

10. Safe delicate information and folders with another password
If different members of the family or workplace colleagues use your pc, you may take a straightforward step to lock your non-public pictures, movies, audio, paperwork, and many others., with an extra password.
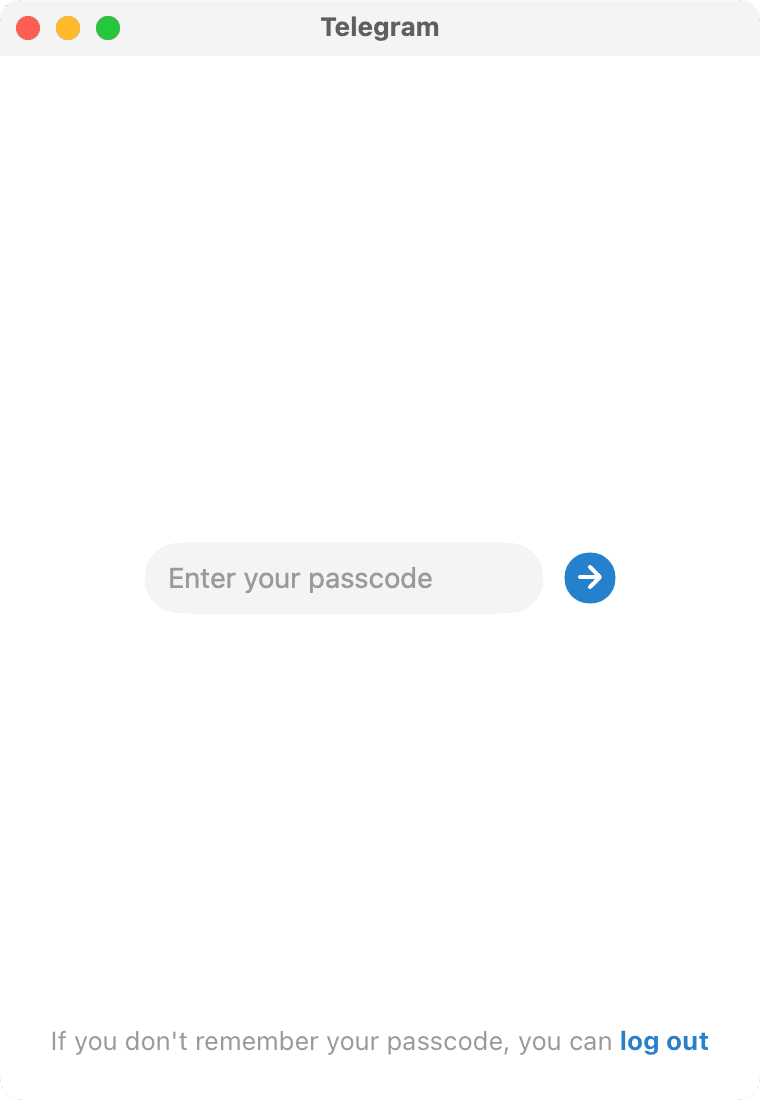
11. Lock supported apps
Some Mac apps like Telegram help you set a password lock to forestall undesirable entry. You’ll be able to discover the in-app settings of the involved app and search for such an possibility or contact the app developer and request them so as to add app lock in a future replace.
Associated: The way to lock your notes on iPhone, iPad, and Mac
12. Create separate customers
It is a handy and protected answer to forestall undesirable entry to your information and nonetheless let different individuals use your Mac. All you must do is create a separate normal person in your Mac, which permits that individual to make use of your Mac however retains your and their information separate and inaccessible.
You’ll be able to create as many separate accounts as you want. For instance, you may create completely different person accounts in your partner, little one, siblings, and so forth. Moreover that, you too can allow Visitor login.
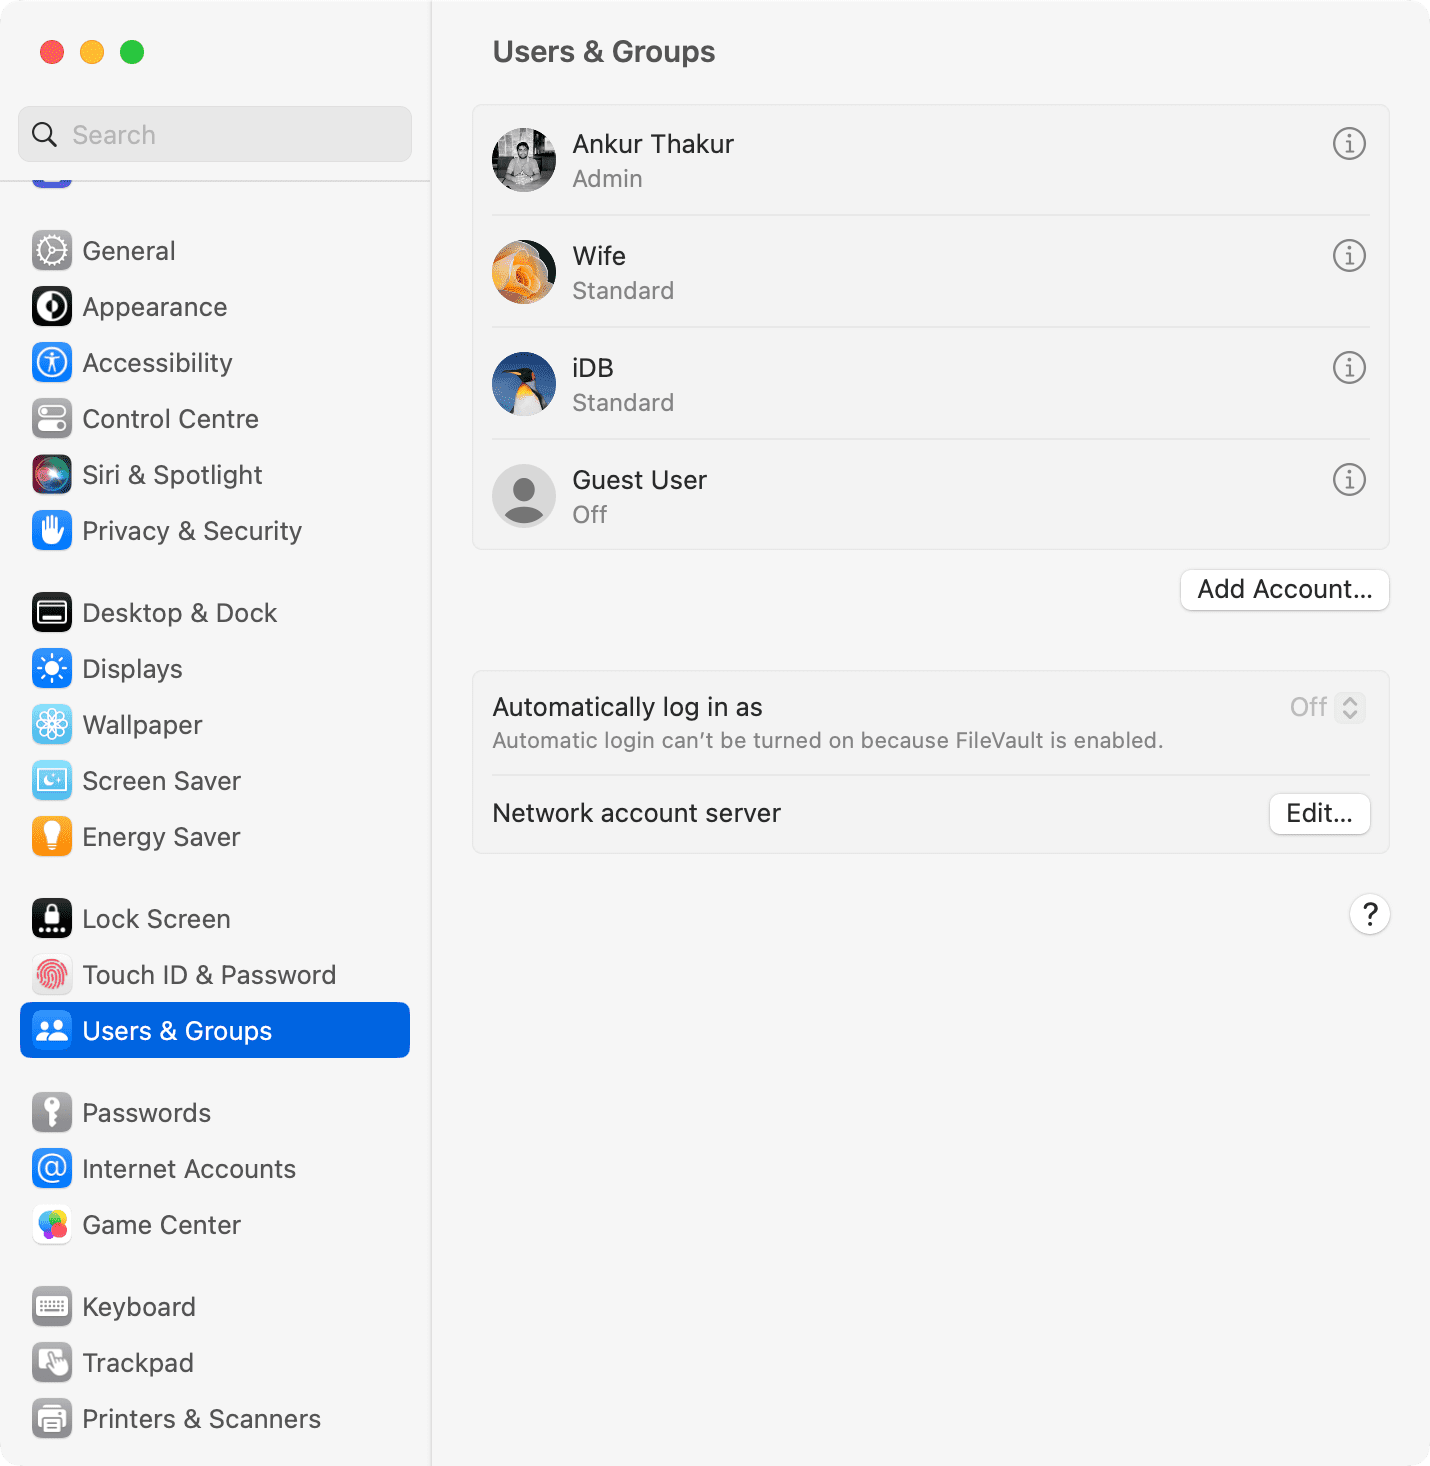
13. Don’t add anybody however you because the Mac’s administrator
Whilst you can create as many normal person accounts as you need, we suggest having just one admin account: yours! Don’t give administrator rights to some other person, as it will give them full management over your Mac.
You’ll be able to see all normal and admin customers of your Mac by going to System Settings > Customers & Teams. To show an admin into a normal person, click on the information button ⓘ subsequent to that person’s title and switch off the swap for ‘Permit this person to manage this pc.’
14. Cease utilizing private footage because the display screen saver
Display saver will be seen by anybody close to your Mac. For optimum privateness and to forestall photograph misuse, you may use lovely inventory pictures because the display screen saver in your workplace Mac versus utilizing your loved ones footage.
15. Forestall delicate information, folders, and knowledge from showing in Highlight
In case your setup entails letting different customers use your Mac, you may nonetheless stop private folders from showing in Highlight Search. This manner, if that individual makes use of Highlight to search out one thing, the folder you exclude received’t present up within the search outcomes.
16. Repeatedly again up your Mac
macOS has the useful Time Machine characteristic to again up your Mac to an exterior drive. Use this often to make sure all of your information and reminiscences are protected and simply recoverable in case one thing unlucky occurs to your pc. Take it one step additional by doing distant backups with companies like Backblaze.
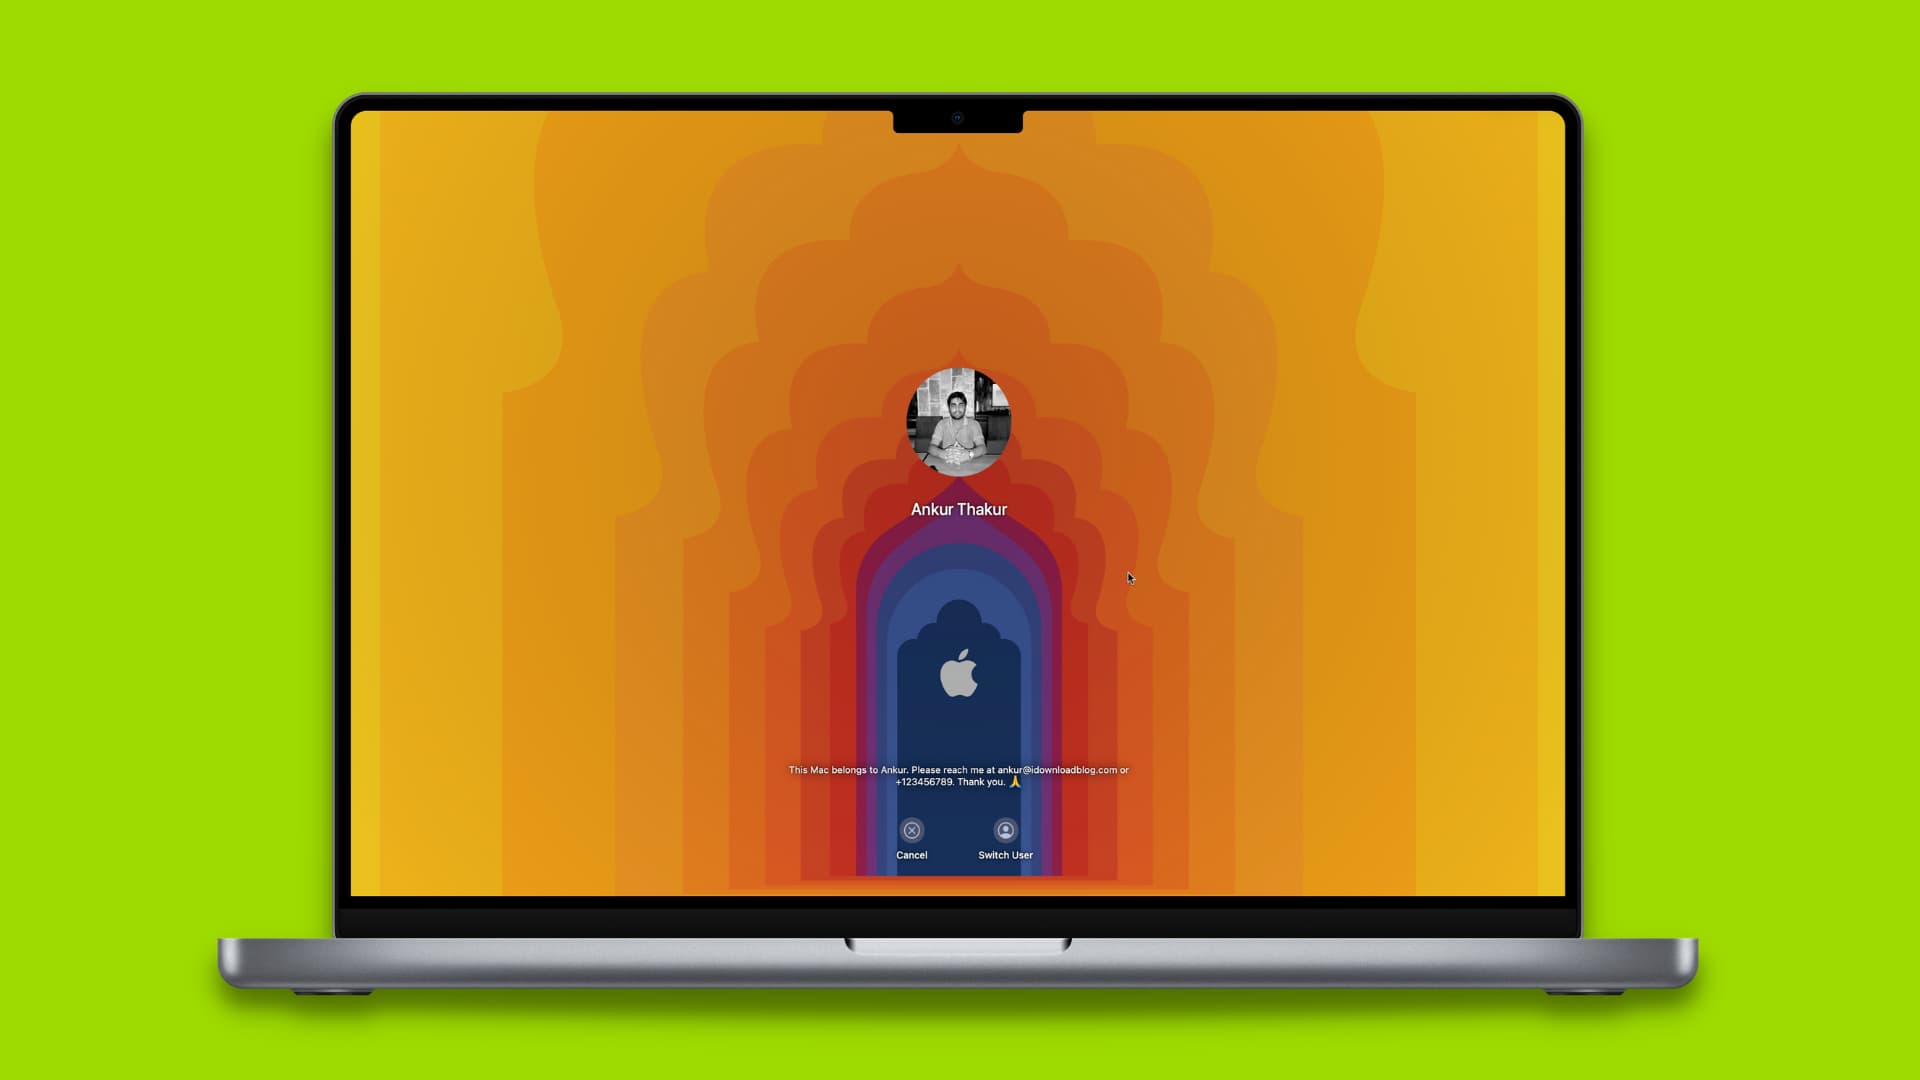
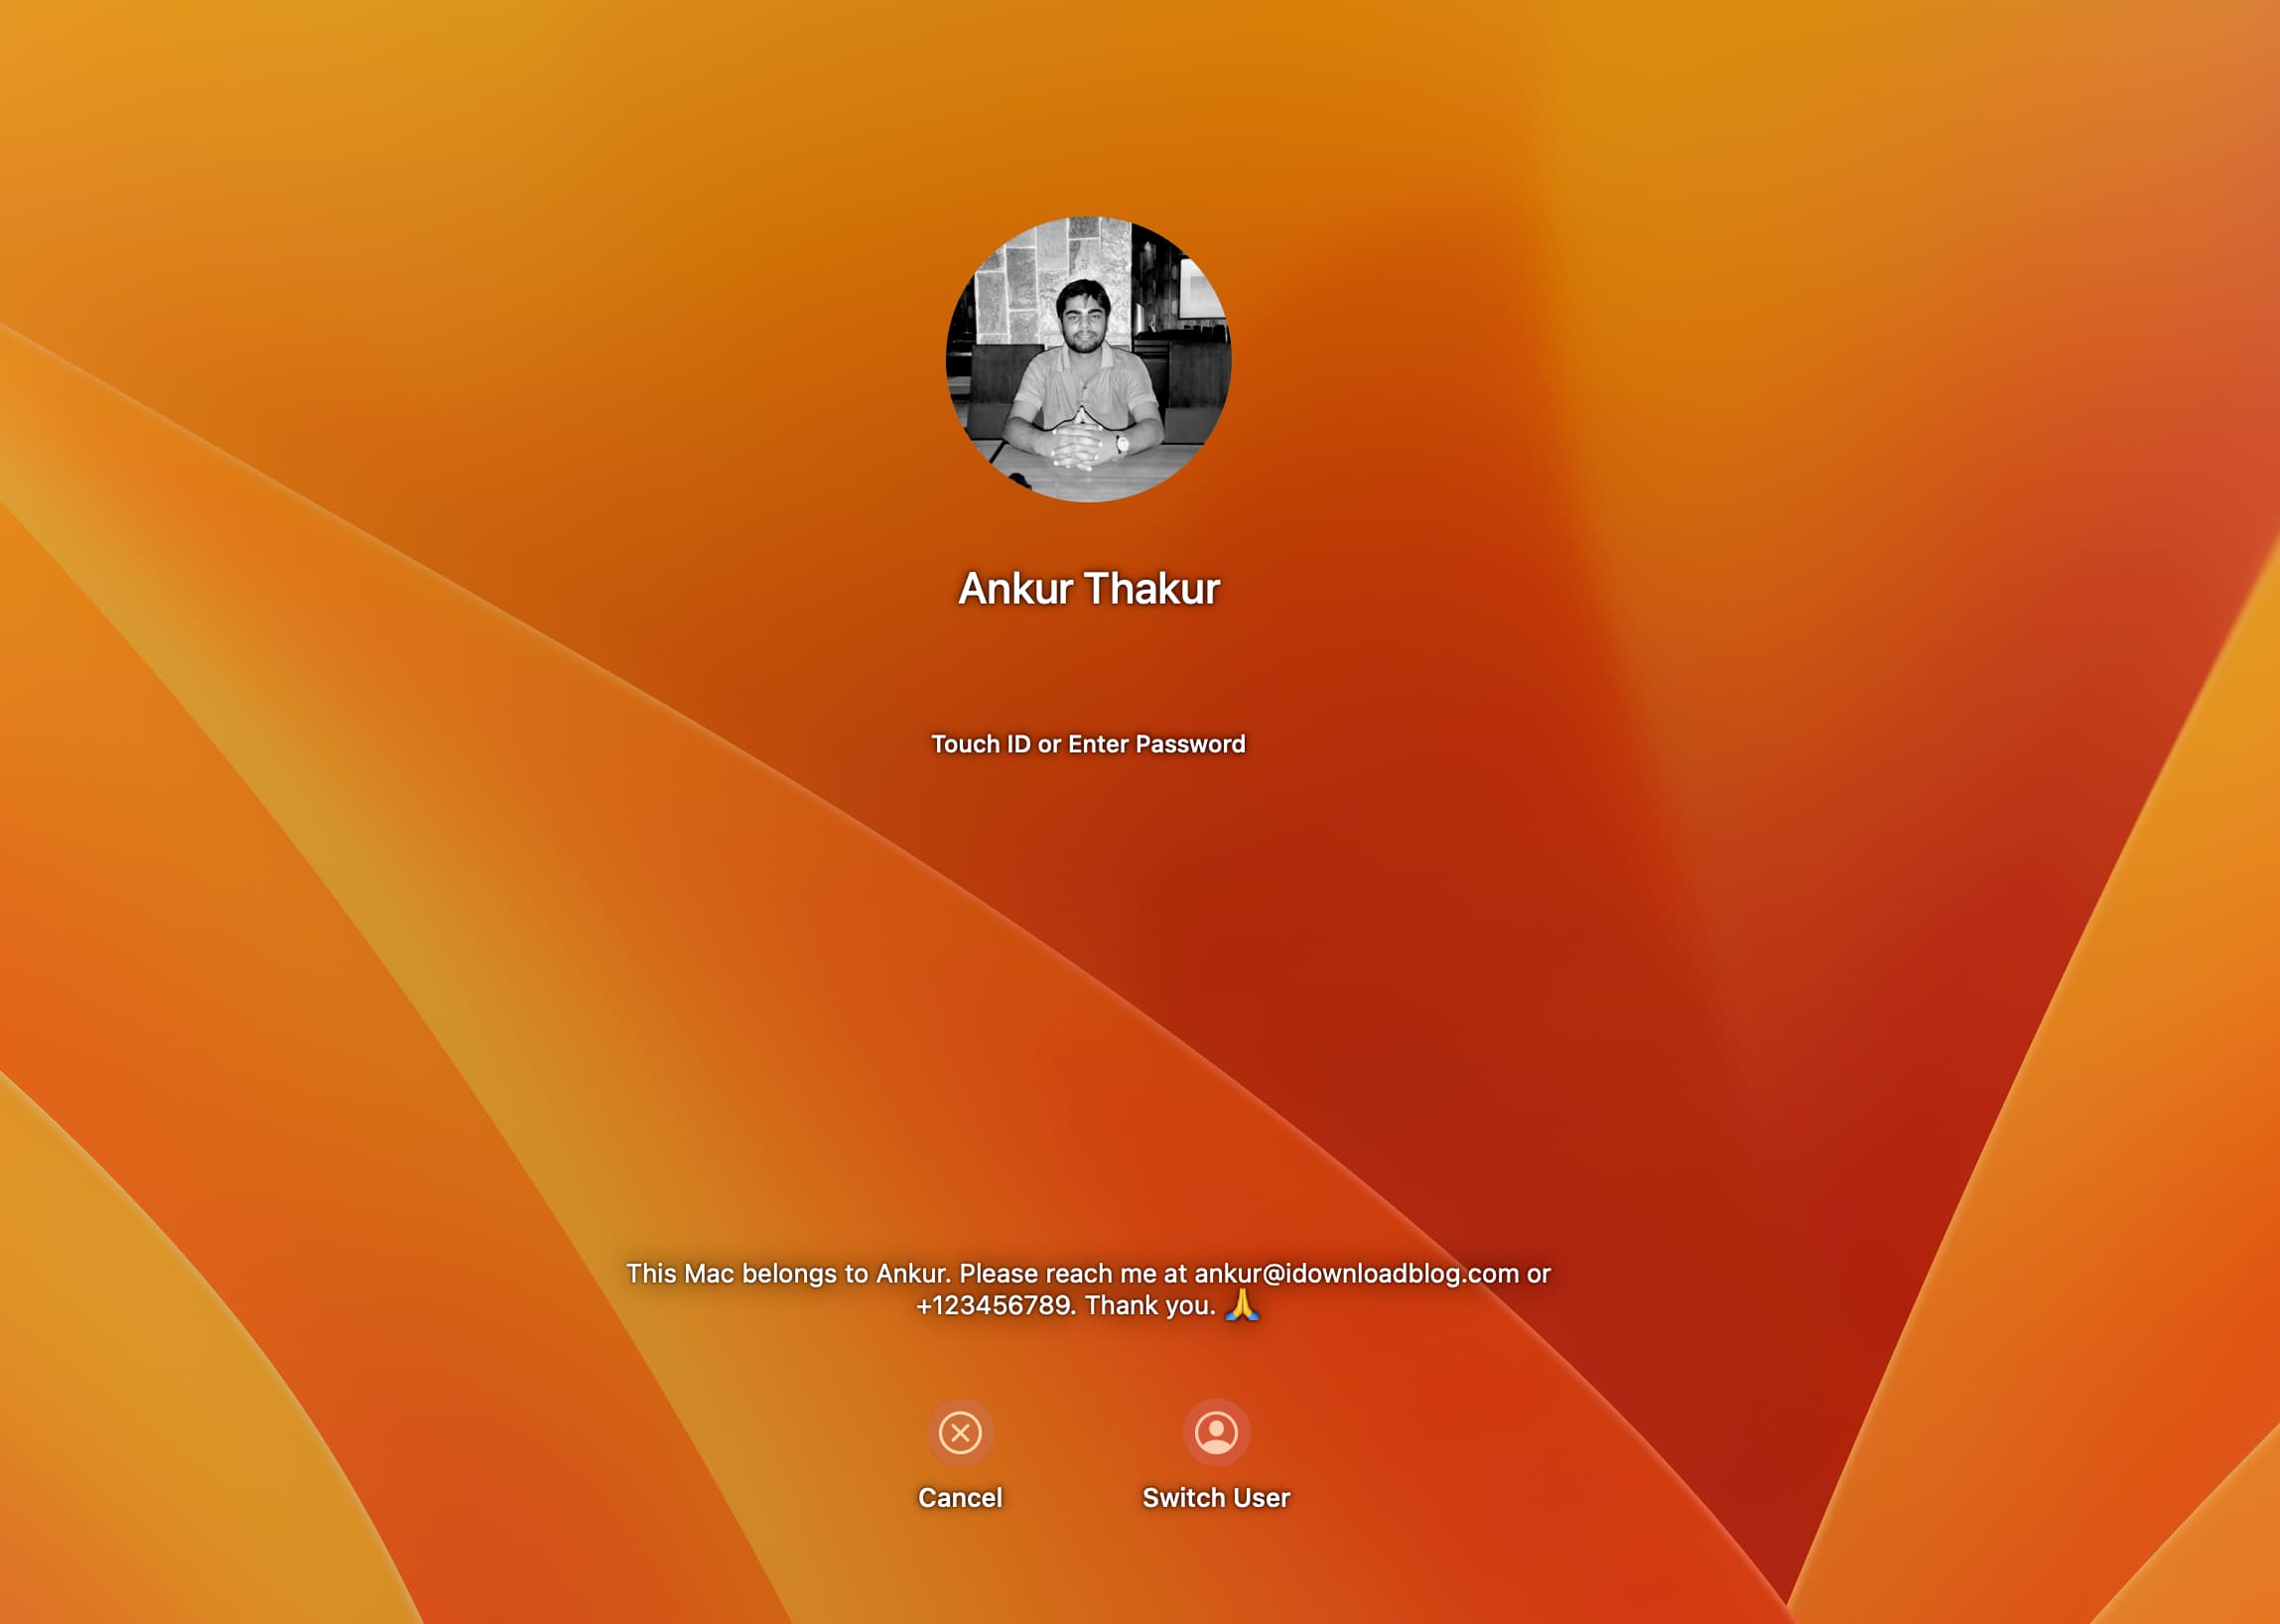
17. Present a message on Mac’s Lock Display
You’ll be able to show a message with an instruction, request, telephone quantity, e mail, or something in your Mac’s Lock Display and login display screen. This manner, for those who ever misplace your Mac, the finder can see it after they boot up the machine and attain out to you to return it.
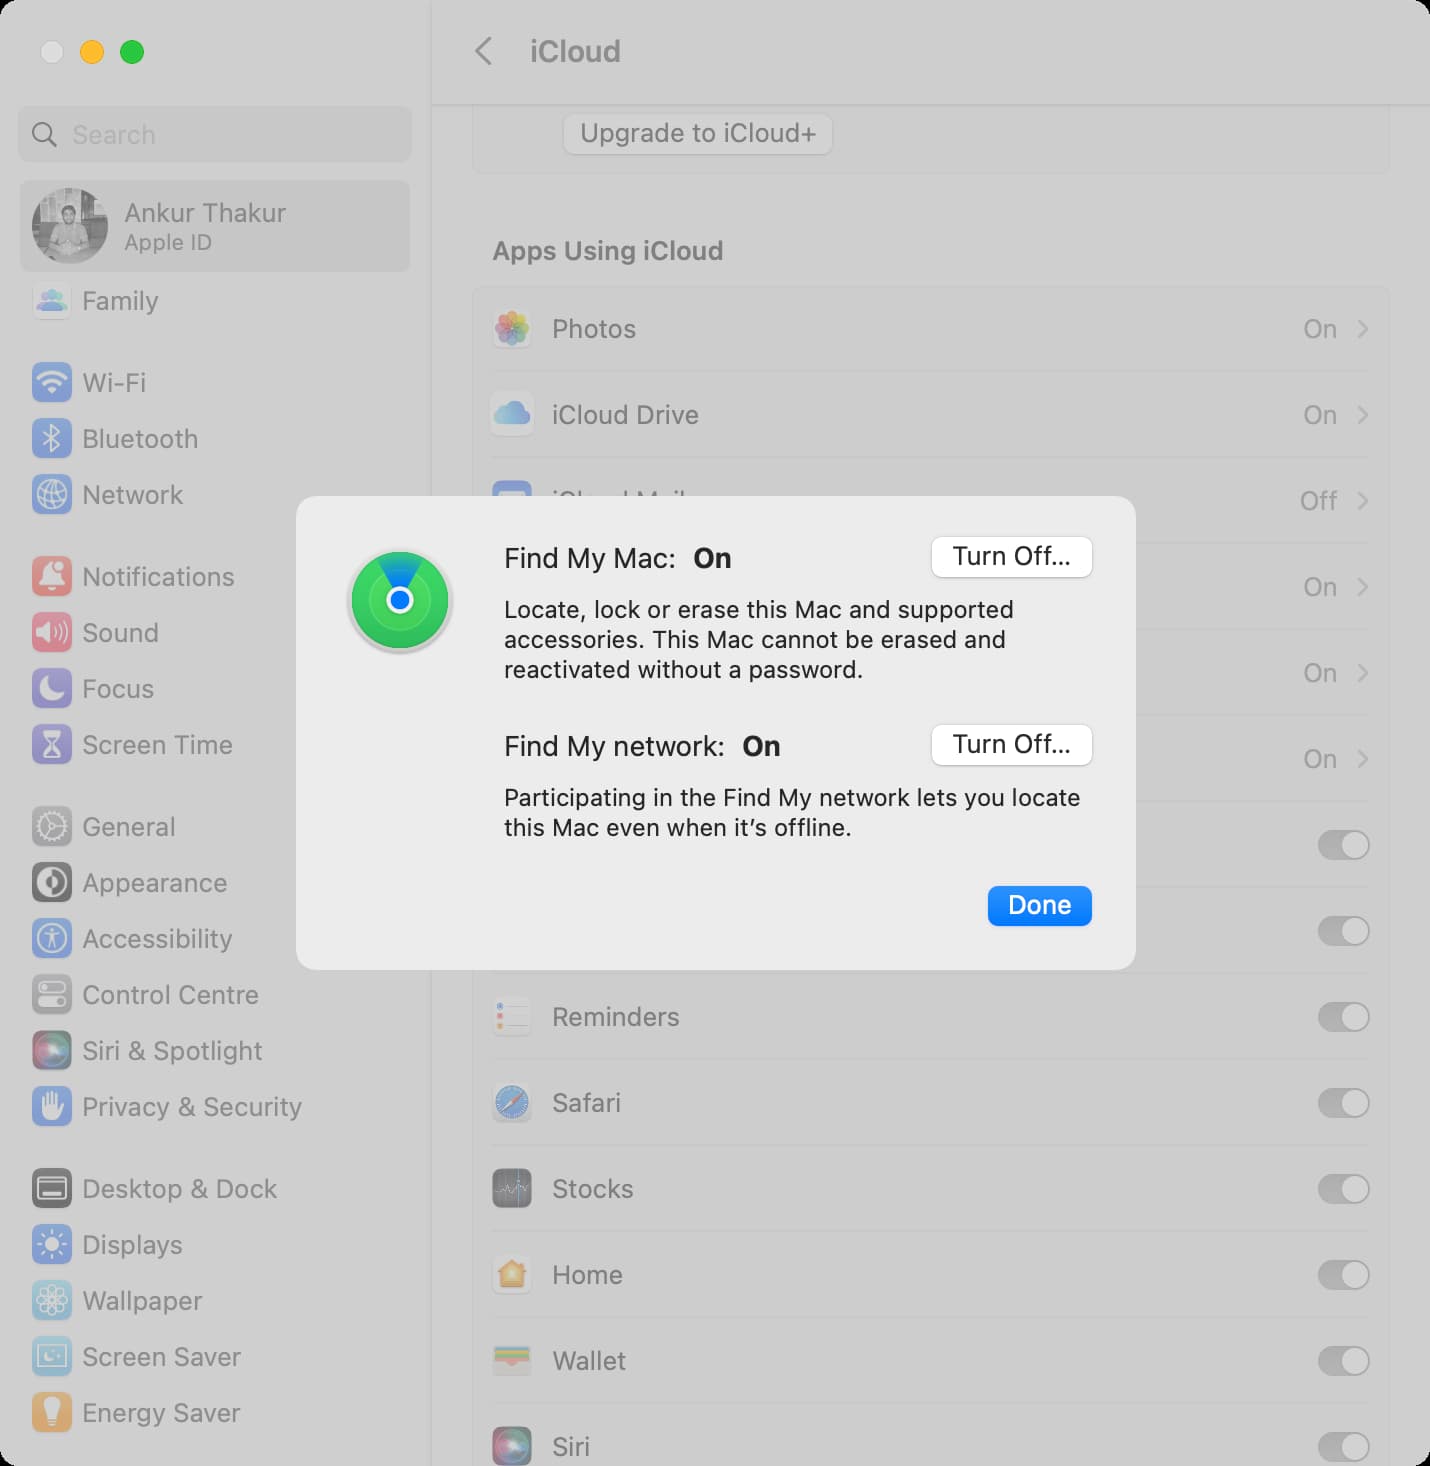
18. Don’t flip off Discover My
Discover My service is mechanically enabled once you arrange your Mac and log in utilizing your Apple ID. It’s a security characteristic that allows you to know the placement, play a sound, show a message, and remotely erase all knowledge out of your Mac. Plus, the added Activation Lock prevents anybody else from utilizing it until they enter your Apple ID password.
Total, it’s a really useful characteristic, and you need to not flip it off. You’ll be able to entry it in System Settings > Apple ID > iCloud > Present All > Discover My Mac.
These have been among the sensible methods to safe your Mac. What else do you utilize in your Mac that may come in useful in defending your knowledge? Please share with us within the feedback.
Try subsequent: