
FileVault hardens macOS by wrapping a layer of login safety across the a part of the startup quantity that holds your information and different information. With FileVault disabled, the info on that quantity is successfully only one password away between an attacker and your information. That’s a harmful scenario if somebody has bodily entry to your pc–in your house or workplace or as a result of they’ve stolen it–they may be capable of make use of identified and not-yet-discovered strategies to bypass the login and entry the drive’s contents.
FileVault on all Macs places a further bar in place: your startup quantity (or, as within the case with macOS Catalina and later, the startup information quantity) is encrypted and its information are unavailable except and till there’s been a profitable macOS login. Solely after the login does macOS enter its regular operation mode. For Intel Macs and not using a T2 Safety Chip, FileVault additionally encrypts the contents of the startup quantity’s information when the pc is powered down. Intel Macs with a T2 Safety Chip and on all M1 Apple silicon Macs all the time encrypt this information. (Learn our clarification about how T2 and M1 Macs work together with FileVault.)
The sturdy safety FileVault provides generally is a double-edged sword: it could deter attackers with bodily entry nevertheless it might block you, too. Suppose you overlook your password (unlikely, I hope!). Or one thing in macOS breaks or is corrupted within the account login course of or information–additionally unlikely, however judging by reader e-mail, it occurs once in a while. In these circumstances, you could be unable to realize entry with out possessing a part of the FileVault setup course of.
Once you allow FileVault, macOS generates a Restoration Key that gives last-ditch entry if account-based entry fails. You’ll be able to both retain that key privately or retailer it securely in iCloud, with Apple holding it in escrow for you. (For those who can’t instantly discover your Restoration Key or keep in mind whether or not or not you selected the iCloud escrow possibility, learn, “Is your macOS FileVault Restoration Key present? Right here’s verify.“)
Regardless of Apple having you depend on the FileVault Restoration Key to allow you to regain entry to your Mac or to reset your account password while you’ve forgotten it, the corporate doesn’t present a single set of easy directions in a single place for a way this works for the a number of circumstances you may encounter. Right here’s our information to these situations.
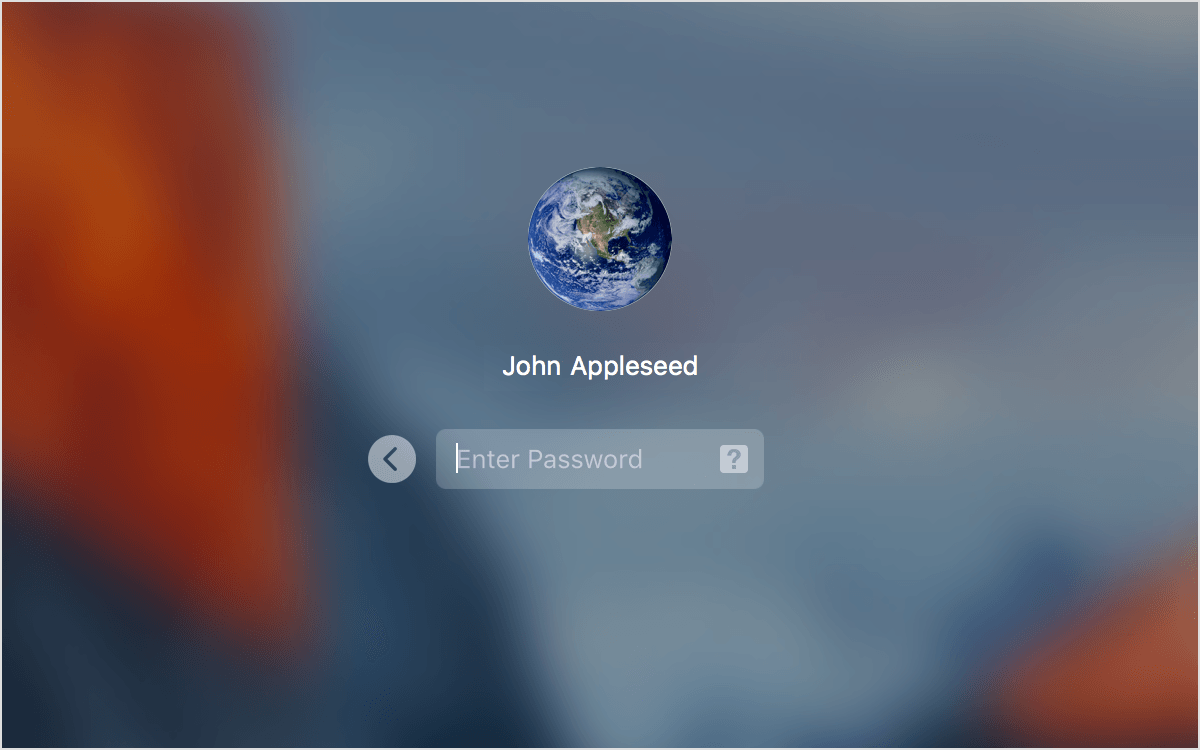
Recuperate by way of login window
First, begin up your Mac if it’s powered down. (For those who’re making an attempt to reset the password and your Mac is booted and logged in, select > Restart.)
Apple
Subsequent, on the login display click on your account icon:
- In macOS Catalina and later, a password area seems with a query mark (?) on the far proper. Click on the query mark. Some prolonged textual content seems that begins, “For those who forgot your password you’ll be able to…”
- In macOS Mojave and earlier, you need to enter your password incorrectly 3 times earlier than a immediate seems.
Now, relying in your alternative in organising FileVault, you will notice certainly one of a number of choices (the textual content might fluctuate in Mojave and earlier releases of macOS):
- iCloud escrow: For those who selected to retailer your key in iCloud throughout FileVault setup, the sentence above continues, ellipsis and all, “…reset it utilizing your Apple ID.” Click on the right-pointing arrow and observe the steps offered to log into the iCloud account related to this Mac. This may recuperate your key, unlock the drive, and allow you to reset your account password.
- You saved the Restoration Key: For those who opted to write down down the Restoration Key, the textual content will proceed “…reset it utilizing your Restoration Key.” Click on the right-pointing arrow after which enter your Restoration Key, omitting hyphens–macOS provides the hyphens mechanically. When accurately entered, your drive is unlocked, and you’ll reset your account password.
Apple notes that–in some circumstances that the corporate doesn’t outline–you may see the textual content “Restart and present password reset choices.” In that case, click on the right-pointing triangle. After your Mac restarts, you’ll be requested for both an Apple ID login or your Restoration Key as above. As an alternative of first choosing a consumer after which coming into that info, on this mode you enter your restoration particulars first and then choose the consumer for which you’re resetting the password to regain entry.
If not one of the above works, you’ll be able to strive utilizing macOS Restoration.
Recuperate by way of macOS Restoration
The method differs by processor. With an Intel Mac:
- Restart or press the facility button after which maintain down Command-R till the Apple emblem seems and the progress bar on loading the working system begins to fill.
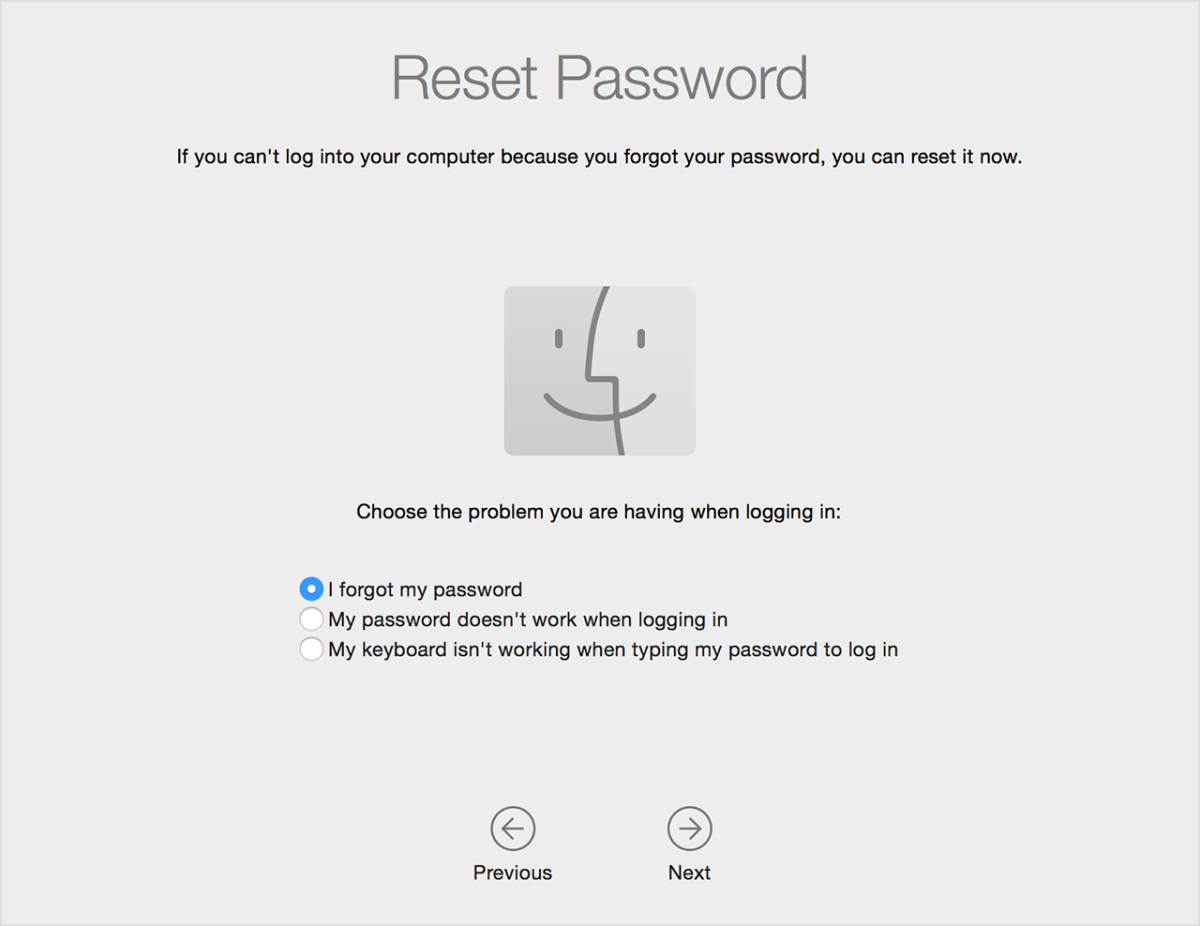
- When the macOS Restoration display seems, select Utilities > Terminal.
- Enter the textual content
resetpasswordand press return. - macOS Restoration launches the particular Reset Password assistant. Choose the choice, “My password doesn’t work when logging in” and click on Subsequent, then observe the remaining steps.
With an M1 Mac, the steps are a little bit extra concerned:
- Shut down the Mac if energetic.
- Maintain down the facility button to begin up and proceed holding it till you see the message “Loading startup choices.” That takes about 10 seconds. Launch the facility button.
- Click on the Choices icon.
- If offered with an inventory of accounts you should utilize to log in to entry macOS Restoration, click on “Forgot all passwords?” You might also or as a substitute be capable of use your Apple ID to log in.
- When the macOS Restoration display seems, select Utilities > Terminal.
- Enter the textual content
resetpasswordand press return. - macOS Restoration launches the particular Reset Password assistant. Choose the choice “My password doesn’t work when logging in” and click on Subsequent, then observe the remaining steps.
This Mac 911 article is in response to a query submitted by Macworld reader Julio.
Ask Mac 911
We’ve compiled an inventory of the questions we get requested most regularly, together with solutions and hyperlinks to columns: learn our tremendous FAQ to see in case your query is roofed. If not, we’re all the time on the lookout for new issues to resolve! E mail yours to [email protected], together with display captures as applicable and whether or not you need your full identify used. Not each query can be answered, we don’t reply to e-mail, and we can not present direct troubleshooting recommendation.