
After set up, you’ll discover that NixOS is kind of totally different from general-purpose Linux distributions.
After all, as one of many superior Linux distributions, it could not really feel proper at dwelling to most new customers.
In case you have no idea why it’s best to use NixOS, and attempting it out of curiosity, it’s vital to know who it’s for earlier than continuing.
Whereas I assume you put in the distro already, if it’s your first time, I recommend putting in NixOS on a digital machine.
1. Replace packages
Updates would all the time be there even in the event you used the newest ISO for the set up. So why not begin by updating the packages?
To improve packages, first, you’ll have to test for updates in added channels:
nix-channel --updateAfter which, use the next command to put in these updates (if any):
sudo nixos-rebuild change --upgradeThat is it! It would handle the remainder.
2. Change hostname in NixOS
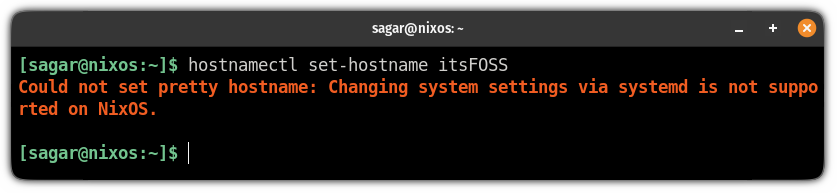
In case you attempt the standard approach of altering the hostname (utilizing the hostnamectl command), it is going to throw the next error:
With NixOS, you possibly can change the hostname simply utilizing its essential config file, which you’ll entry utilizing the next command:
sudo nano /and so on/nixos/configuration.nixOn this config file, search for the next line:
networking.hostName = "nixos";And alter it to:
networking.hostName = "Your_Hostname";For instance, I modified my hostname to itsFOSS:
networking.hostName = "itsFOSS";
Now, save adjustments and exit from the nano textual content editor.
To take impact from the change you made to hostname, execute the next command:
sudo nixos-rebuild changeAnd at last, reopen the terminal, and the change in hostname ought to mirror.
Steered Learn 📖
Vim vs Nano: What Ought to You Select?
Vim and Nano are two fashionable terminal textual content editors. How are they totally different? What’s greatest for you? Allow us to discover out.

3. Setup Flatpak
I do know what you may be considering. The Nix package deal supervisor already provides a plethora of packages. So, why do you want Flatpak?
Putting in what you want might be a bit time-consuming for first-time customers. So, Flatpak ought to make issues handy for you.
Establishing Flatpak is just not the identical as you do on Ubuntu.
To setup Flatpak, you’ll have to make adjustments to the configuration.nix file, which may be accessed utilizing the next:
sudo nano /and so on/nixos/configuration.nixGo to the top of the road in nano and add the next line earlier than the }:
companies.flatpak.allow = true;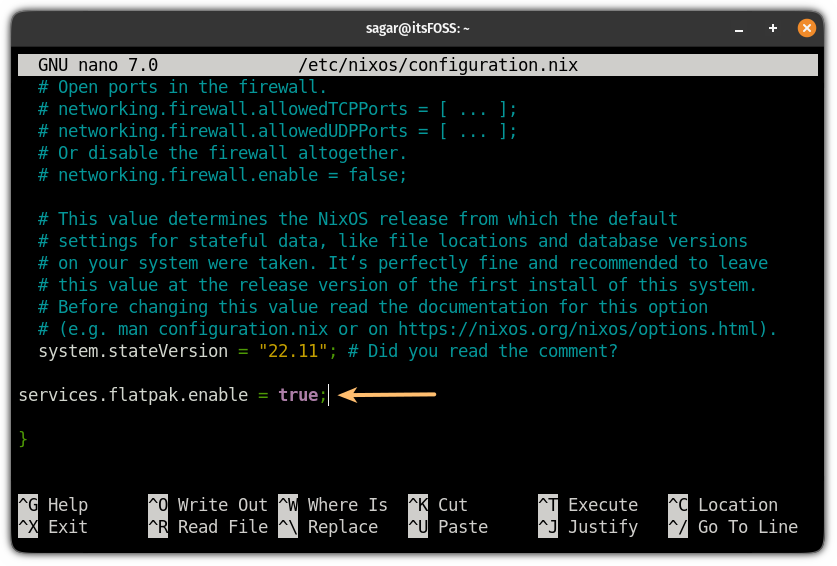
Save adjustments by urgent Ctrl + O, hit enter and exit by Ctrl + X.
Subsequent, rebuild and change to the brand new config file utilizing the next command:
sudo nixos-rebuild changeAnd at last, add the Flathub repository to the system utilizing the next command:
flatpak remote-add --if-not-exists flathub https://flathub.org/repo/flathub.flatpakrepoWish to know what precisely is a Flatpak package deal? You may discuss with our article on it:
What’s Flatpak? All the things Necessary You Must Know About This Common Packaging System
What are Flatpak packages? Why is it referred to as a common packaging system, what drawback does it resolve and the way does it work? Find out about Flatpak.

4. Allow rubbish assortment
NixOS is understood for being immutable, and there’s a sturdy cause why.
Everytime you improve a package deal, the outdated package deal will not be eliminated. Simply the symlinks of the outdated package deal will probably be given to the newest model.
And doing that, you’ll acquire pointless trash out of your system.
However eradicating each outdated era will falsify the aim of NixOS.
So, in that case, you possibly can configure your system to take away rubbish packages weekly.
To do this, first, open the nix configuration file:
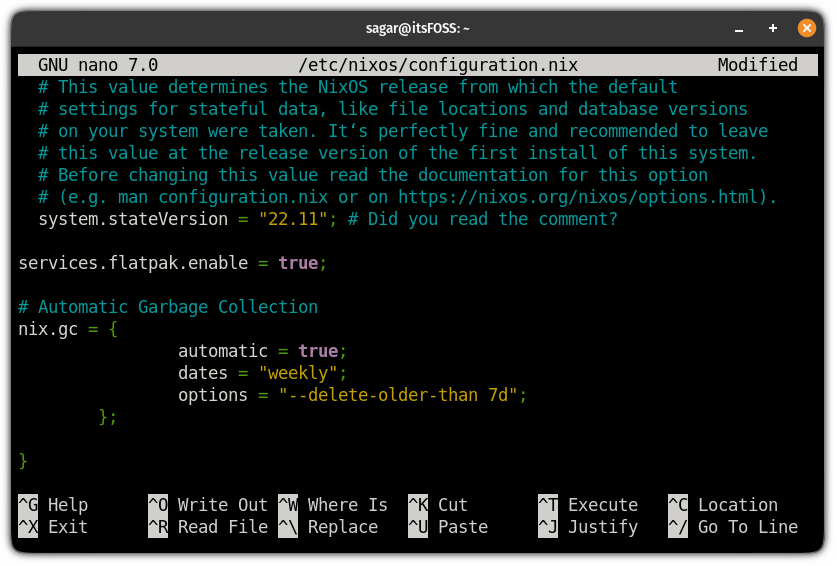
sudo nano /and so on/nixos/configuration.nixAnd add the next line on the finish of the config file earlier than }:
# Automated Rubbish Assortment
nix.gc = {
                computerized = true;
                dates = "weekly";
                choices = "--delete-older-than 7d";
        };
Save adjustments and exit from the nano textual content editor.
To activate the rubbish assortment, rebuild and change to the brand new config file:
sudo nixos-rebuild changeIf you’re unsure whether or not the rubbish collector is operating advantageous within the background, you possibly can checklist energetic timers utilizing the next command:
systemctl list-timers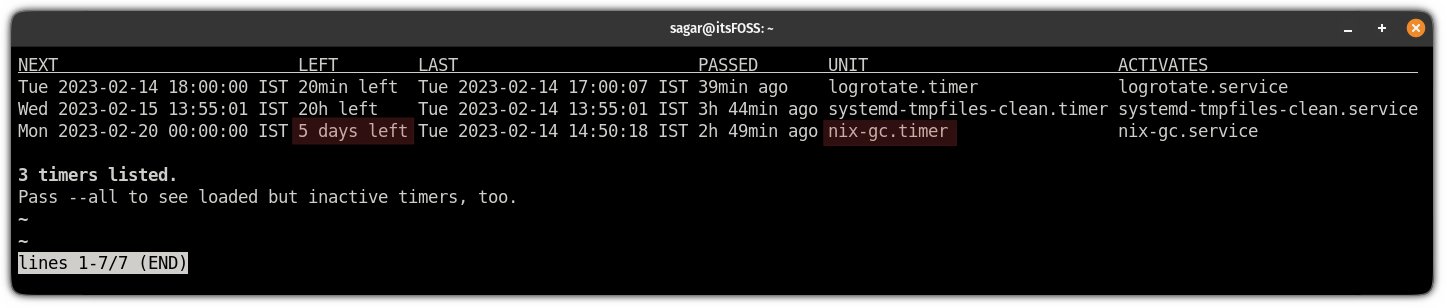
And as you possibly can see, the Nix rubbish collector is operating as anticipated and reveals 5 days left for the following cleanup.
5. Set up your favourite software program
I imply that is the one cause why we use computer systems. “To make use of our favourite software program,” and if there’s none, we make it occur!
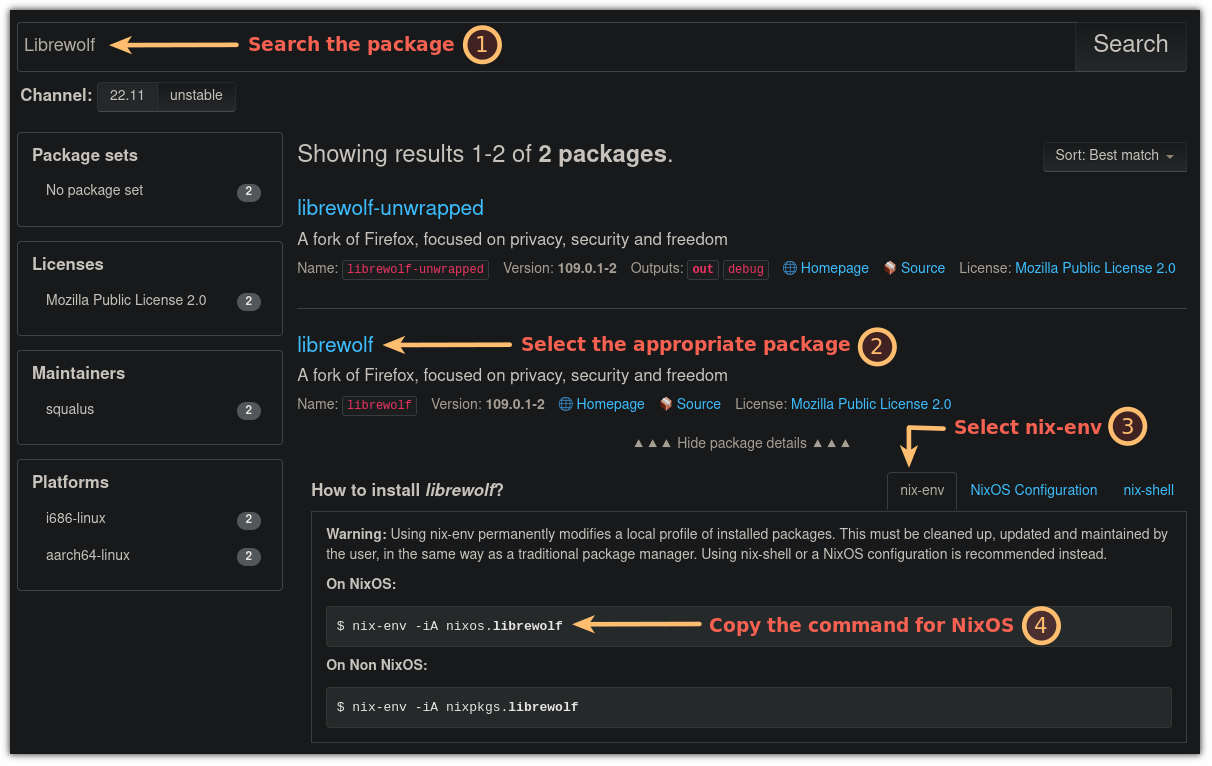
The perfect place to search for packages is the Nix package deal search which may be accessed utilizing any of your most popular browsers.
- Search package deal
- Choose the package deal
- Click on on
nix-envand replica the given command forNixOS - Execute that command, and that is it
You may test our NixOS package deal administration information to get all the main points.
Let me provide you with a fast recap right here. For instance, right here, I need to set up Librewolf, so I went with the next:
However if you wish to set up companies like SSH or plex, the above technique will not work.
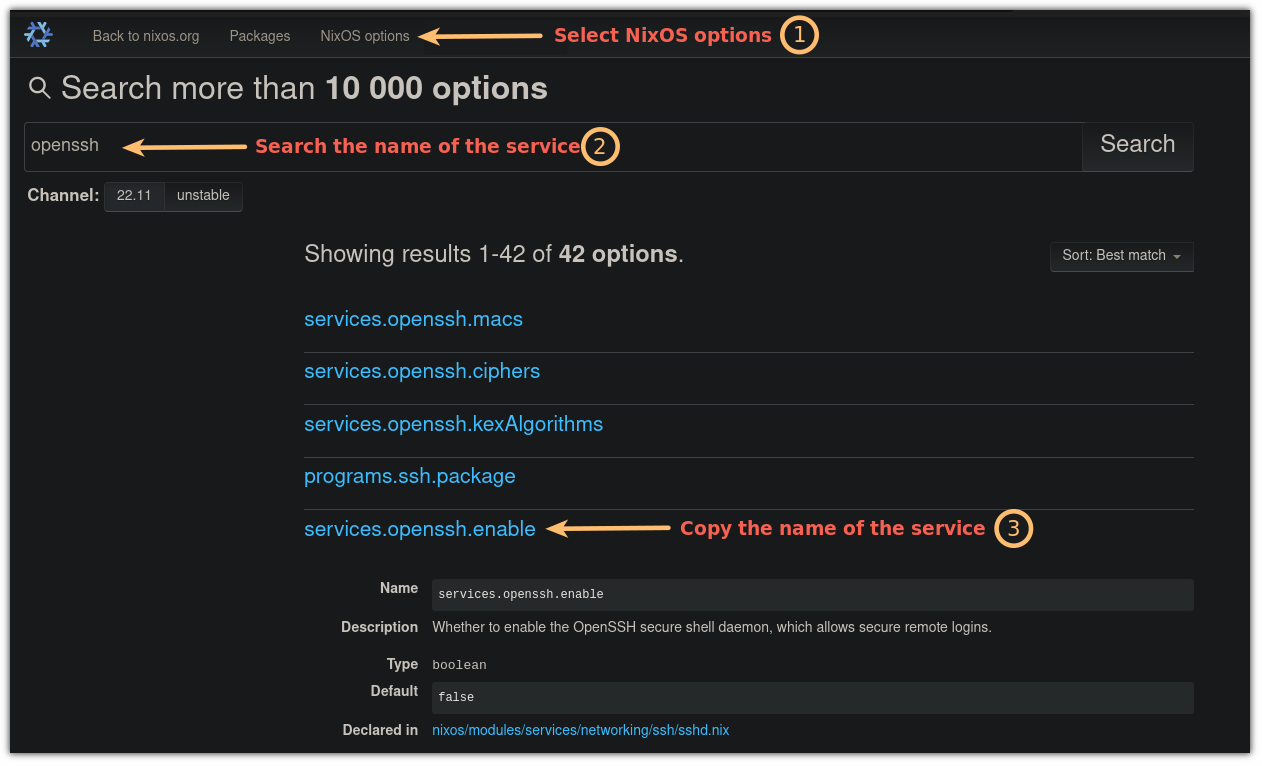
For that, you’ll have to look into NixOS choices located on the high of the web page.
So for instance I need to set up OpenSSH, so I’ve to observe the given steps:
- Go to
NixOS choices - Search the identify of the service
- Get the identify of the service and paste it to the
configuration.nixby altering its worth totrue
companies.openssh.allow = true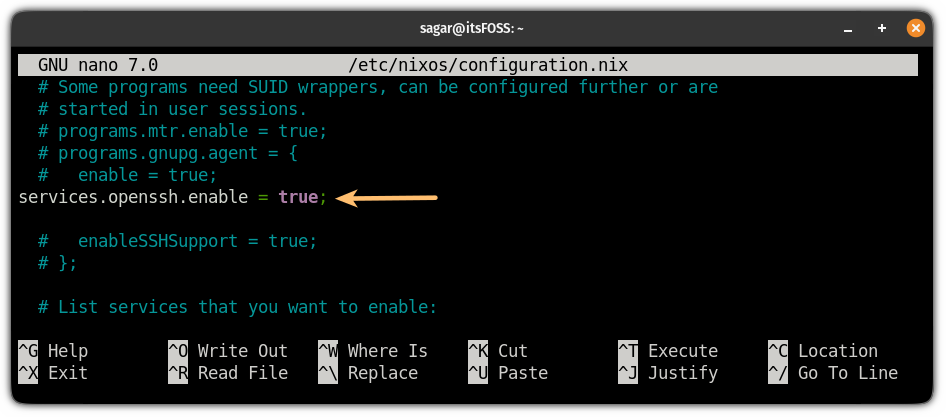
After including the road to the config file, rebuild the service:
sudo nixos-rebuild change6. Allow auto-update in NixOS (non-compulsory)
Some customers want to have auto-updates enabled, whereas others can replace packages at their comfort.
So it’s all as much as you.
To allow auto-update, first open the configuration.nix file:
sudo nano /and so on/nixos/configuration.nixSubsequent, add the next line on the finish of the config file earlier than }:
# Auto system replace
system.autoUpgrade = {
      allow = true;
};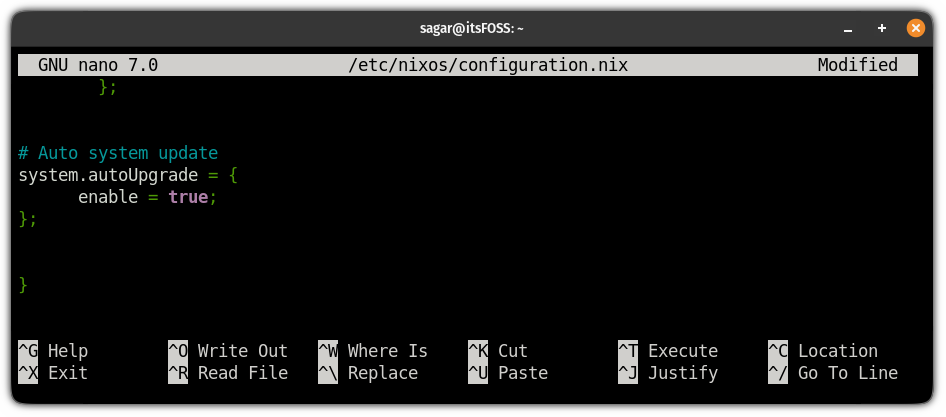
Save adjustments and exit from the nano.
To allow the auto-update, you’ll have to rebuild and change to that file utilizing the next:
sudo nixos-rebuild changeYou may also test the NixOS improve timer utilizing the next command:
systemctl list-timers
And as you possibly can see, the nixos-upgrade.service is operating within the background as supposed!
7. Cut back swapiness
If you’re using the swap partition, chances are you’ll need to cut back the swapiness worth.
Swapiness is nothing however the worth of how aggressively you need to use the swap partition (or reminiscence), which ranges from 0 to 100.
The lesser the swapiness, the extra your system will use the bodily reminiscence (RAM), whereas a swap partition is nothing however a little bit of a part of your storage drive.
Additionally, storage drives are comparatively slower than RAM, so it’s best to cut back the swapiness if potential.
Steered Learn 📖
How A lot Swap Ought to You Use in Linux?
How a lot ought to be the swap dimension? Ought to the swap be double of the RAM dimension or ought to it’s half of the RAM dimension? Do I want swap in any respect if my system has obtained a number of GBs of RAM? Maybe these are the most typical requested questions on selecting

To test the default swapiness of your system, use the next:
cat /proc/sys/vm/swappiness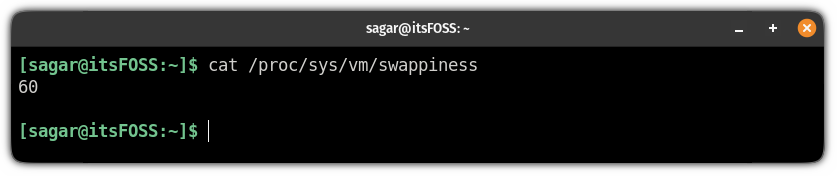
And for many Linux distributions, it’s set to 60.
I’d suggest you decrease this worth to 10.
To do this, first, open the configuration file utilizing the next command:
sudo nano /and so on/nixos/hardware-configuration.nixAnd add the next line on the finish of the road earlier than }:
boot.kernel.sysctl = { "vm.swappiness" = 10;};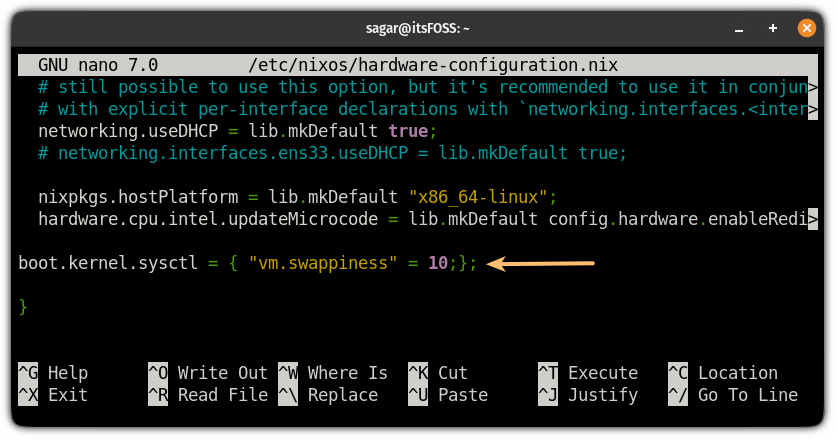
Save adjustments and exit from the textual content editor.
Now, rebuild the config and change to it utilizing the next:
sudo nixos-rebuild changeAnd now, you possibly can test the swapiness once more and it ought to mirror the change:
cat /proc/sys/vm/swappiness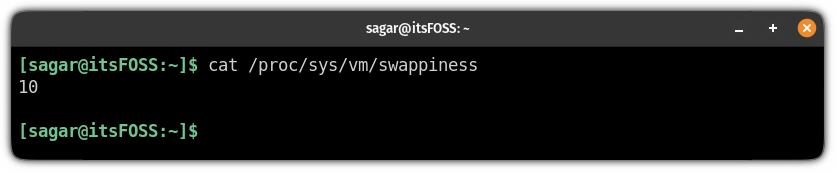
That is it!
Wrapping Up
In case you observe these factors proper after putting in NixOS for the primary time, it’s best to get an excellent consumer expertise.
Positive, there could be a few different issues relying in your necessities. However, I feel the above-mentioned issues are probably the most important or frequent issues to do.
For the following a part of this sequence, I shall talk about establishing the house supervisor on NixOS, which ought to be useful for a system with a number of customers.
💬 What do you first do after putting in NixOS? Let me know your ideas.