

Whenever you’re constructing apps, the entry barrier to some options, together with textual content recognition, is excessive. Even skilled coders take a variety of time and code to get textual content recognition working in video.
DataScannerViewController from the highly effective VisionKit is a self-contained scanner for textual content and barcodes that removes a lot of the difficulties from this activity.
If it is advisable get textual content data into your app, this API could be for you. Inconveniently, DataScannerViewController is a UIViewController and isn’t instantly uncovered to SwiftUI. That’s OK as a result of UIKit isn’t going away quickly and it’s simple to mix UIKit and SwiftUI.
On this tutorial, you’ll discover ways to use and customise DataScannerViewController in a UIKit based mostly app whereas mixing in SwiftUI parts.
To do that tutorial, you want:
- Xcode 14.0.1 or larger.
- An iPhone or iPad working iOS 16 with an A12 Bionic processor or higher (Late 2017 ahead).
- Primary SwiftUI information.
Getting Began
Slurpy is an app that makes use of DataScannerViewController to seize textual content and barcodes and retailer them for future use. For instance, a scholar visiting a museum may use Slurpy to seize textual content from exhibit data playing cards for later use.
Obtain the challenge utilizing the Obtain Supplies hyperlink on the prime or backside of the tutorial. Open Starter, after which open Slurpy.xcodeproj.
You’ll construct to your gadget for this tutorial. Join the gadget to your Mac and choose it because the run vacation spot. The identify within the bar will likely be your gadget’s identify.
![]()
Choose the challenge file within the Venture navigator:
- Choose the goal Slurpy.
- Swap to the Signing and Capabilities tab.
- Set your personal Growth Staff.
- Change the Bundle ID to your particular staff worth.

Construct and run. You’ll see a premade tabbed interface with two tabs, Ingest and Use, to maintain you centered on the cool content material. Subsequent, you’ll add DataScannerViewController to your interface.

Utilizing DataScannerViewController
On this part, you’ll create and configure the DataScannerViewController from VisionKit and add it to the interface’s Ingest tab. Quickly you’ll have the ability to see what the digicam acknowledges within the view.
Making a Delegate
Delegate protocols, or the delegation sample, are widespread all via the Apple SDKs. They aid you change a category conduct with no need to create a subclass.
Within the Venture navigator, within the group ViewControllers, open ScannerViewController.swift. You’ll see an empty class declaration for ScannerViewController.
Beneath the road import UIKit, add the import assertion:
import VisionKit
Subsequent, add the next code on the backside of ScannerViewController.swift:
extension ScannerViewController: DataScannerViewControllerDelegate {
  func dataScanner(
    _ dataScanner: DataScannerViewController,
    didAdd addedItems: [RecognizedItem],
    allItems: [RecognizedItem]
  ) {
  }

  func dataScanner(
    _ dataScanner: DataScannerViewController,
    didUpdate updatedItems: [RecognizedItem],
    allItems: [RecognizedItem]
  ) {
  }

  func dataScanner(
    _ dataScanner: DataScannerViewController,
    didRemove removedItems: [RecognizedItem],
    allItems: [RecognizedItem]
  ) {
  }

  func dataScanner(
    _ dataScanner: DataScannerViewController,
    didTapOn merchandise: RecognizedItem
  ) {
  }
}
On this extension, you conform ScannerViewController to the protocol DataScannerViewControllerDelegate. DataScannerViewControllerDelegate has strategies which can be referred to as when DataScannerViewController begins recognizing or stops recognizing objects in its discipline of view.
You’ll come again right here later after getting the scanner working. For now, this extension should exist to stop compiler errors.
Subsequent, you’ll prolong DataScannerViewController with a operate that instantiates and configures it to your wants.
Extending DataScannerViewController
On this part, you’ll make a DataScannerViewController and set it as much as scan textual content and barcodes.
Add this extension on the backside of ScannerViewController.swift:
extension DataScannerViewController {
  static func makeDatascanner(delegate: DataScannerViewControllerDelegate)
    -> DataScannerViewController {
    let scanner = DataScannerViewController(
      recognizedDataTypes: [
         // restrict the types here later
         .text()
      ],
      isGuidanceEnabled: true,
      isHighlightingEnabled: true
    )

    scanner.delegate = delegate
    return scanner
  }
}
In makeDatascanner, you instantiate DataScannerViewController. The primary argument to init, recognizedDataTypes is an array of RecognizedDataType objects. The array is empty for now — you’ll add gadgets you need to acknowledge quickly.
The arguments isGuidanceEnabled and isHighlightingEnabled add further UI to the view that will help you find objects. Lastly, you make ScannerViewController the delegate of DataScannerViewController. This property project connects the DataScannerViewControllerDelegate strategies you added earlier than.
Including the Scanner to the View
You’re prepared so as to add the scanner to the view. On the prime of ScannerViewController.swift, find the category declaration for ScannerViewController and add the next inside the category physique:
var datascanner: DataScannerViewController?
You’ll hold a reference to the scanner you create so you can begin and cease the scanner. Subsequent, add this methodology to the category physique:
 func installDataScanner() {
  // 1.
  guard datascanner == nil else {
    return
  }

  // add guard right here

  // 2.
  let scanner = DataScannerViewController.makeDatascanner(delegate: self)
  datascanner = scanner
  addChild(scanner)
  view.pinToInside(scanner.view)

  // 3.
  addChild(scanner)
  scanner.didMove(toParent: self)

  // 4.
  do {
    strive scanner.startScanning()
  } catch {
    print("** oh no (unable to begin scan) - (error)")
  }
}
On this code you:
- Examine for an current scanner so that you don’t add one twice.
- Create a scanner utilizing
makeDatascannerthen pin the view ofDataScannerViewControllercontained in thesafeAreaLayoutGuidespace ofScannerViewController.pinToInsideis an Auto Format helper included with the starter challenge. - Add your
DataScannerViewControllertoScannerViewControlleras a baby view controller, then inform the scanner it moved to a father or mother view controller. - Begin the
DataScannerViewController.
Final, you’ll name installDataScanner when the view seems. Add this code contained in the physique of ScannerViewController:
override func viewDidAppear(_ animated: Bool) {
  tremendous.viewDidAppear(animated)
  installDataScanner()
}
You’re prepared to fireplace up the app! Construct and run. You’ll see the app instantly crashes with a console message just like this:
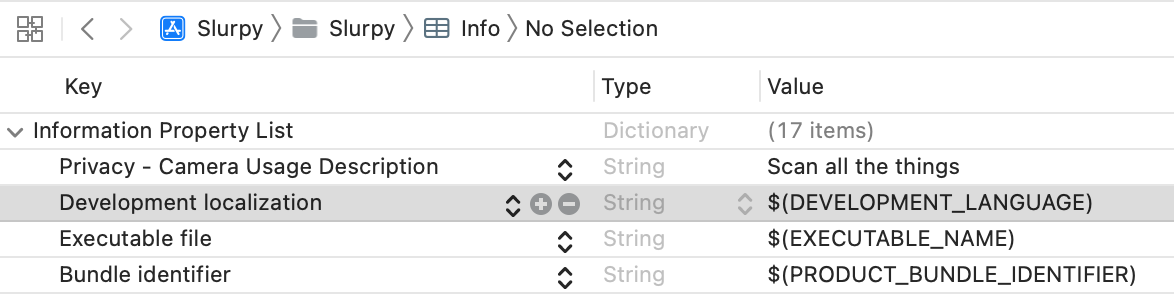
[access] This app has crashed as a result of it tried to entry privacy-sensitive information with out a utilization description. The app's Information.plist should comprise an NSCameraUsageDescription key with a string worth explaining to the person how the app makes use of this information.
When an app must entry the digicam, it should clarify why it must be permitted. You’ll add the required key subsequent.
Including Digital camera Utilization Description
Now it is advisable change the Information.plist to get your app working.
- Find and open Information.plist within the Venture navigator.
- Copy this key, NSCameraUsageDescription.
- Choose the highest degree object Info Property Checklist
- Click on the + management that seems so as to add a worth to the dictionary.
- Within the discipline that seems, paste the important thing NSCameraUsageDescription and press Return. You’ll see the important thing modifications to a human-readable worth of Privateness — Digital camera Utilization Description.
- Add the outline Scan all of the issues to the Worth discipline.
Construct and run. You’ll see a permission alert seem with the textual content from the digicam utilization description you added.

Contact OK to grant permission. You now have a working digicam.
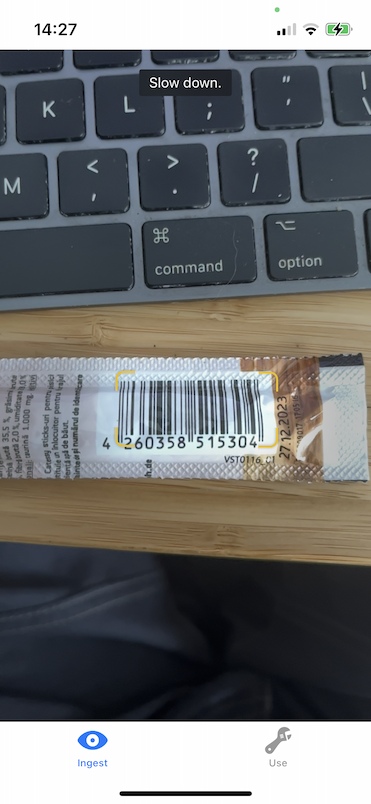
Level your digicam at some textual content, and also you’ll see a bounding rectangle. This conduct is toggled by isHighlightingEnabled, which you met earlier.
The default state for DataScannerViewController is to acknowledge every part it may. That’s enjoyable, however it won’t be what you need. Within the subsequent part, you’ll discover ways to restrict DataScannerViewController to solely acknowledge what you want.
Limiting Acknowledged Varieties
Barcode Symbologies
A barcode symbology is an ordinary coding methodology for a bit of information. When you encode your information utilizing QR symbology, anyone with a QR reader can decode it.
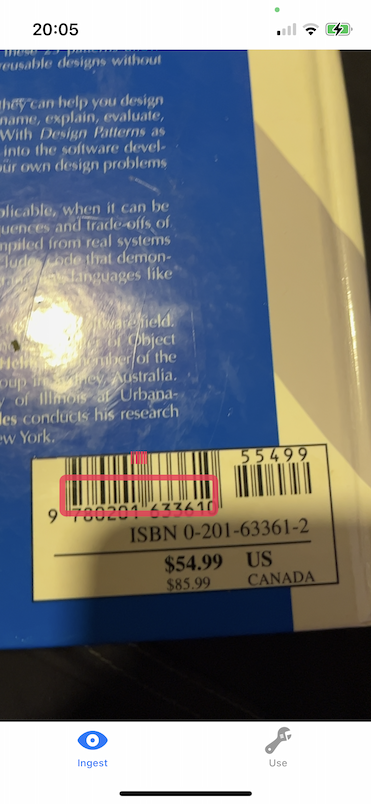
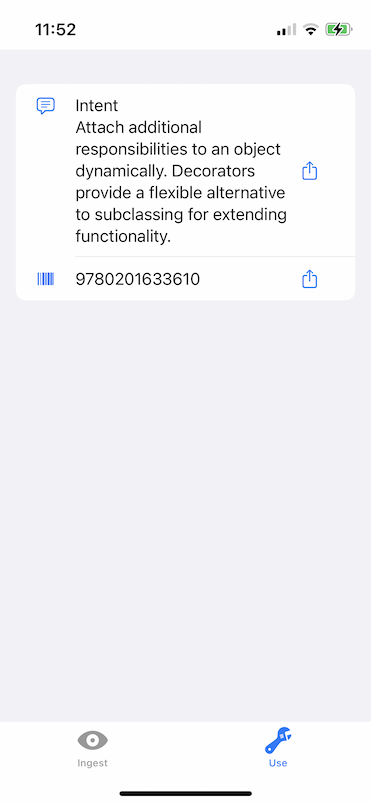
As an example, say your museum or library customer wish to scan some textual content or the ISBN of a e book. An ISBN is a 13-digit quantity. An ISBN ought to use EAN-13 symbology in barcode format, so that you’ll limit your scanning to that sort.
VNBarcodeSymbology declares all the categories you could learn with VisionKit. Amongst these varieties is the EAN-13 customary.
Configuring the Scanner
In ScannerViewController, find makeDatascanner and discover the remark // add varieties right here.
Delete the remark, then add this code to the array within the parameter recognizedDataTypes:
.barcode(
  symbologies: [
    .ean13
  ]),
.textual content(languages: ["en", "pt"])
You advised the DataScannerViewController to search for one sort of barcode and English or Portuguese textual content. Be at liberty to customise the languages array with the ISO 639-1 language code on your personal nation.
Construct and run, then scan the barcodes above once more. Discover how Slurpy locks onto the barcodes faster and spends much less time leaping round locking onto different gadgets within the discipline of view.
Customizing the Scanner View
The UI that DataScannerViewController offers is efficient, however say you need one thing else. Pink is scorching proper now, so that you’ll study to make a customized information rectangle subsequent.
DataScannerViewController has a property overlayContainerView. Views positioned inside this container gained’t intrude with the hit testing within the scanner, which suggests you’ll be able to nonetheless contact gadgets so as to add them to your catalog. You’ll make a SwiftUI-based renderer for the acknowledged gadgets you scan.
Including a Mannequin
You’re on the level in your app the place you want a mannequin layer to maintain monitor of the objects that DataScannerViewController acknowledges. The starter challenge features a easy mannequin layer to save lots of time and hold the give attention to the tutorial subject.
DataScannerViewController makes use of VisionKit.RecognizedItem to explain an object that it sees.
Within the Venture navigator, open Mannequin. Then open TransientItem.swift. TransientItem is a wrapper round RecognizedItem. You’ve gotten this construction so your app isn’t depending on the information construction of RecognizedItem.
The subsequent information construction is StoredItem.swift. StoredItem is Codable and might be continued between classes.
The final file within the Mannequin group is DataStore.swift. DataStore is an ObservableObject and a container for each StoredItem that you simply need to hold and TransientItem that DataScannerViewController acknowledges throughout a scanning session.
DataStore manages entry to the 2 @Printed collections, collectedItems and transientItems. You’ll plug it into your SwiftUI code later.
Within the subsequent part, you’ll use this mannequin to construct an overlay view.
Creating an Overlay View
You’re now able to create that cool Nineteen Eighties-inspired interface you’ve at all times needed. Within the Venture navigator, choose the Views group.
- Press Command-N to current the File Template picker.
- Choose SwiftUI View and press Subsequent.
- Title the file Highlighter.swift and press Create.
In Highlighter.swift, exchange every part inside Highlighter with:
@EnvironmentObject var datastore: DataStore

var physique: some View {
  ForEach(datastore.allTransientItems) { merchandise in
    RoundedRectangle(cornerRadius: 4)
      .stroke(.pink, lineWidth: 6)
      .body(width: merchandise.bounds.width, peak: merchandise.bounds.peak)
      .place(x: merchandise.bounds.minX, y: merchandise.bounds.minY)
      .overlay(
        Picture(systemName: merchandise.icon)
          .place(
            x: merchandise.bounds.minX,
            y: merchandise.bounds.minY - merchandise.bounds.peak / 2 - 20
          )
          .foregroundColor(.pink)
      )
  }
}
On this View, you draw a RoundedRectangle with a pink stroke for every acknowledged merchandise seen. Above the rectangle, you present an icon that reveals whether or not the merchandise is a barcode or textual content. You’ll see this in motion quickly.
Internet hosting a SwiftUI View
Within the Venture navigator, open the ViewControllers group after which open PaintingViewController.swift. Add this import above PaintingViewController:
import SwiftUI
Add this code inside PaintingViewController:
override func viewDidLoad() {
  tremendous.viewDidLoad()

  let paintController = UIHostingController(
    rootView: Highlighter().environmentObject(DataStore.shared)
  )
  paintController.view.backgroundColor = .clear
  view.pinToInside(paintController.view)
  addChild(paintController)
  paintController.didMove(toParent: self)
}
Right here you wrap Highlighter in a UIHostingController and inject the shared occasion of DataStore into the view hierarchy. You’ll use this sample a number of extra occasions on this tutorial.
The final sequence for internet hosting a SwiftUI View in a UIViewController is:
- Create a
UIHostingControlleron your SwiftUI view. - Add the
viewof theUIHostingControllerto the father or motherUIViewController. - Add the
UIHostingControlleras a baby of the father or motherUIViewController. - Name
didMove(toParent:)to informUIHostingControllerof that occasion.
Open ScannerViewController.swift once more. Contained in the physique of ScannerViewController, add the next property beneath var datascanner: DataScannerViewController?.
let overlay = PaintingViewController()
Subsequent in makeDataScanner, find the parameter isHighlightingEnabled and set it to false so the default UI doesn’t seem below your significantly better model.
Lastly, add this line on the finish of installDataScanner:
scanner.overlayContainerView.pinToInside(overlay.view)
The Highlighter view is now a part of the view hierarchy. You’re virtually able to go.
Utilizing Delegate Strategies
Return to ScannerViewController.swift and find extension ScannerViewController: DataScannerViewControllerDelegate, which you added earlier. There are 4 strategies in that extension.
The highest methodology is:
func dataScanner(
  _ dataScanner: DataScannerViewController,
  didAdd addedItems: [RecognizedItem],
  allItems: [RecognizedItem]
)
This delegate methodology is known as when DataScannerViewController begins recognizing an merchandise. Add this code to the physique of dataScanner(_:didAdd:allItems:):
DataStore.shared.addThings(
  addedItems.map { TransientItem(merchandise: $0) },
  allItems: allItems.map { TransientItem(merchandise: $0) }
)
Right here you map every RecognizedItem to a TransientItem, then ahead the mapped collections to DataStore.
Subsequent, you’ll full the same activity for dataScanner(_:didUpdate:allItems:), which is known as when an merchandise is modified.
Add this code to the physique of dataScanner(_:didUpdate:allItems:):
DataStore.shared.updateThings(
  updatedItems.map { TransientItem(merchandise: $0) },
  allItems: allItems.map { TransientItem(merchandise: $0) }
)
Comply with up with the third delegate dataScanner(_:didRemove:allItems:), which is known as when DataScannerViewController stops recognizing an merchandise.
Add this code to the physique of dataScanner(_:didRemove:allItems:):
DataStore.shared.removeThings(
  removedItems.map { TransientItem(merchandise: $0) },
  allItems: allItems.map { TransientItem(merchandise: $0) }
)
The ultimate delegate, dataScanner(_:didTapOn:), is known as whenever you contact the display screen inside a acknowledged area:
Add this line to the physique of dataScanner(_:didTapOn:):
DataStore.shared.keepItem(TransientItem(merchandise: merchandise).toStoredItem())
keepItem makes use of a StoredItem since you’re attempting to persist the thing, so you change TransientItem to StoredItem utilizing a helper.
In that part, you routed the modifications from DataScannerViewController to DataStore, performing all the required mapping on the shopper facet.
Construct and run to see the brand new hotness.

You now have a scanner able to recording textual content and ISBNs. Subsequent, you’ll construct an inventory to show all of the gadgets you acquire.
Making a Checklist
You’ll use SwiftUI to construct a desk after which put that desk within the app’s second tab, Use.
Making a Desk
Within the Venture navigator, choose Views, then add a brand new SwiftUI View file named ListOfThings.swift.
Delete every part inside ListOfThings, then exchange it with:
@EnvironmentObject var datastore: DataStore

var physique: some View {
  Checklist {
    ForEach(datastore.collectedItems, id: .id) { merchandise in
      // 1.
      HStack {
        Label(
          merchandise.string ?? "<No Textual content>",
          systemImage: merchandise.icon
        )
        Spacer()
        ShareLink(merchandise: merchandise.string ?? "") {
          Label("", systemImage: "sq..and.arrow.up")
        }
      }
    }
    // 2.
    .onDelete { indexset in
      if let index = indexset.first {
        let merchandise = datastore.collectedItems[index]
        datastore.deleteItem(merchandise)
      }
    }
  }
}
This code generates a Checklist. The desk content material is certain to the @Printed array collectedItems from the DataStore occasion.
- Every cell has a label with an icon at the vanguard and a share icon on the trailing edge. A contact gesture presents an ordinary iOS share sheet.
- An ordinary swipe gesture deletes the saved merchandise.
Internet hosting a Desk
As soon as once more, it is advisable embed ListOfThings in a UIHostingController. Within the Venture navigator, go to ViewControllers after which open ListViewController.swift.
Insert this import above ListViewController:
import SwiftUI
Add this code inside ListViewController:
override func viewDidLoad() {
  tremendous.viewDidLoad()

  let datastore = DataStore.shared
  let listController = UIHostingController(
    rootView: ListOfThings().environmentObject(datastore)
  )
  view.pinToInside(listController.view)
  addChild(listController)
  listController.didMove(toParent: self)
}
That’s the identical sample you used when including Highlighter to DataScannerViewController‘s overlay container.
Construct and run.

Scan a e book barcode and faucet on the acknowledged area. Then, scan a bit of textual content. When you can’t discover any of your personal, use those above.
Now whenever you faucet on a acknowledged merchandise, it’s added to the information retailer. Swap to the Use tab, and also you’ll see the gadgets listed.
Contact any merchandise and share the content material utilizing an ordinary share sheet.

Congratulations! You’ve constructed up the core of your app. You may scan barcodes and textual content and share the scanned content material. The app isn’t fairly customer-ready, so subsequent, you’ll carry out duties to make it prepared for a wider viewers.
Working with Availability and Permissions
On this part, you’ll deal with some situations the place the scanner won’t begin. There are two major causes:
- The person’s gadget is just too outdated and doesn’t help DataScannerViewController.
- The person has declined permission to make use of the digicam or has eliminated permission to make use of the digicam.
You’ll cope with dealing with that availability now.
Dealing with System Help Checks
You want some UI to show to customers when their units aren’t supported or obtainable. You’ll create a general-purpose banner to make use of for warning functions.
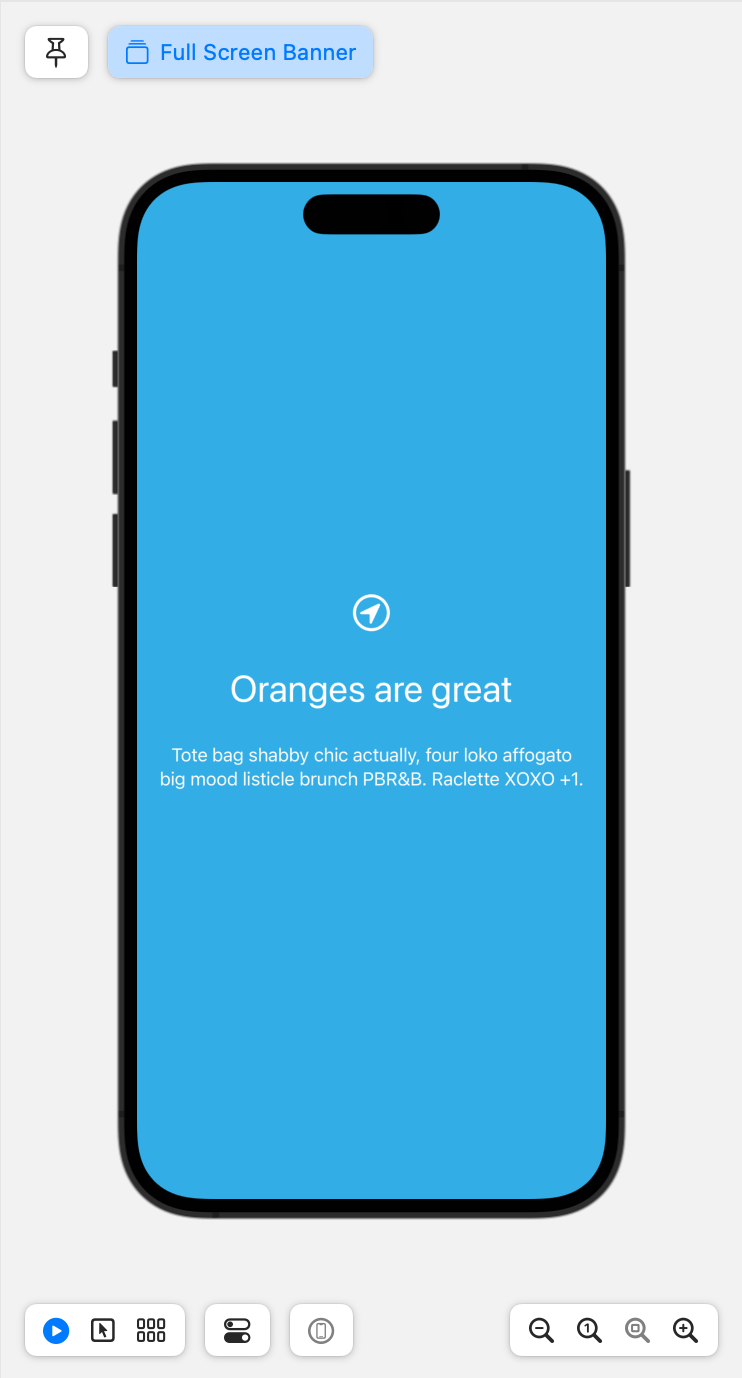
Within the Venture navigator, choose Views and add a brand new SwiftUI View file named FullScreenBanner.swift.
Exchange every part inside FullScreenBanner.swift beneath import SwiftUI with:
struct FullScreenBanner: View {
  var systemImageName: String
  var mainText: String
  var detailText: String
  var backgroundColor: Shade

  var physique: some View {
    Rectangle()
      .fill(backgroundColor)
      .overlay(
        VStack(spacing: 30) {
          Picture(systemName: systemImageName)
            .font(.largeTitle)
          Textual content(mainText)
            .font(.largeTitle)
            .multilineTextAlignment(.heart)
          Textual content(detailText)
            .font(.physique)
            .multilineTextAlignment(.heart)
            .padding(EdgeInsets(prime: 0, main: 20, backside: 0, trailing: 20))
        }
          .foregroundColor(.white)
      )
      .edgesIgnoringSafeArea(.all)
  }
}

struct FullScreenBanner_Previews: PreviewProvider {
  static var previews: some View {
    FullScreenBanner(
      systemImageName: "location.circle",
      mainText: "Oranges are nice",
      detailText: "Lorem ipsum dolor sit amet, consectetur adipiscing elit",
      backgroundColor: .cyan
    )
  }
}
You declare a View with a vertical stack of 1 picture and two textual content blocks. Show the Preview canvas to see what that appears like:
Now, you’ll add a tool help examine to your software logic.
Within the Venture navigator, in ViewControllers, open ScannerViewController.swift.
Add this methodology and property to ScannerViewController:
var alertHost: UIViewController?

func cleanHost() {
  alertHost?.view.removeFromSuperview()
  alertHost = nil
}
In cleanHost, you take away any beforehand put in view from the view hierarchy of ScannerViewController.
Add this import beneath import VisionKit:
import SwiftUI
Now add these two related strategies to ScannerViewController:
func installNoScanOverlay() {
cleanHost()
let scanNotSupported = FullScreenBanner(
systemImageName: "exclamationmark.octagon.fill",
mainText: "Scanner not supported on this gadget",
detailText: "You want a tool with a digicam and an A12 Bionic processor or higher (Late 2017)",
backgroundColor: .pink
)
let host = UIHostingController(rootView: scanNotSupported)
view.pinToInside(host.view)
alertHost = host
}
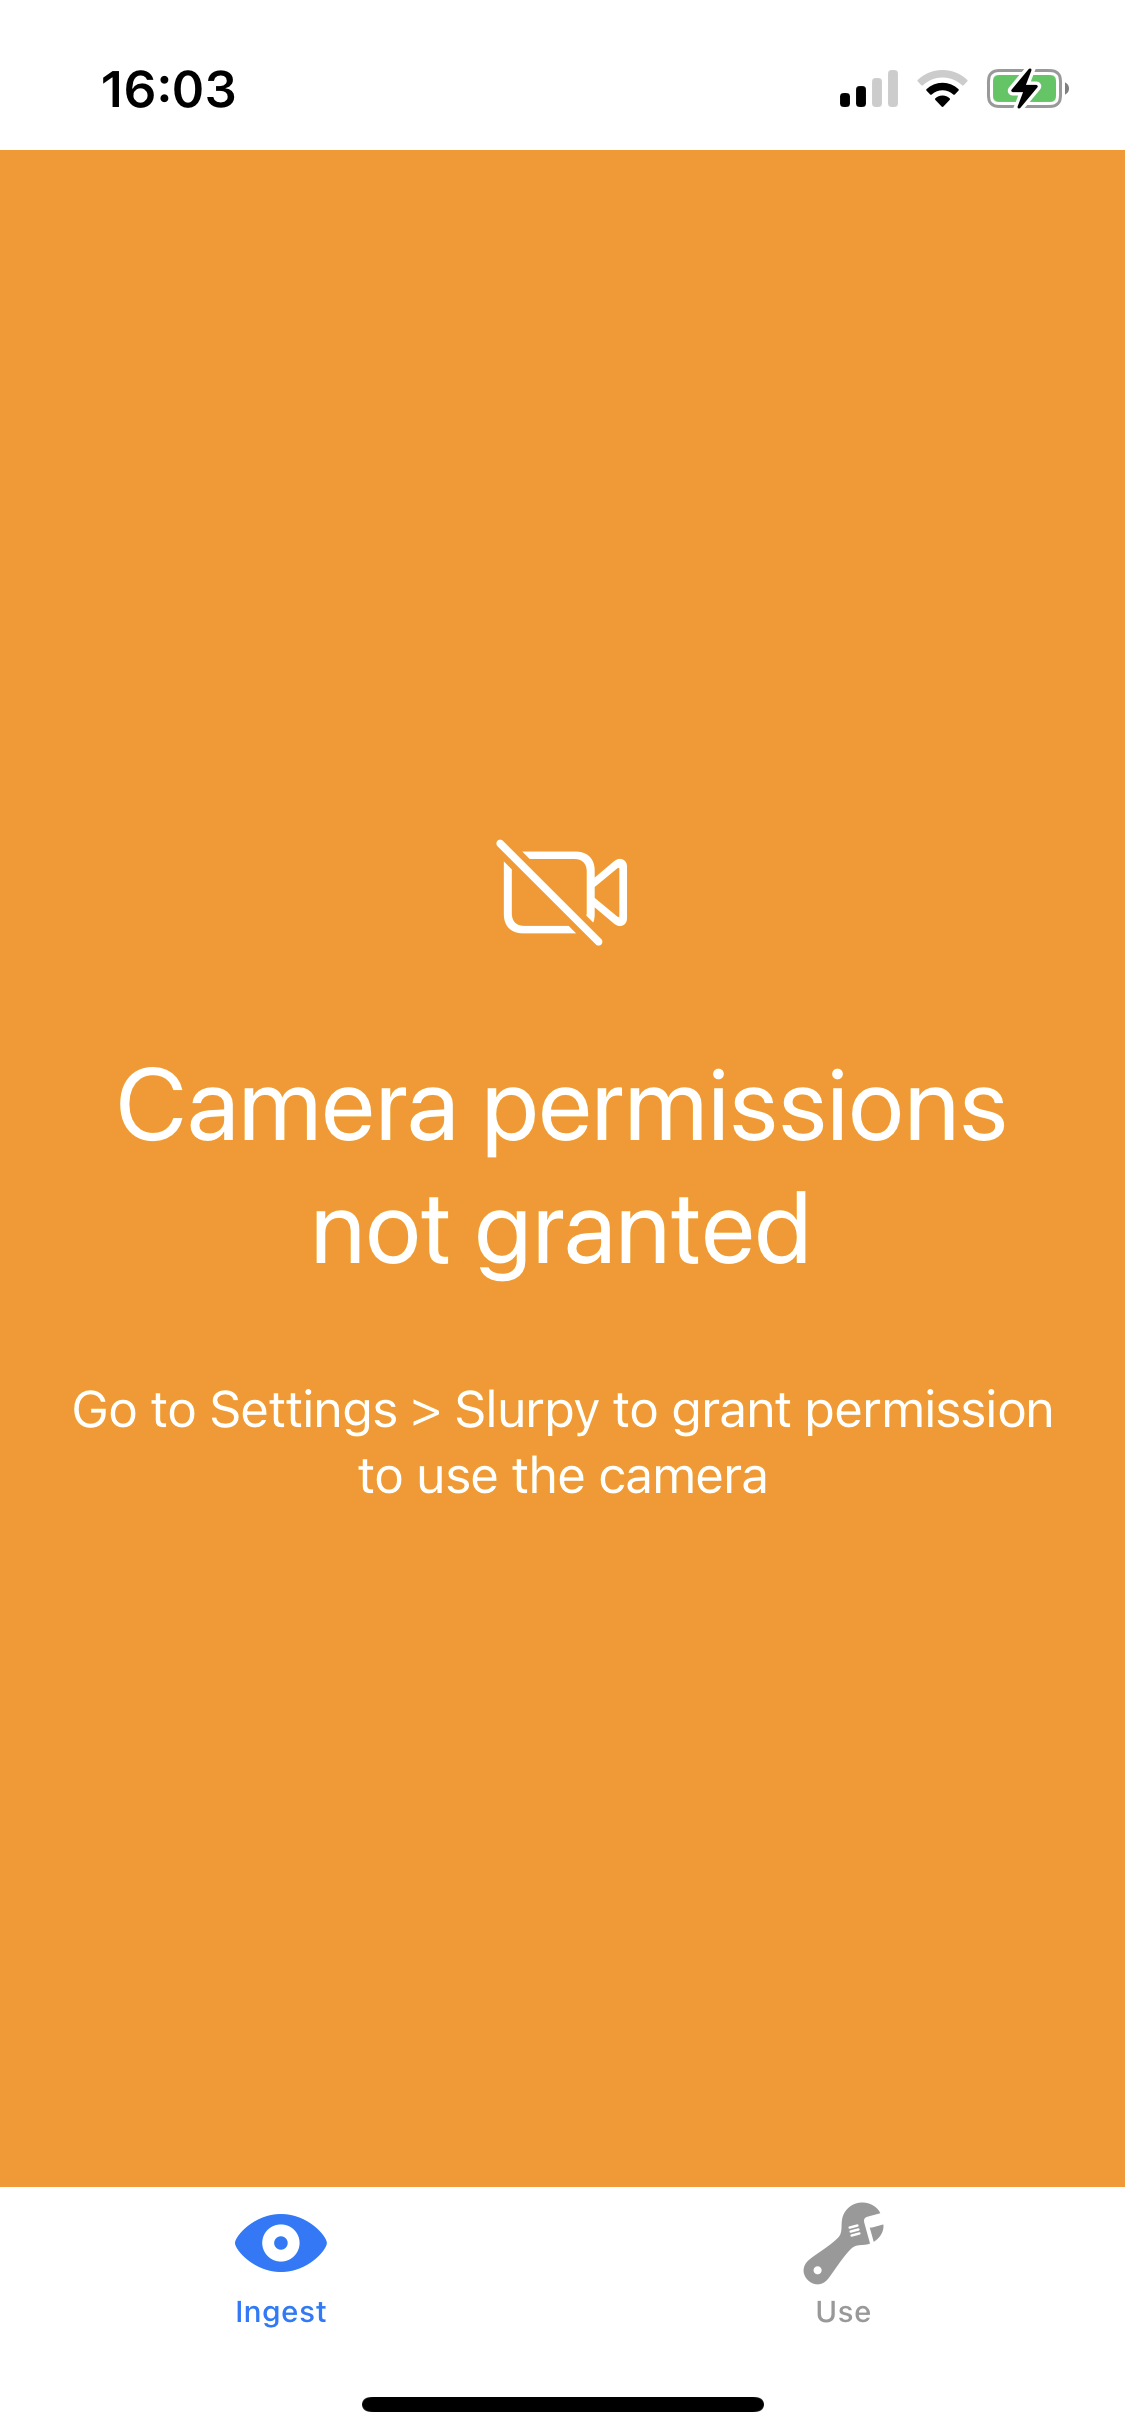
func installNoPermissionOverlay() {
cleanHost()
let noCameraPermission = FullScreenBanner(
systemImageName: "video.slash",
mainText: "Digital camera permissions not granted",
detailText: "Go to Settings > Slurpy to grant permission to make use of the digicam",
backgroundColor: .orange
)
let host = UIHostingController(rootView: noCameraPermission)
view.pinToInside(host.view)
alertHost = host
}
These two strategies configure a FullScreenBanner after which place that View into the view hierarchy.
Then add this code to ScannerViewController:
var scanningIsSupported: Bool {
  false
  // DataScannerViewController.isSupported
}

var scanningIsAvailable: Bool {
  DataScannerViewController.isAvailable
}
DataScannerViewController has isSupported, a static property that you should utilize to question whether or not the gadget is updated. For this run-only, you ignore it and return false so you’ll be able to take a look at the logic.
Lastly, you should make sure you don’t set up the scanner for a nonsupported gadget to stop a crash.
Find installDataScanner in ScannerViewController. On the prime of installDataScanner, add this code on the remark // add guards right here:
guard scanningIsSupported else {
  installNoScanOverlay()
  return
}

guard scanningIsAvailable else {
  installNoPermissionOverlay()
  return
}
These two guards forestall you from instantiating DataScannerViewController if the preconditions aren’t met. Digital camera permissions might be withdrawn at any time by the person, so you should examine every time you need to begin the digicam.
Construct and run. You’ll see the view ScanNotSupported as an alternative of the digicam.

Return to var scanningIsSupported to take away the mock Boolean worth.
- Delete the road
false. - Uncomment the road
DataScannerViewController.isSupported.
Construct and run.
At this level, you will have the choice of going to Settings > Slurpy in your gadget and switching off Permit Slurpy to Entry Digital camera to watch the no permission view in place. When you do, keep in mind to change permission again on to proceed with the tutorial.
Stopping the Scanner
When working with any iOS digicam API, it’s good follow to close the digicam down whenever you end utilizing it. You begin the scanner in viewDidAppear, so now you’ll cease it in viewWillDisappear.
Add this code to ScannerViewController:
func uninstallDatascanner() {
  guard let datascanner else {
    return
  }
  datascanner.stopScanning()
  datascanner.view.removeFromSuperview()
  datascanner.removeFromParent()
  self.datascanner = nil
}

override func viewWillDisappear(_ animated: Bool) {
  tremendous.viewWillDisappear(animated)
  uninstallDatascanner()
}
In uninstallDatascanner, you cease DataScannerViewController after which take away it from the view. You cease utilizing assets that you simply not want.
Offering Person Suggestions
Whenever you scanned the e book barcode and a textual content fragment, you in all probability weren’t certain whether or not the merchandise saved. On this part, you’ll present some haptic suggestions to the person after they save an merchandise.
Offering Haptic Suggestions
Haptic suggestions is when your gadget vibrates in response to an motion. You’ll use CoreHaptics to generate these vibrations.
Add this import on the prime of ScannerViewController beneath import SwiftUI:
import CoreHaptics
Then, add this property to the highest of ScannerViewController:
let hapticEngine: CHHapticEngine? = {
  do {
    let engine = strive CHHapticEngine()
    engine.notifyWhenPlayersFinished { _ in
      return .stopEngine
    }
    return engine
  } catch {
    print("haptics are usually not working - as a result of (error)")
    return nil
  }
}()
Right here you create a CHHapticEngine and configure it to cease working by returning .stopEngine as soon as all patterns have performed to the person. Stopping the engine after use is beneficial by the documentation.
Add this extension to ScannerViewController.swift:
extension ScannerViewController {
  func hapticPattern() throws -> CHHapticPattern {
    let occasions = [
      CHHapticEvent(
        eventType: .hapticTransient,
        parameters: [],
        relativeTime: 0,
        period: 0.25
      ),
      CHHapticEvent(
        eventType: .hapticTransient,
        parameters: [],
        relativeTime: 0.25,
        period: 0.5
      )
    ]
    let sample = strive CHHapticPattern(occasions: occasions, parameters: [])
    return sample
  }

  func playHapticClick() {
    guard let hapticEngine else {
      return
    }

    guard UIDevice.present.userInterfaceIdiom == .telephone else {
      return
    }

    do {
      strive hapticEngine.begin()
      let sample = strive hapticPattern()
      let participant = strive hapticEngine.makePlayer(with: sample)
      strive participant.begin(atTime: 0)
    } catch {
      print("haptics are usually not working - as a result of (error)")
    }
  }
}
In hapticPattern, you construct a CHHapticPattern that describes a double faucet sample. CHHapticPattern has a wealthy API that’ss value exploring past this tutorial.
playHapticClick performs your hapticPattern. Haptics are solely obtainable on iPhone, so should you’re utilizing an iPad, you utilize an early return to do nothing. You’ll quickly do one thing else for iPad.
You begin CHHapticEngine simply earlier than you play the sample. This connects to the worth .stopEngine that you simply returned in notifyWhenPlayersFinished beforehand.
Lastly, find extension ScannerViewController: DataScannerViewControllerDelegate and add this line on the finish of dataScanner(_:didTapOn:):
playHapticClick()
Construct and run to really feel the haptic sample whenever you faucet a acknowledged merchandise. Within the subsequent part, you’ll add a recognition sound for individuals utilizing an iPad.
Including a Suggestions Sound
To play a sound, you want a sound file. You could possibly make your personal, however for this tutorial, you’ll use a sound that’s included within the starter challenge.
Go to the highest of ScannerViewController.swift and add this import beneath the opposite imports:
import AVFoundation
Add this property inside ScannerViewController:
var feedbackPlayer: AVAudioPlayer?
Lastly, add this extension to ScannerViewController.swift:
extension ScannerViewController {
  func playFeedbackSound() {
    guard let url = Bundle.major.url(
      forResource: "WAV_Jinja",
      withExtension: "wav"
    ) else {
      return
    }
    do {
      feedbackPlayer = strive AVAudioPlayer(contentsOf: url)
      feedbackPlayer?.play()
    } catch {
      print("Error taking part in sound - (error)!")
    }
  }
}
Inside dataScanner(_:didTapOn:), beneath playHapticClick() add this name:
playFeedbackSound()
Construct and run. Make sure that the gadget isn’t muted and the quantity isn’t zero. Whenever you contact a acknowledged merchandise, a sound will ring out.
Congratulations! You made a barcode and textual content scanner centered on college students or librarians who need to acquire ISBNs and textual content fragments.
That’s all the fabric for this tutorial, however you’ll be able to browse the documentation for DataScannerViewController to see different parts of this API.
On this tutorial, you used a UIKit-based challenge. If you wish to use DataScannerViewController in a SwiftUI challenge, you’ll must host it in a UIViewControllerRepresentable SwiftUI View. UIViewControllerRepresentable is the mirror API of UIHostingViewController.
- Use SwiftUI views in UIKit with
UIHostingViewController. - Use UIKit view controllers in SwiftUI with
UIViewControllerRepresentable.
Studying easy methods to implement UIViewControllerRepresentable is out of scope for this tutorial, however what you’ve realized about DataScannerViewController will apply whenever you do.
You may obtain the finished challenge utilizing the Obtain Supplies hyperlink on the prime or backside of the tutorial.
On this tutorial, you realized easy methods to:
- Begin and cease DataScannerViewController.
- Work with the information buildings that DataScannerViewController offers.
- Combine SwiftUI views in UIKit parts.
- Work with digicam {hardware} availability and person permissions.
- Use haptics and sound to offer person suggestions.
DataScannerViewController opens up a world of interplay — at minimal growth value — with the bodily and textual worlds.
Have some enjoyable and create a recreation or use it to cover data in plain sight. A QR code can maintain as much as 7,000 characters relying on measurement. When you use encryption solely, individuals with the important thing can learn that information. That’s an data channel even when web entry is blocked, unavailable or insecure.
Please share what you develop within the discussion board for this tutorial utilizing the hyperlink beneath. I stay up for seeing what you do!