
On this article, we’ll discover “Python networking” and canopy every little thing to get began with community programming utilizing Python. This weblog’s content material is as follows:
What’s Python Networking?
“Python networking” refers to the usage of the Python programming language to construct functions that may talk over a community. In a community, units share assets and data by connecting to at least one one other. Python networking permits these units to speak with one another utilizing numerous protocols, together with “HTTP”, “FTP”, “SMTP”, and extra.
Python networking is a robust device that can be utilized to construct a variety of community functions, together with “internet servers”, “chat functions”, and extra. It’s additionally utilized in information analytics for extracting and analyzing internet information.
Tips on how to Get Began With Python Networking?
To get began with “Python networking”, it’s essential to have a primary overview of Python. For those who’re new to Python, we advocate beginning with a newbie’s information to Python programming earlier than diving into networking.
Upon getting a very good grasp of Python programming, you can begin studying about networking ideas like “socket programming”, “internet scraping”, and extra. There are many assets accessible on-line that will help you be taught these ideas, together with tutorials, video programs, and extra.
Socket Programming With Python
“Socket programming” is a key idea in Python networking. It’s a low-level networking interface that makes it doable for 2 units to speak over a community. With socket programming, you’ll be able to construct highly effective community functions like “chat servers”, “file switch functions”, and extra.
So as to learn to program sockets in Python, you’ll want to know the next ideas:
Socket
Sockets are the endpoints of communication hyperlinks between two units that present a two-way stream of knowledge between them. The system is recognized by an Web Protocol (IP) handle and a Port Quantity.
Shopper-Server Mannequin
There are two varieties of units in socket programming: “shoppers” and “servers”. A “server” listens and responds to incoming requests from shoppers, and a “shopper” sends requests to servers.
TCP vs UDP
There are two major transport protocols utilized in socket programming – “TCP” and “UDP”. “UDP” is a straightforward, non-connection-oriented protocol, whereas “TCP” is dependable, connection-oriented.
Blocking vs Non-Blocking Sockets
Socket programming might be both “blocking” or “non-blocking”. With “blocking” sockets, this system waits for a response from the opposite system earlier than persevering with. With “non-blocking” sockets, this system continues to run so long as a response is obtained.
Socket Strategies
Python’s socket module supplies a number of strategies for creating and manipulating sockets. These strategies embody the next:
- socket()
- bind()
- hear()
- settle for()
- join()
- ship()
- recv()
Examples of Networking in Python
Following are examples of networking in Python:
Instance 1: Making a Easy “Shopper-Server” Communication Program Utilizing the “socket” Module
Let’s first create the server-side code.
Server-Facet Code
Overview of the next code snippet:
import socket
server_socket = socket.socket(socket.AF_INET, socket.SOCK_STREAM)
host = socket.gethostname()
port = 12345
server_socket.bind((host, port))
server_socket.hear(1)
print(‘Ready for a shopper connection…’)
client_socket, addr = server_socket.settle for()
print(‘Connection established with:’, addr)
message = ‘Welcome to the server!’
client_socket.ship(message.encode())
client_socket.shut()
Shopper-Facet Code
Now, the client-side code is created. Right here is an instance code:
import socket
client_socket = socket.socket(socket.AF_INET, socket.SOCK_STREAM)
host = socket.gethostname()
port = 12345
client_socket.join((host, port))
message = client_socket.recv(1024)
print(message.decode())
client_socket.shut()
Within the above server-client code:
- The “client-server” communication program is created utilizing the built-in “socket” module in Python.
- The “server” waits for a shopper connection, generates a welcome notification to the shopper, after which closes the connection.
- The “shopper” creates/establishes a reference to the server, retrieves the welcome message, after which closes the connection.
Output
To execute the above client-server communication code in Python, first, open the code editor and duplicate the server and shopper code into two separate Python information, corresponding to “server.py”, and “shopper.py”. After that, open two terminal home windows or command immediate home windows.
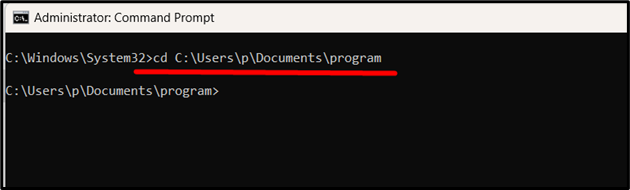
Within the first terminal window, navigate to the listing the place the “server.py” file is saved utilizing the “cd” command, as follows:

Now, execute the “server.py” file by operating the next command:
Right here is the output snippet:
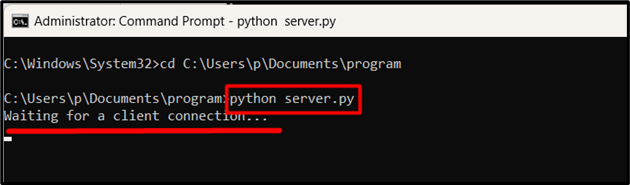
The server will begin operating and look forward to a shopper connection.
Now, open the second terminal. Right here, navigate to the listing the place the “shopper.py” file is saved utilizing the “cd” command:
Right here, execute the “shopper.py” file by operating the next command:
Following is the output snippet:
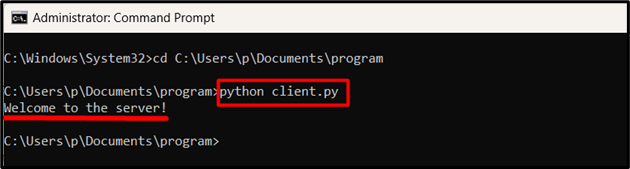
The shopper will now hook up with the server and obtain the welcome message from the server.
Be aware: Within the first terminal window the place you executed “server.py”, you will notice the message “Connection established with: <client_address>” displayed. A server may also shut a shopper’s connection after sending a message.
Instance 2: Sending an HTTP Request Utilizing the “requests” Module
Right here is an instance code:
import requests
response = requests.get(‘https://www.google.com’)
print(response.content material)
Within the above code, the “requests” module is used to ship an “HTTP GET” request to “https://www.google.com” and print the response content material.
Output
The above snippet reveals the response content material of the desired web site.
Instance 3: Resolving a Hostname to an IP Tackle Using the “socket” Module
Following is an instance code:
import socket
hostname = ‘www.google.com’
ip_address = socket.gethostbyname(hostname)
print(ip_address)
The above code snippet makes use of the “socket” module to resolve the hostname “www.google.com” to its corresponding IP handle and prints it.
Output
The above snippet shows the IP handle of the desired web site.
Conclusion
“Python Networking” permits builders to create server and shopper functions, ship and obtain information over the community, and handle community protocols effortlessly. A number of networking-specific libraries, corresponding to the favored “requests”, “Scapy” libraries, and “socket”, and so on. are utilized in Python.