
Discover ways to spotlight, underline, and strikethrough textual content in PDF information in your iPhone, iPad, and Mac, making it simple to maintain monitor of necessary data or annotate paperwork. This text gives a step-by-step information to utilizing these helpful options without cost.
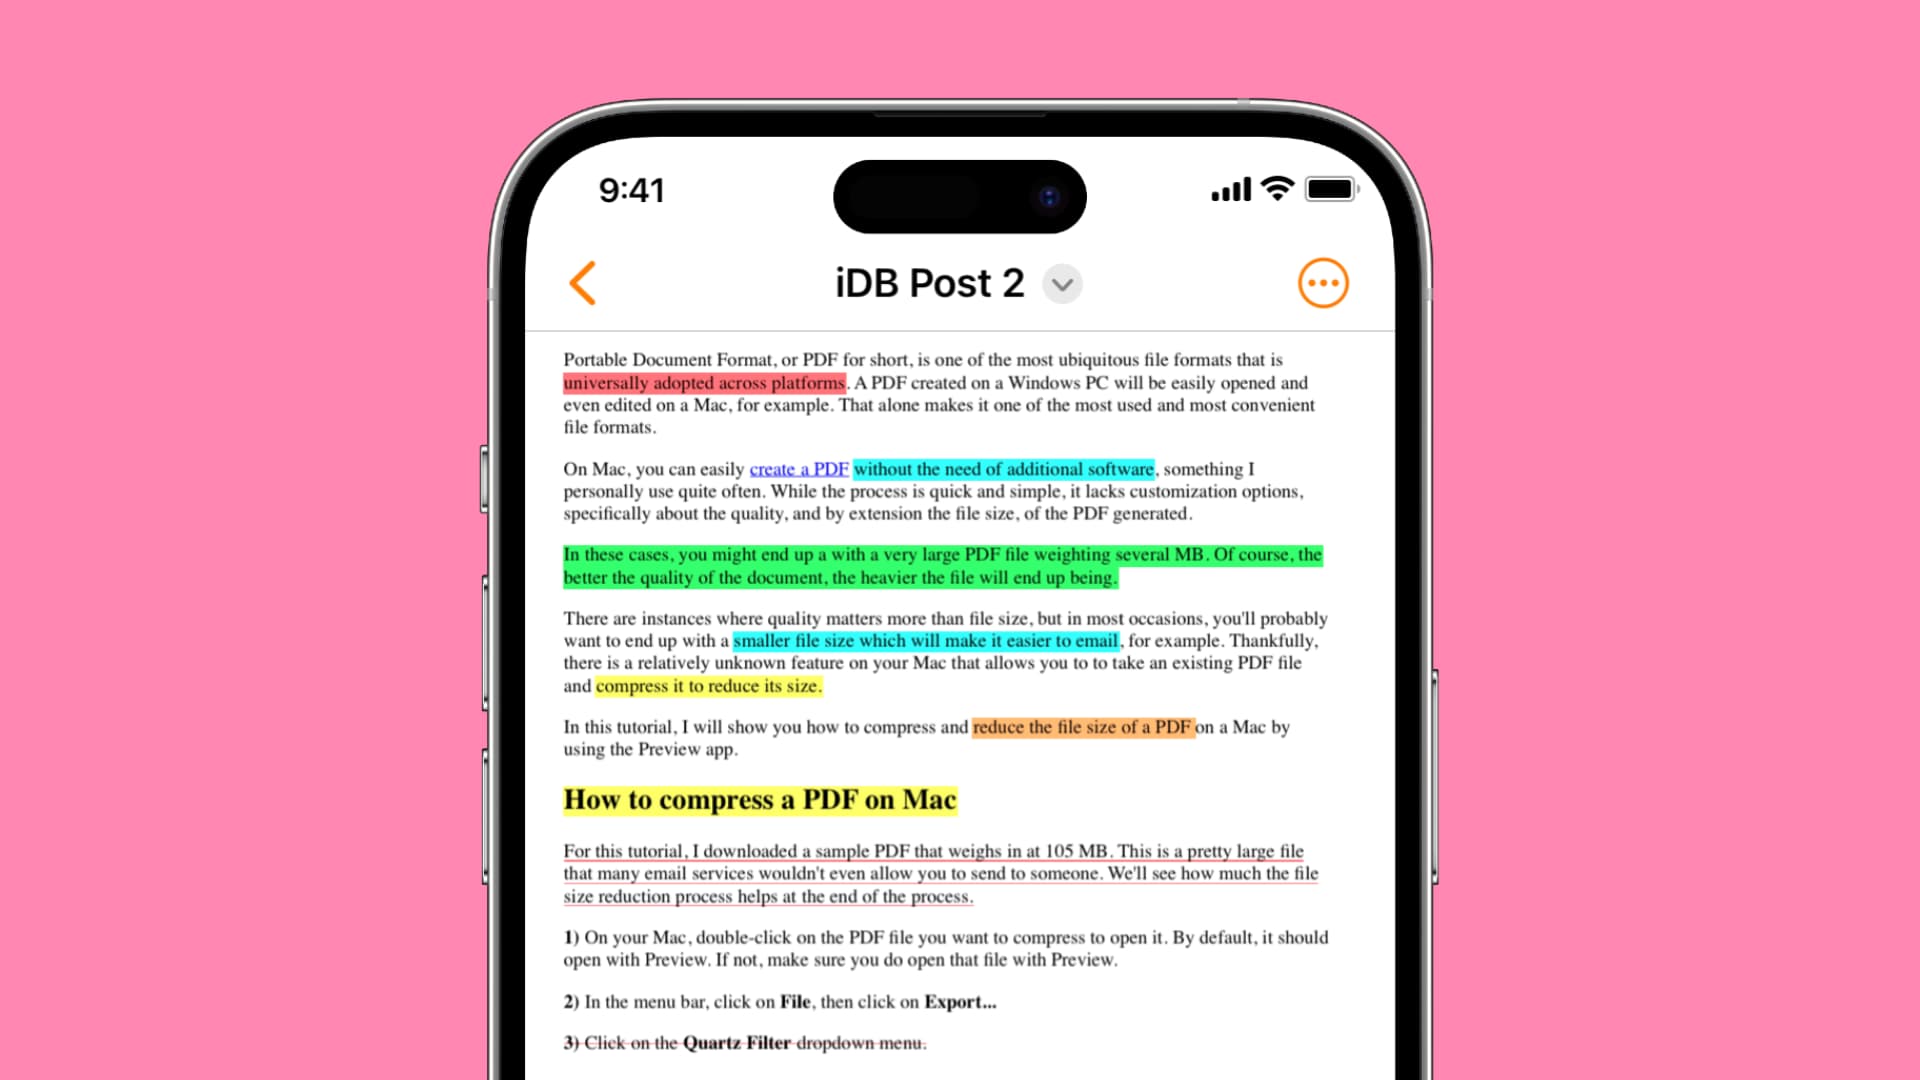
Whereas studying by a PDF, you may wish to use a lightweight fluorescent colour to spotlight essential textual content, comparable to when finding out for college or school exams, or for simple reference of key factors in an workplace PDF.
Moreover, you possibly can underline textual content to differentiate it from the remaining of the doc, and use the strikeout or strikethrough instrument to mark textual content that’s irrelevant.
This step-by-step tutorial helps you do all this with ease.
On iPhone and iPad
iOS and iPadOS lack a sturdy instrument to annotate textual content. Due to this fact, we’ll first present you ways to do that utilizing some nice third-party apps. We may even point out the built-in Markup methodology.
Use the Highlights app
1) Obtain the Highlights app without cost from the App Retailer and open it.
2) Go to On My iPhone, iCloud Drive, or one of many added providers, and decide the PDF you wish to edit.
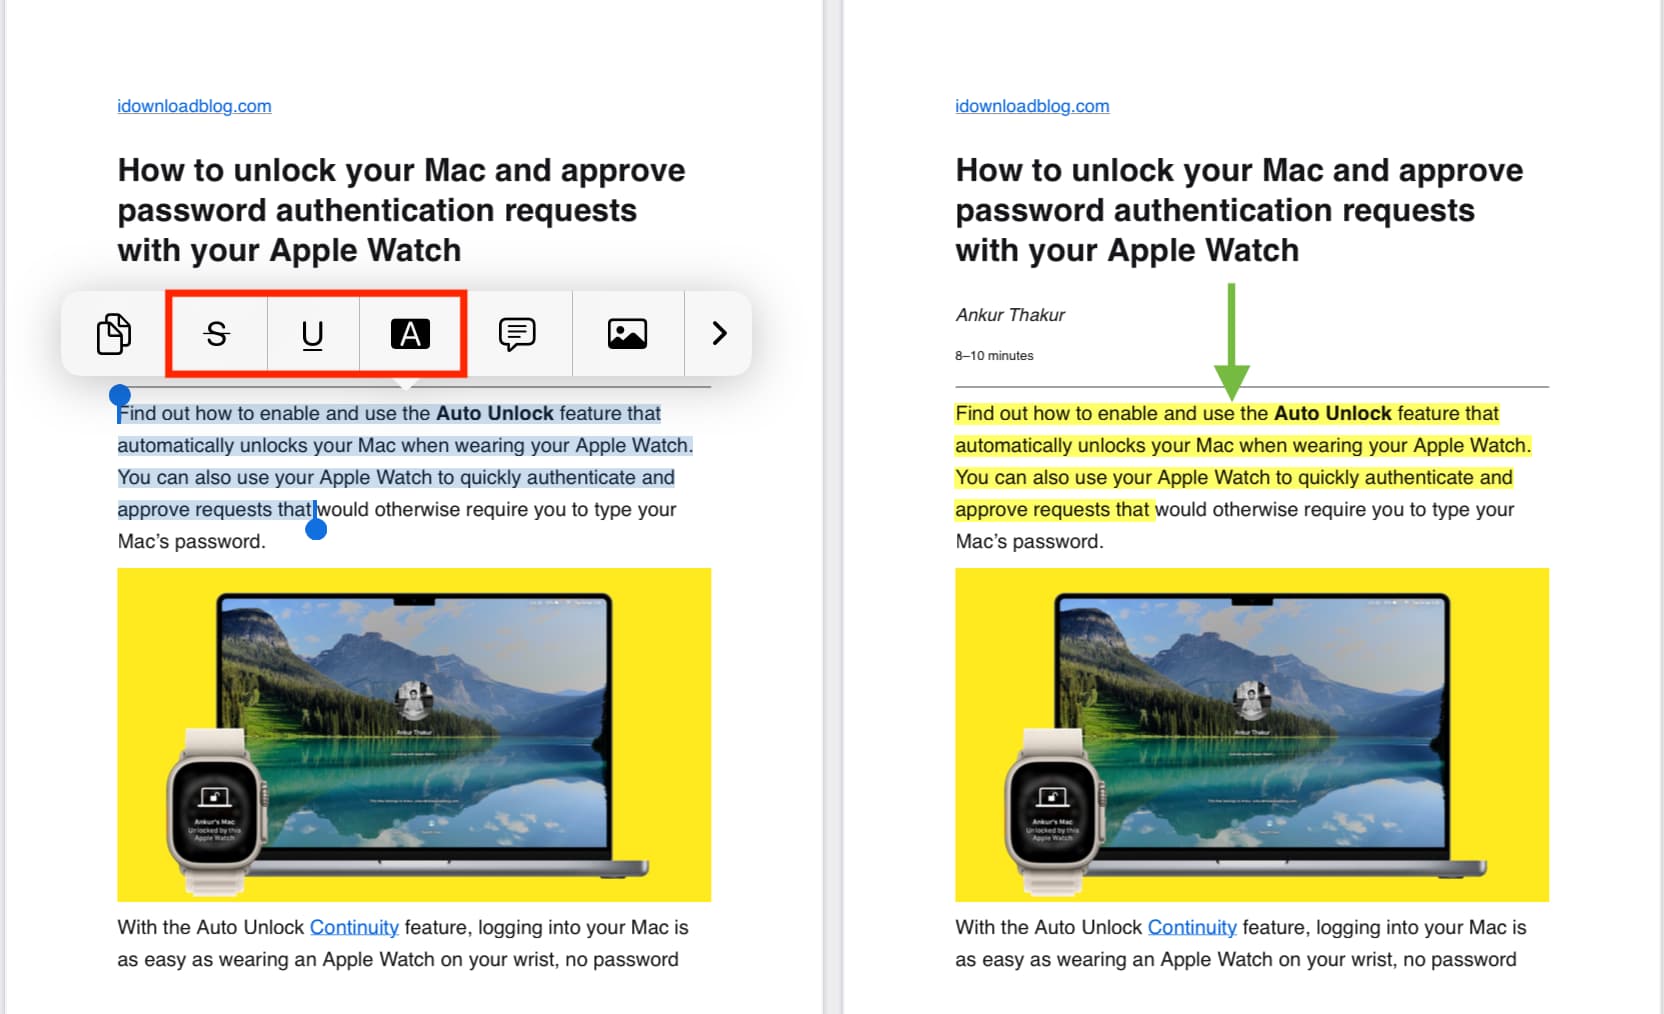
3) Choose the textual content you wish to spotlight, underline, or strikethrough.
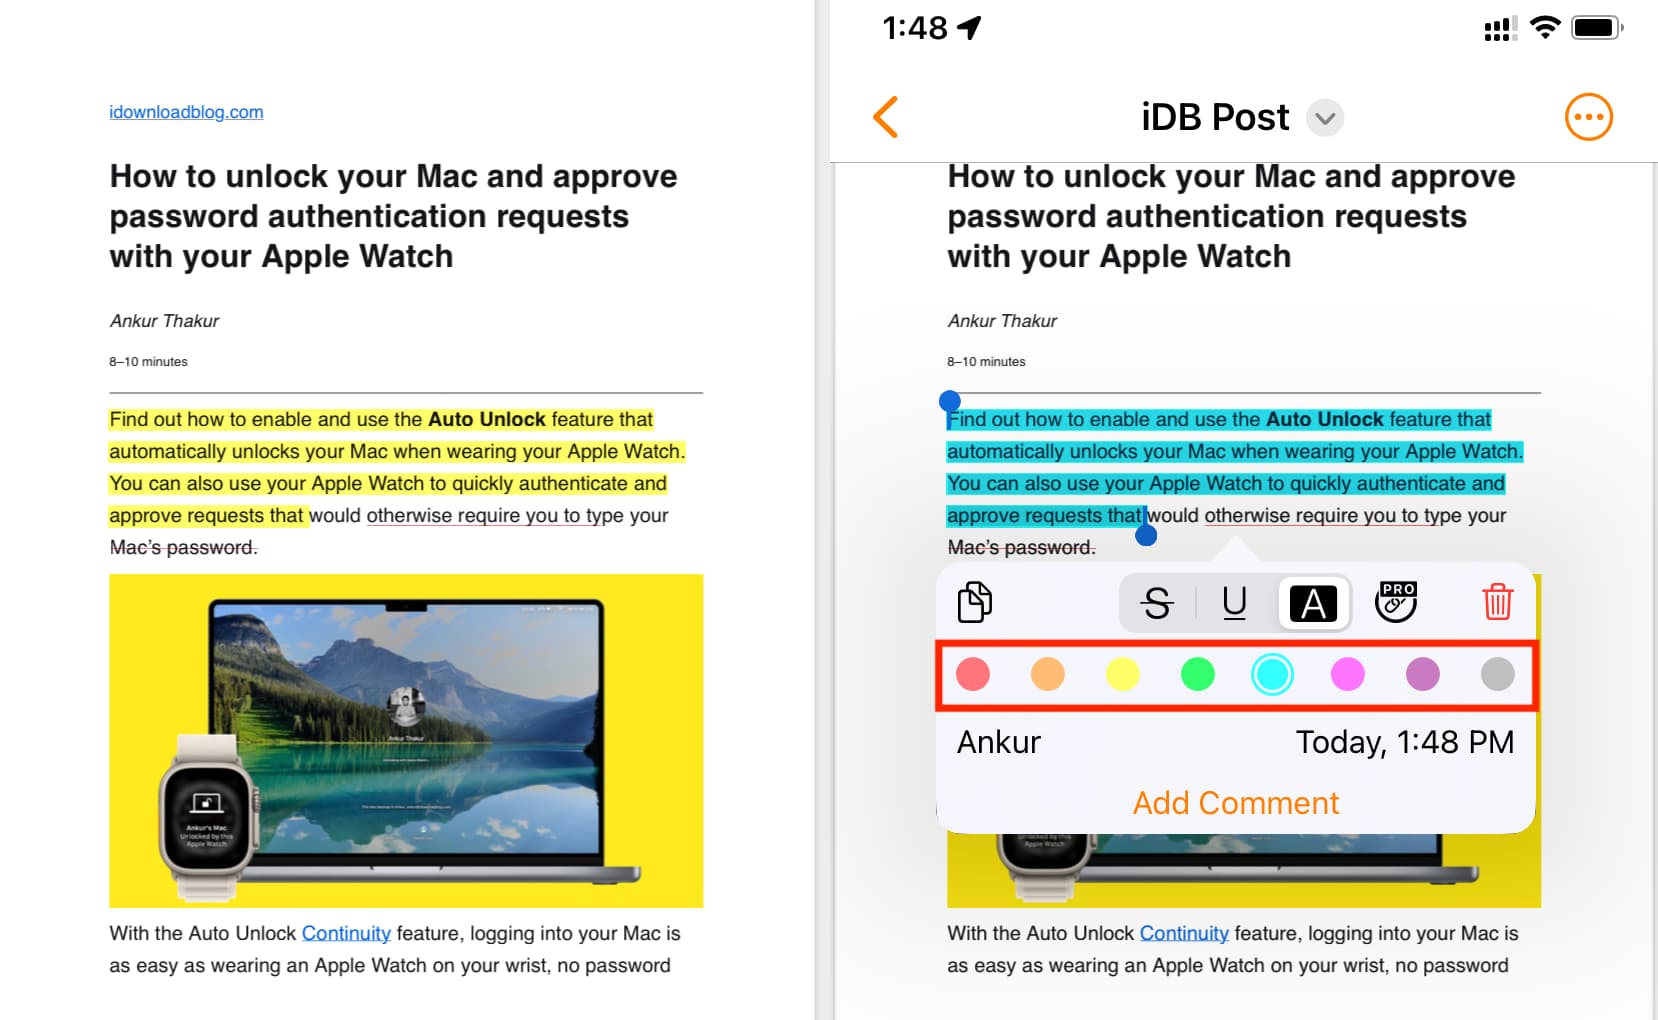
4) Instantly after deciding on the textual content, a popup will seem. Faucet the S (strikethrough), U (underline), or A (spotlight) buttons there, and it’ll add the chosen formatting to the textual content. Enter your title because the writer title when requested.
Observe: On iPad, it’s also possible to entry these instruments from the highest toolbar.
5) To vary the spotlight, underline, or strikethrough colour, faucet the edited textual content, and it’ll carry up a further menu from the place you possibly can select crimson, orange, yellow, inexperienced, blue, pink, magenta, or grey colours. And to take away the spotlight, faucet the crimson trash button.
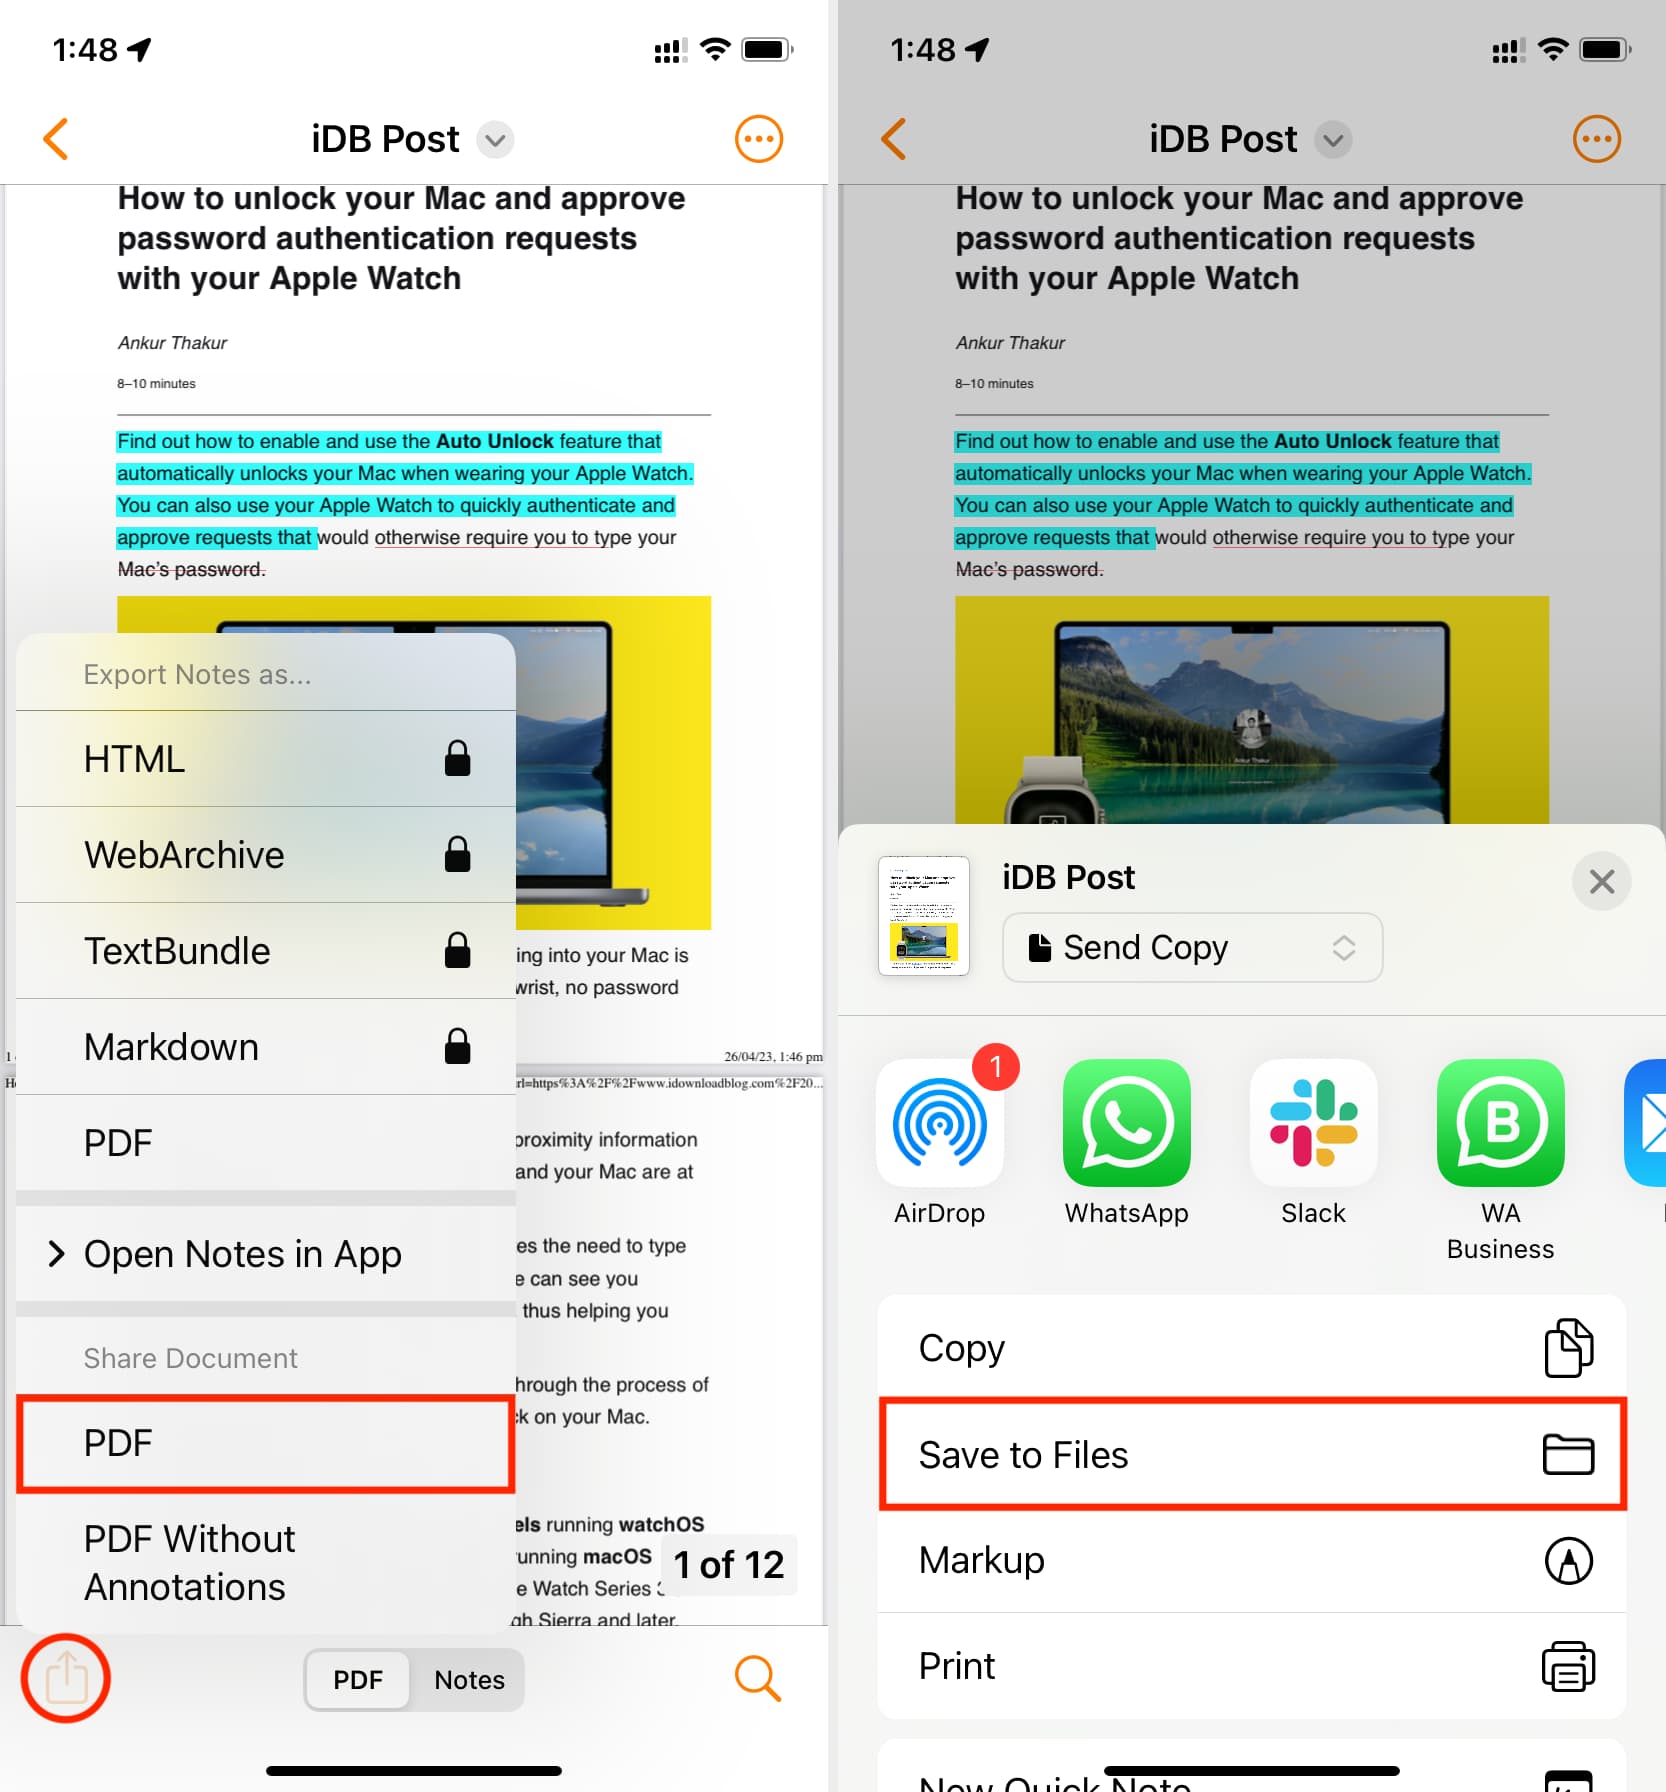
6) After you end enhancing, faucet as soon as on the display to disclose the app buttons. From right here, faucet the share icon > PDF (underneath the Share Doc heading) > Save to Recordsdata > decide a folder and hit Save.
Now, open the pre-installed Apple Recordsdata app in your iPhone or iPad and go to the folder you chose in Step 6 to seek out the PDF with the highlighted textual content.
Comparable third-party apps
I examined over a dozen iPhone and iPad apps that permit annotating and enhancing PDFs. Out of all these, I discovered the Highlights app to work nicely and thus defined its detailed steps above. In addition to that, I additionally discovered these three apps to completely do the job of highlighting, underlining, and hanging out PDF textual content, even of their free model.
- WPS Workplace: Faucet Cloud > iCloud > decide the PDF > choose textual content > use Spotlight, Underline, or StrikeOut. Subsequent, faucet the save icon > Share as File > Share as File > Save to Recordsdata.
- PDF Knowledgeable – Editor & Reader: Massive blue plus button > Recordsdata > choose the PDF > faucet the imported PDF from the PDF Knowledgeable display > choose textual content > Spotlight or use the enhancing icons on the highest. After that, faucet the three dots icon from the highest proper > Share > Share > Save to Recordsdata.
- PDF Further: Scan, Edit & Signal: Recordsdata > Browse Recordsdata > select the PDF > choose textual content > Spotlight, Strikethrough, Underline > three dots icon > Share > Save to Recordsdata.
Use the built-in Markup instruments
Markup is nice for including traces or signing a PDF, however it isn’t helpful as a highlighting instrument. Nonetheless, in the event you solely wish to roughly spotlight some traces and don’t wish to hassle downloading an app, then right here’s how to do this straight out of your iPhone or iPad:
1) Go contained in the Recordsdata app and faucet a PDF to open it in full display.
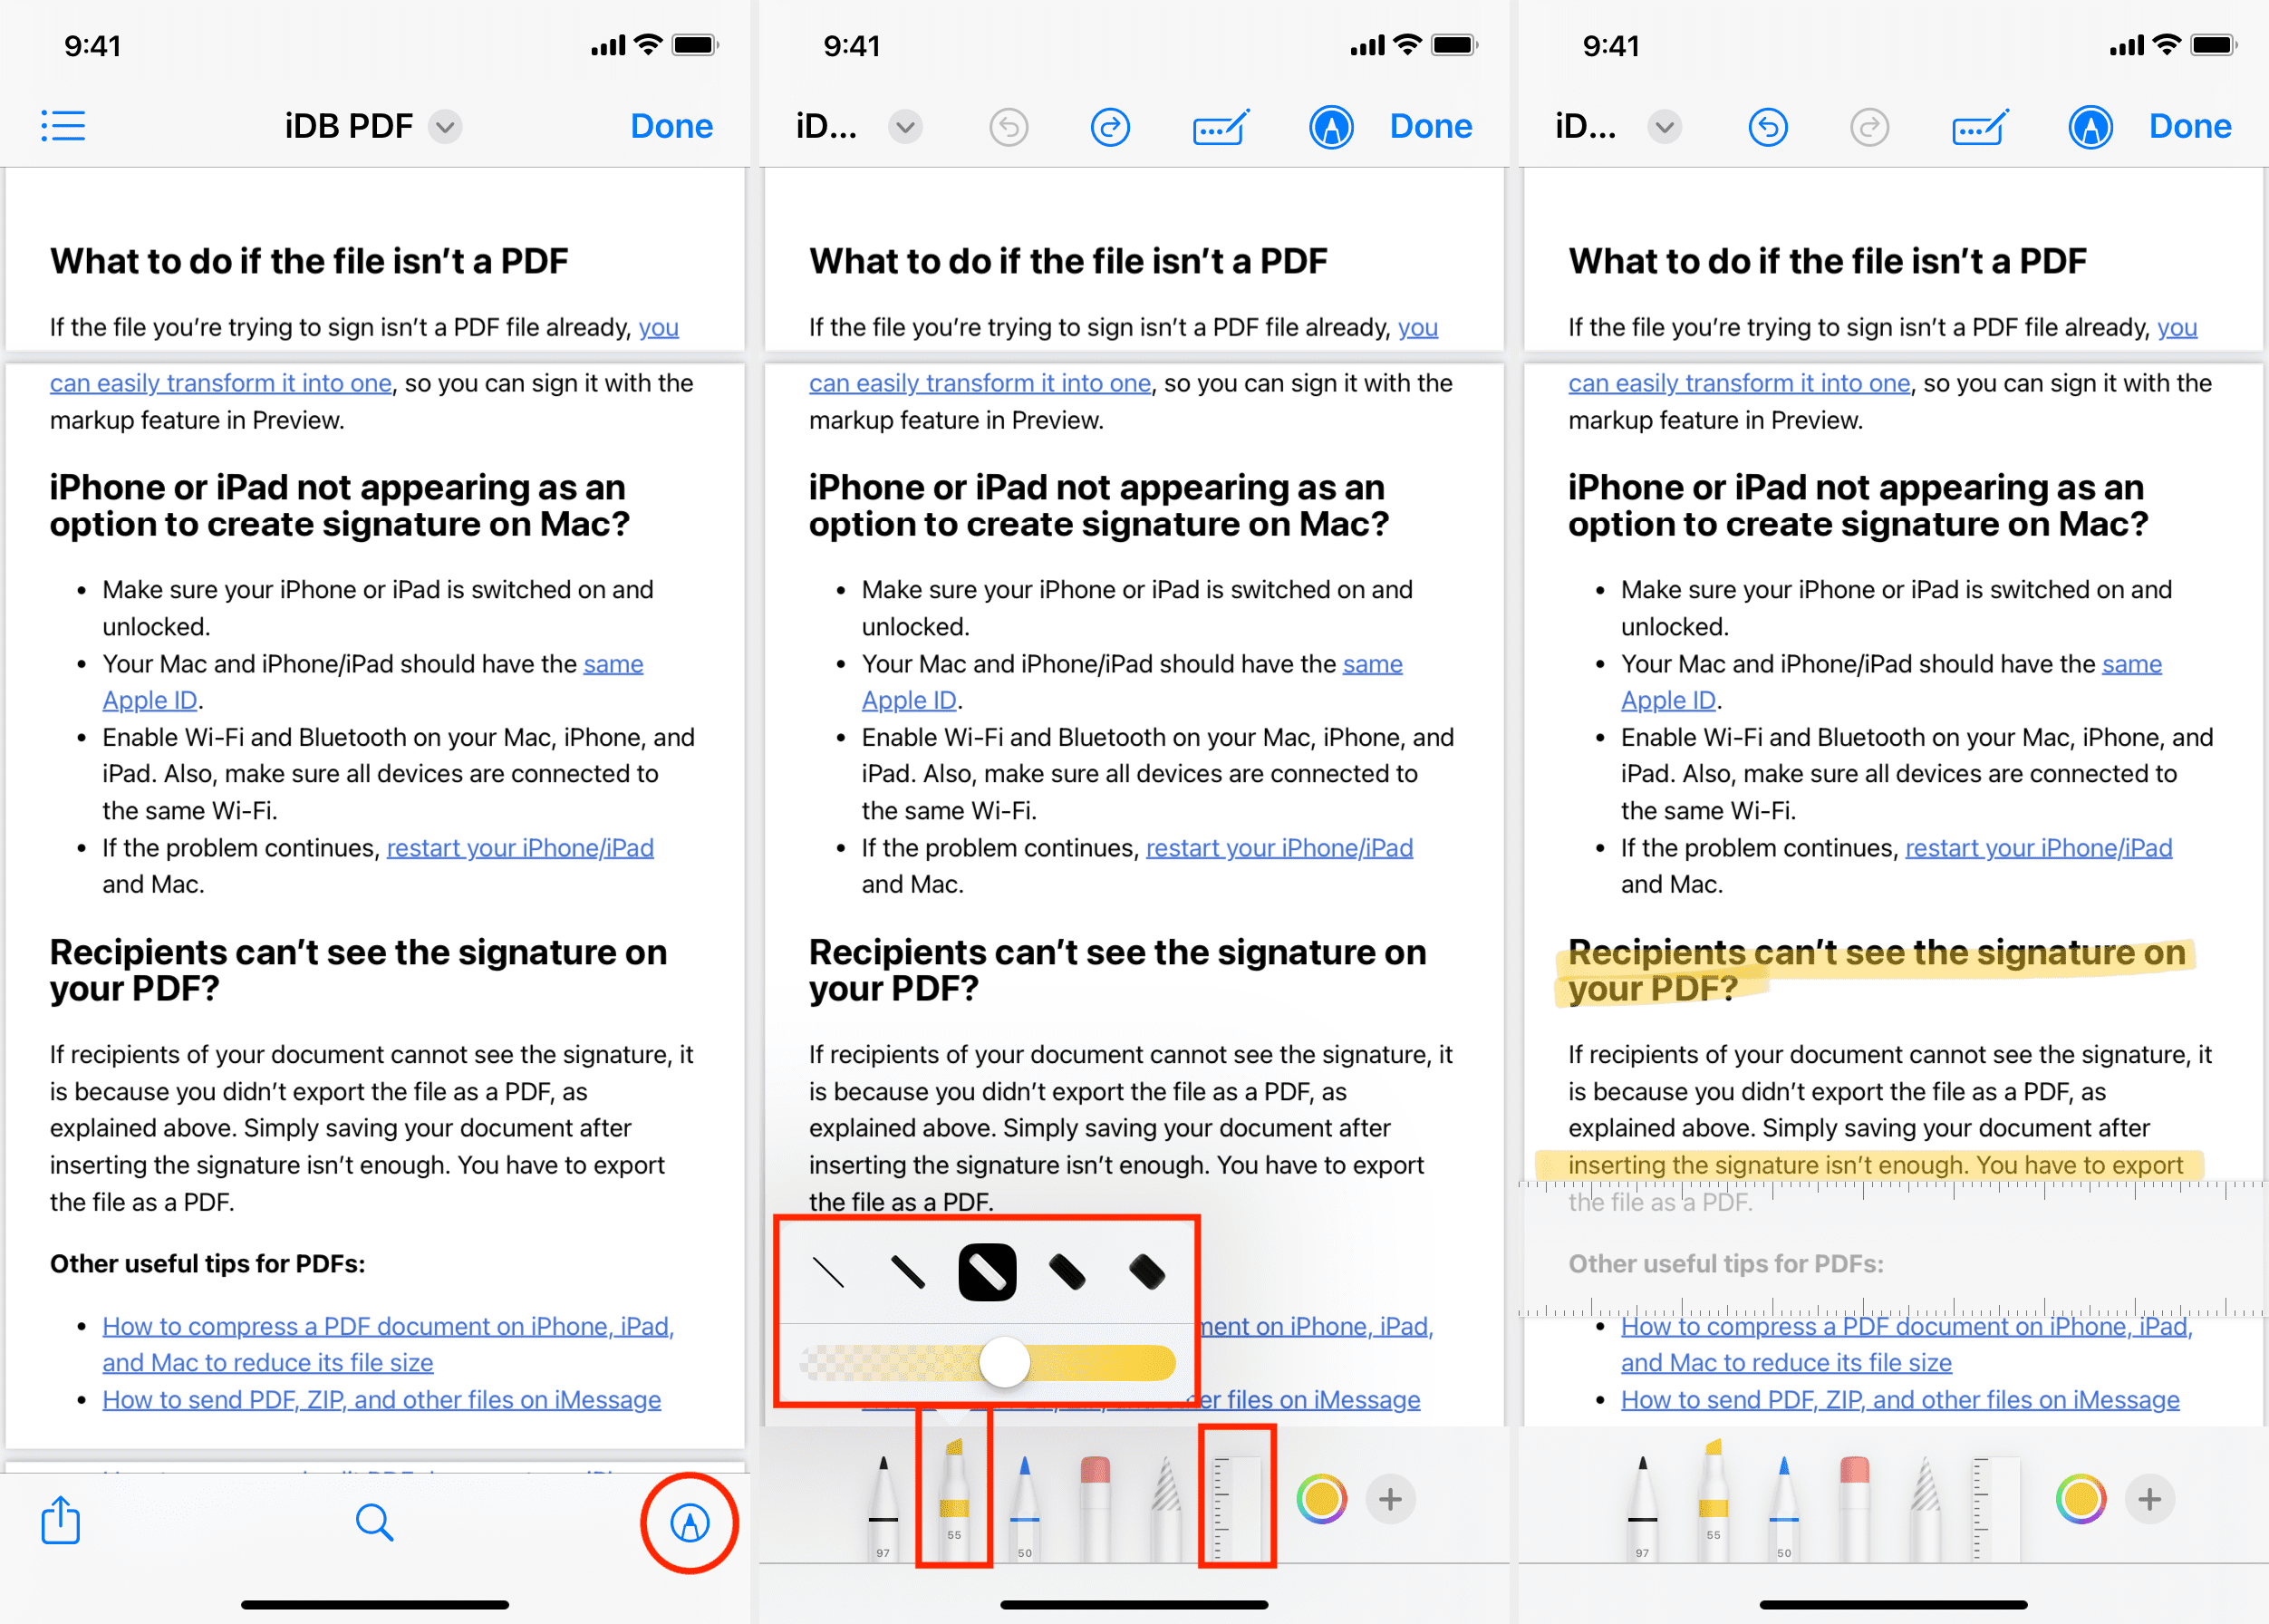
2) Faucet the Markup button.
3) Choose the highlighter instrument. After that, select its thickness and colour opacity. To vary the spotlight colour, faucet the prevailing colour dot and choose another shade.
4) Once you’re prepared, simply drag your finger or Apple Pencil over the PDF textual content to focus on it.
It gained’t be a straight line, however you possibly can choose the ruler instrument, use two fingers to rotate it, after which use one finger to place it just under the textual content you wish to spotlight. Subsequent, spotlight the textual content by working your finger or Apple Pencil simply above the ruler. This time, it must be a straight line.
5) Lastly, faucet Finished to save lots of the edits.
On Mac
The Preview app on Mac has all the mandatory instruments to annotate your PDFs, thus eliminating the necessity to spend money on a third-party app:
1) Open the PDF within the Preview app. See this in the event you can’t.
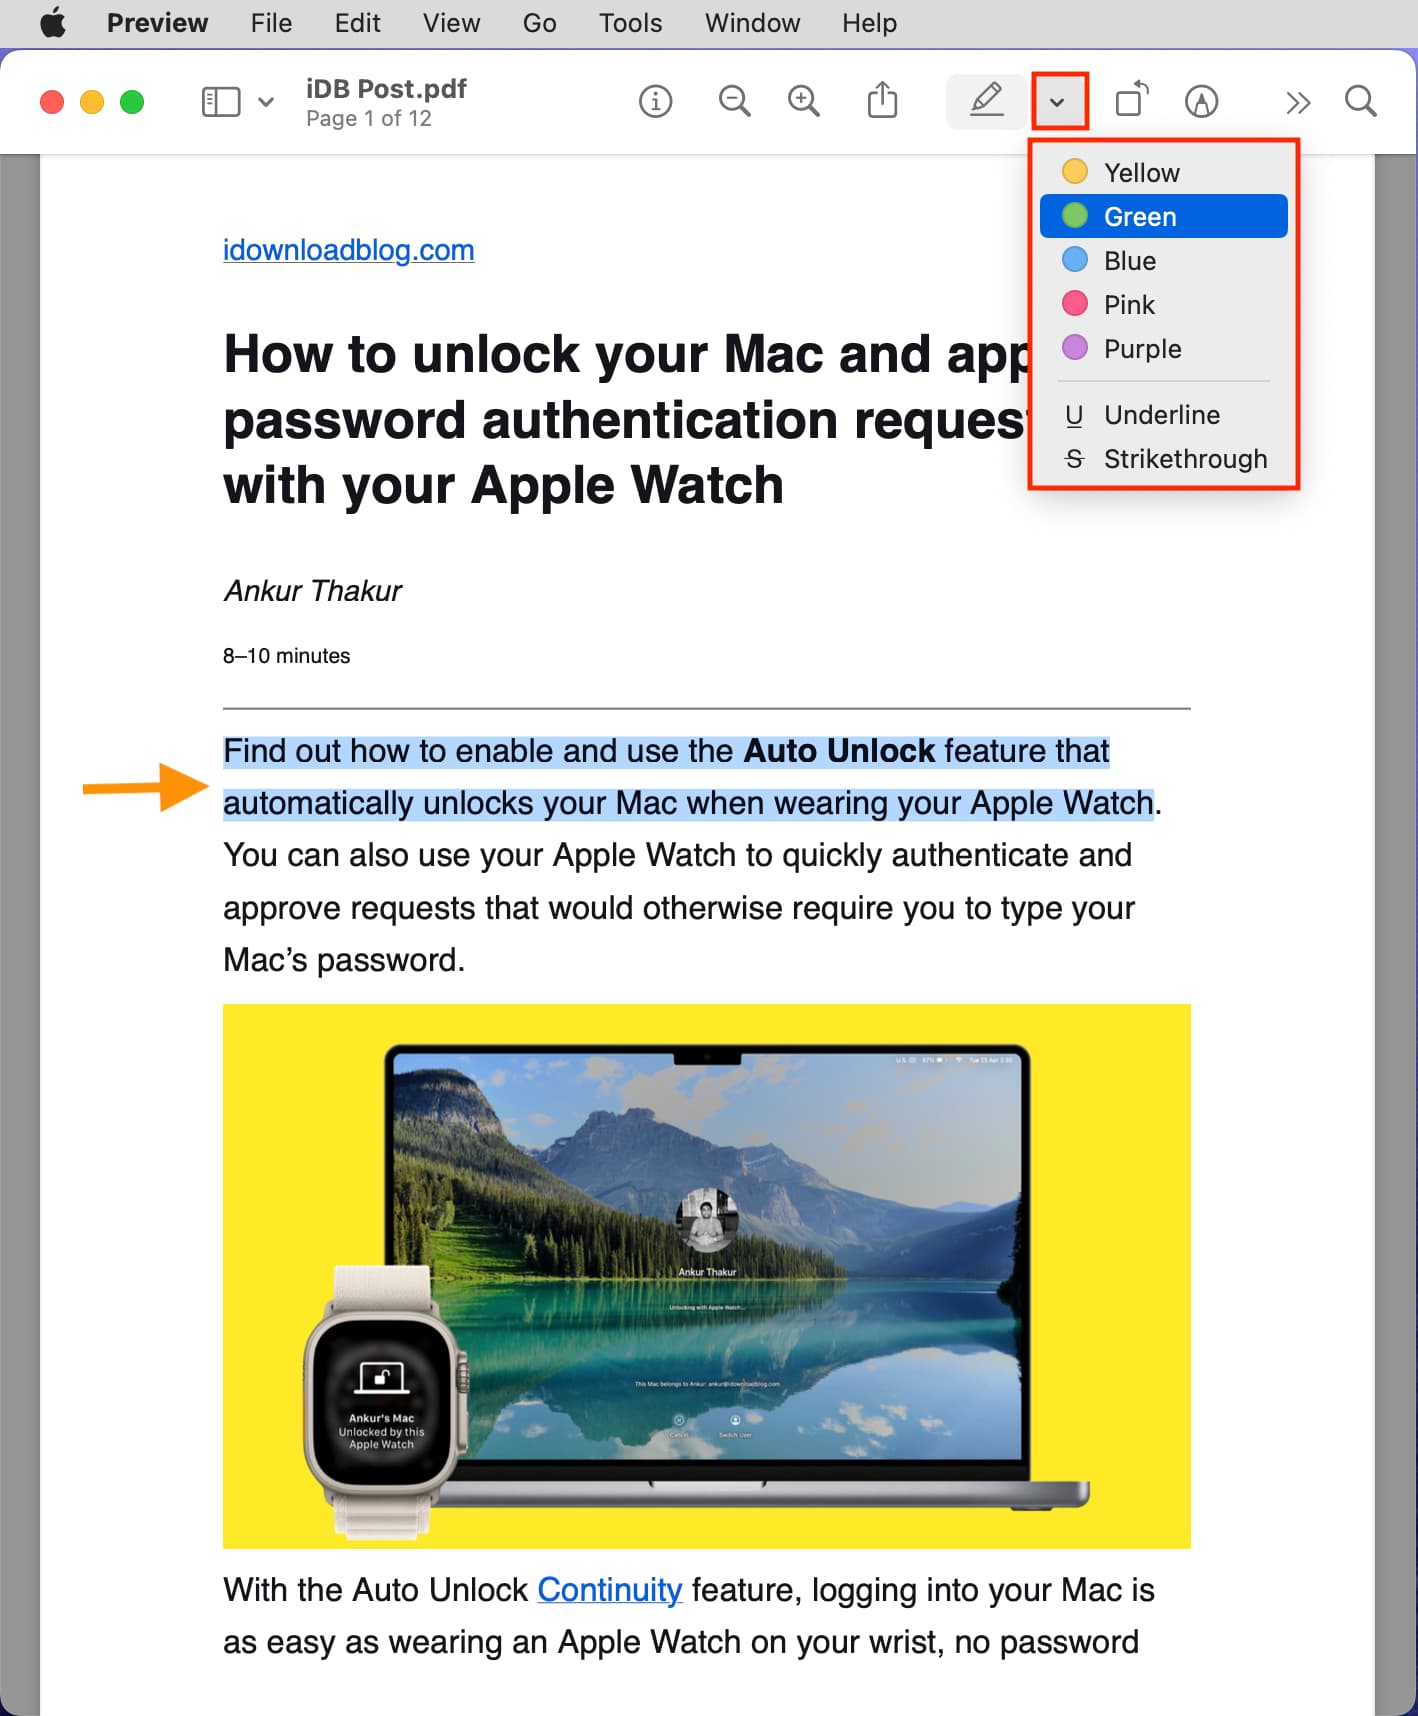
2) Choose the textual content.
3) Click on the arrow subsequent to the Spotlight button and select a colour to focus on the chosen textual content. Or, decide Underline and Strikethrough so as to add these formatting choices to the chosen textual content.
4) When you’re finished highlighting, click on the crimson shut button and all of the edits shall be robotically saved.
You possibly can open this highlighted PDF once more in Preview or some other PDF reader app, and you need to see all of the annotations.
Rapidly spotlight, underline, or strikethrough a number of traces
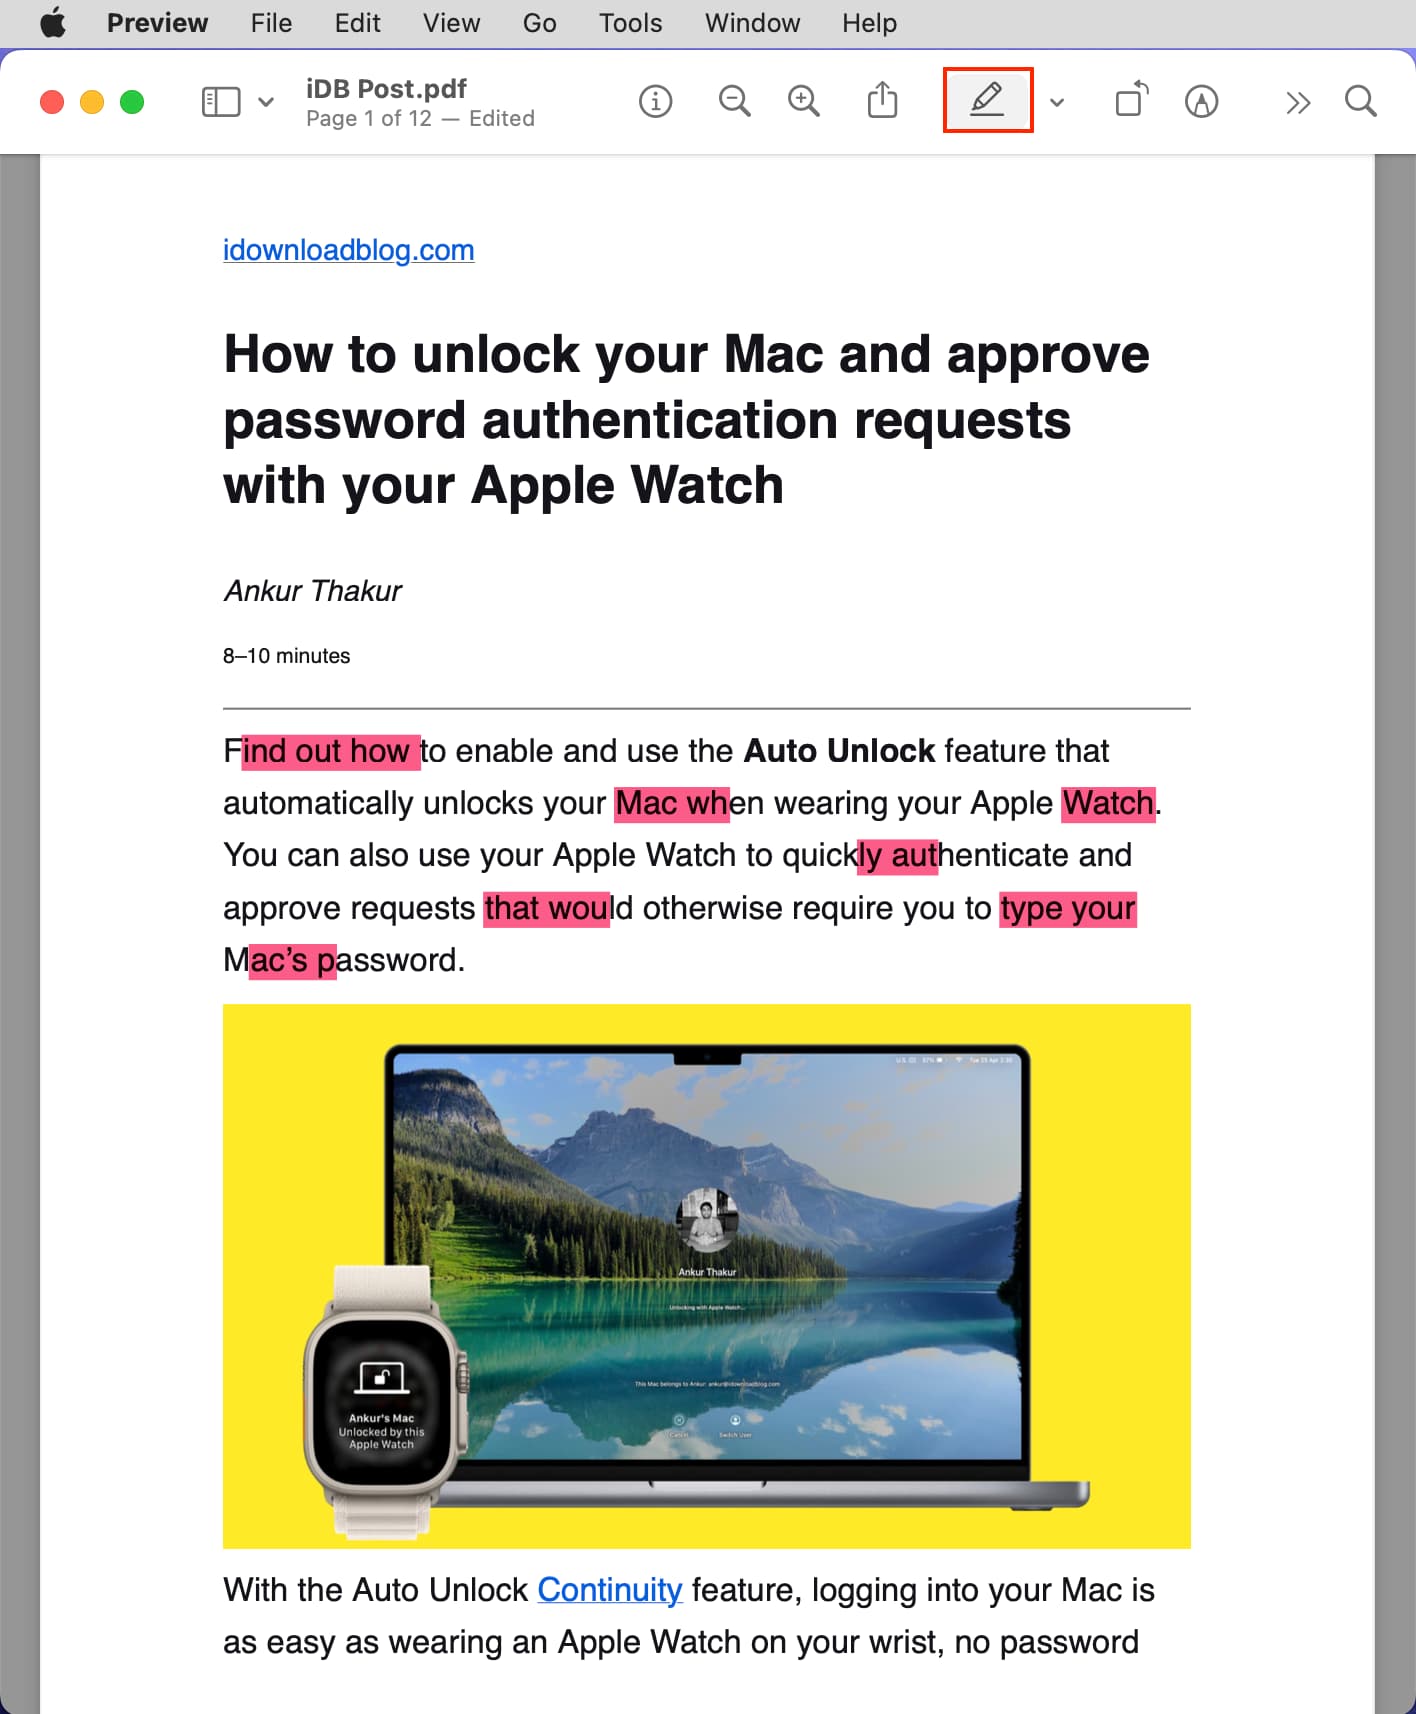
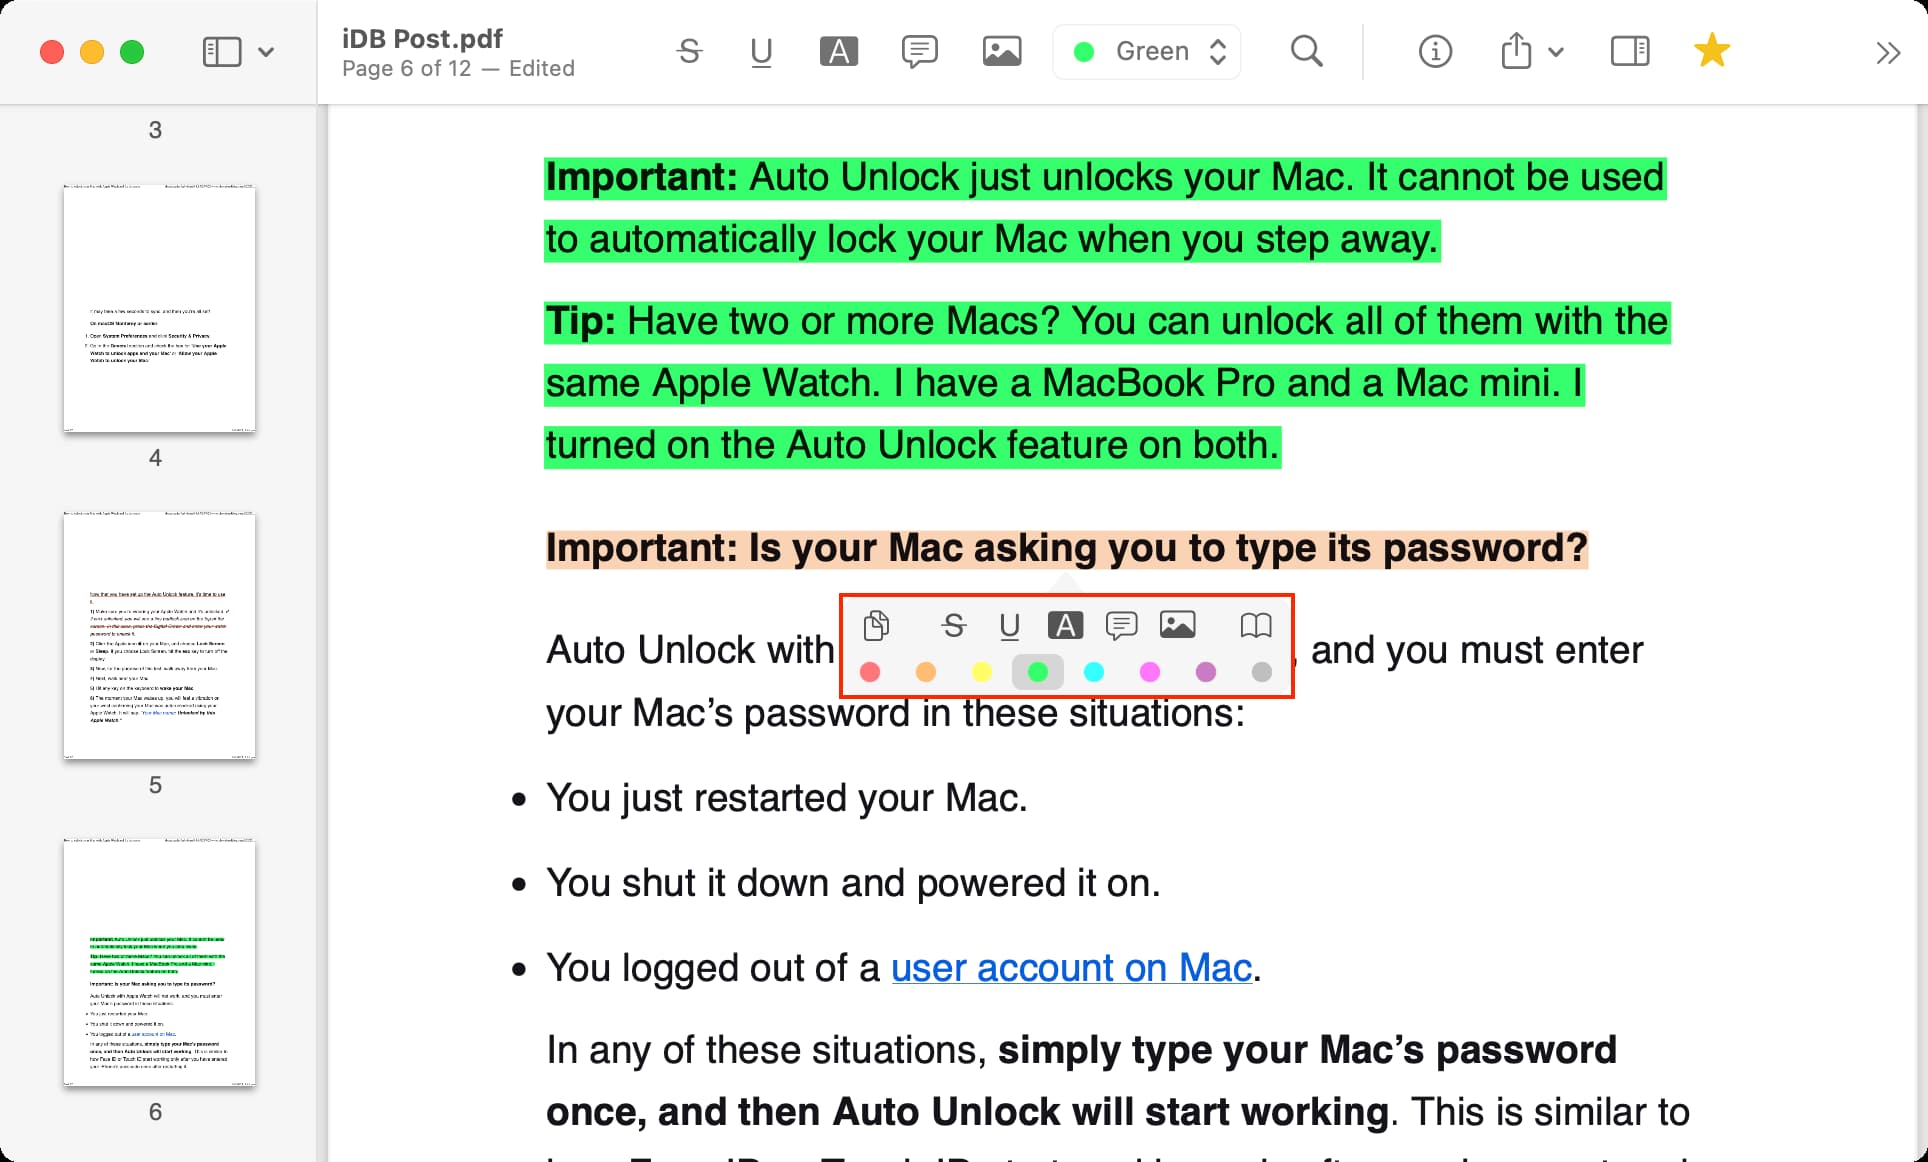
1) With the PDF open in Preview, click on the spotlight button within the high toolbar, and it’ll turn into grey signifying spotlight mode.
2) Click on the arrow subsequent to the spotlight button and select one of many highlighting kinds like spotlight colour, underline, or strikethrough.
3) Now choose the textual content in your PDF, and it’ll robotically add the highlighting type you select in Step 2. You possibly can hold deciding on extra textual content, and it’ll proceed to focus on them robotically.
4) Click on the identical spotlight button once more to flip off highlighting. If it’s caught, hit the crimson shut button to stop Preview and reopen your PDF in it.
Tip: It’s also possible to use the above steps to shortly take away the added highlights by merely deciding on the highlighted textual content.
See all of the highlights in a PDF
1) Open the PDF in Mac’s Preview app.
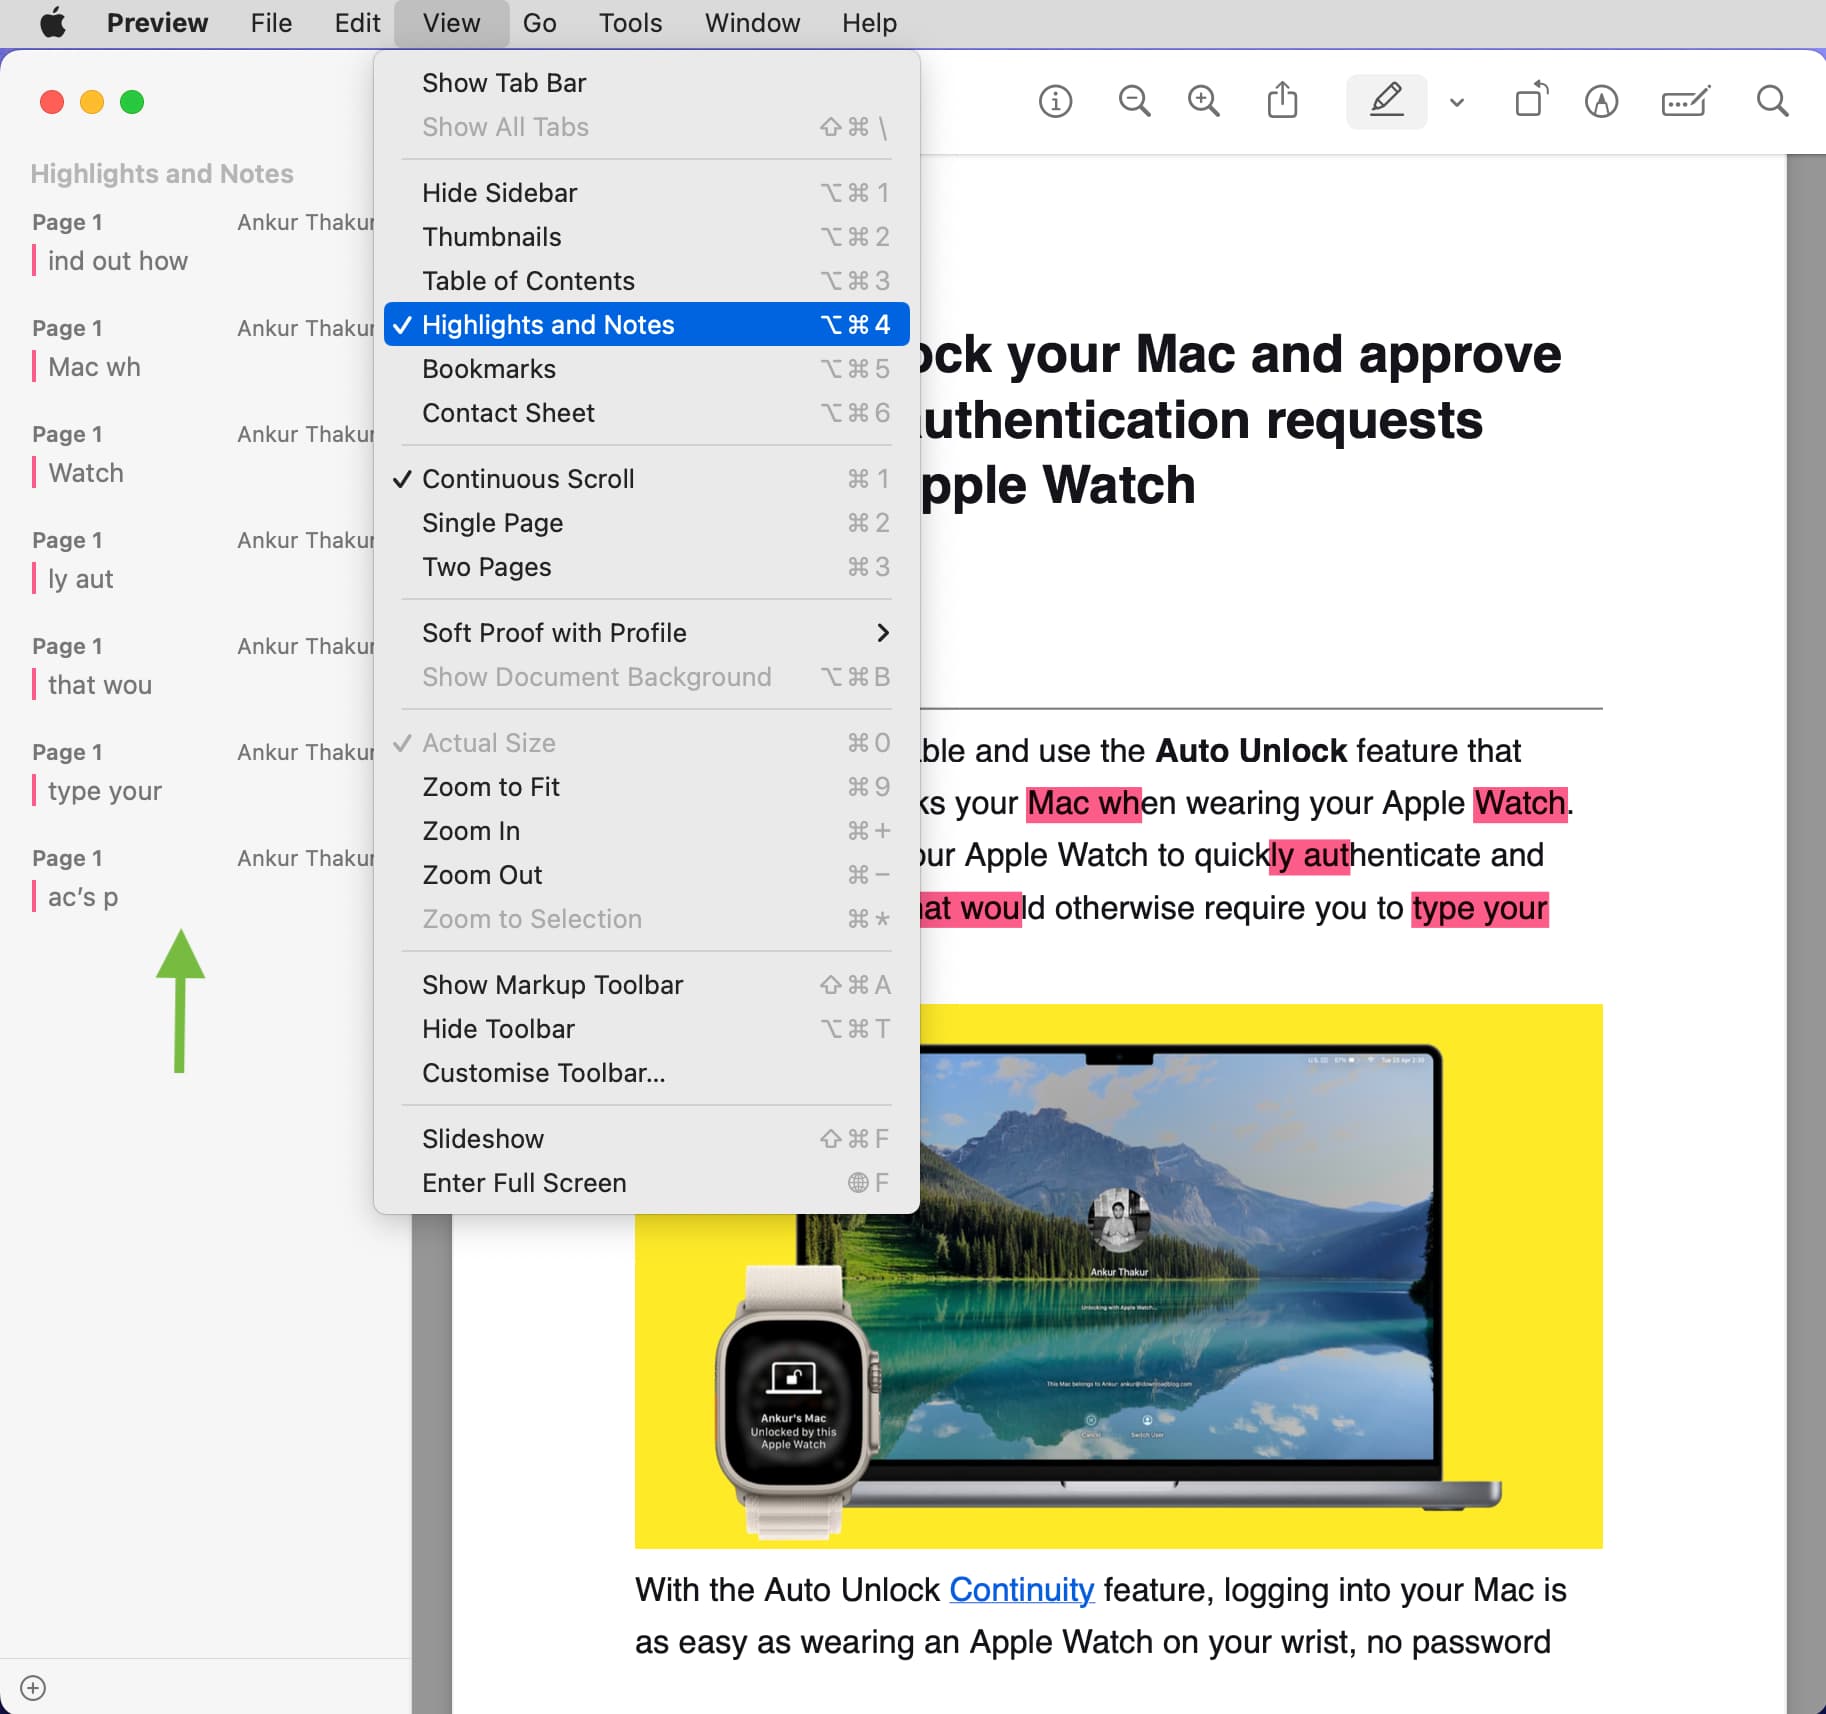
2) Click on View > Highlights and Notes from the highest menu bar.
3) You will note all of the PDF highlights within the left sidebar. Click on one to leap straight to that highlighted part.
To hide the left sidebar, click on View > Cover Sidebar.
Change the spotlight colour
1) Proper-click or maintain the Management key & click on as soon as on the highlighted textual content.
2) Choose a special colour from the menu.
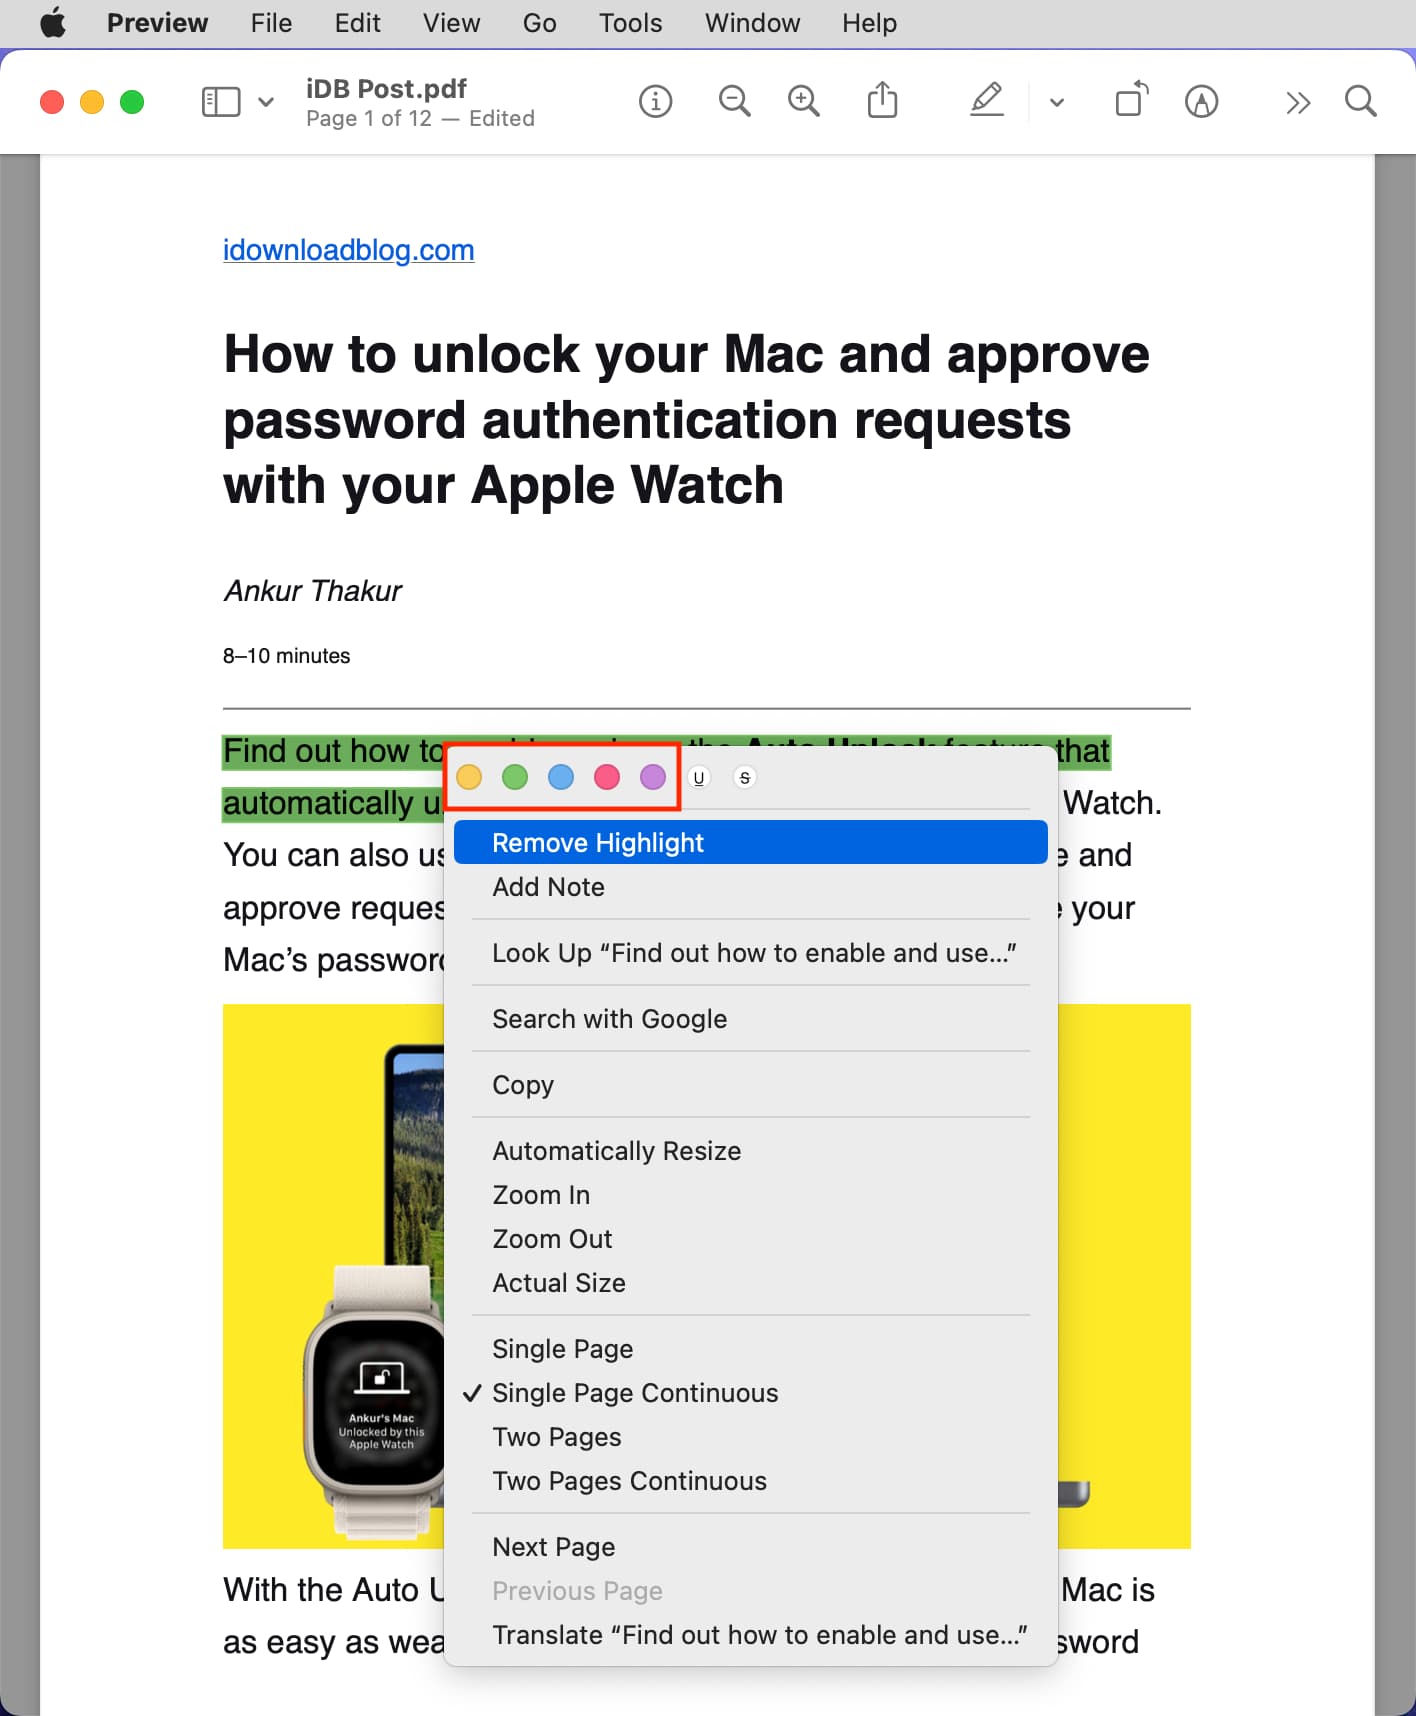
Take away spotlight
1) Proper-click or Management-click over the highlighted textual content.
2) Choose Take away Spotlight.
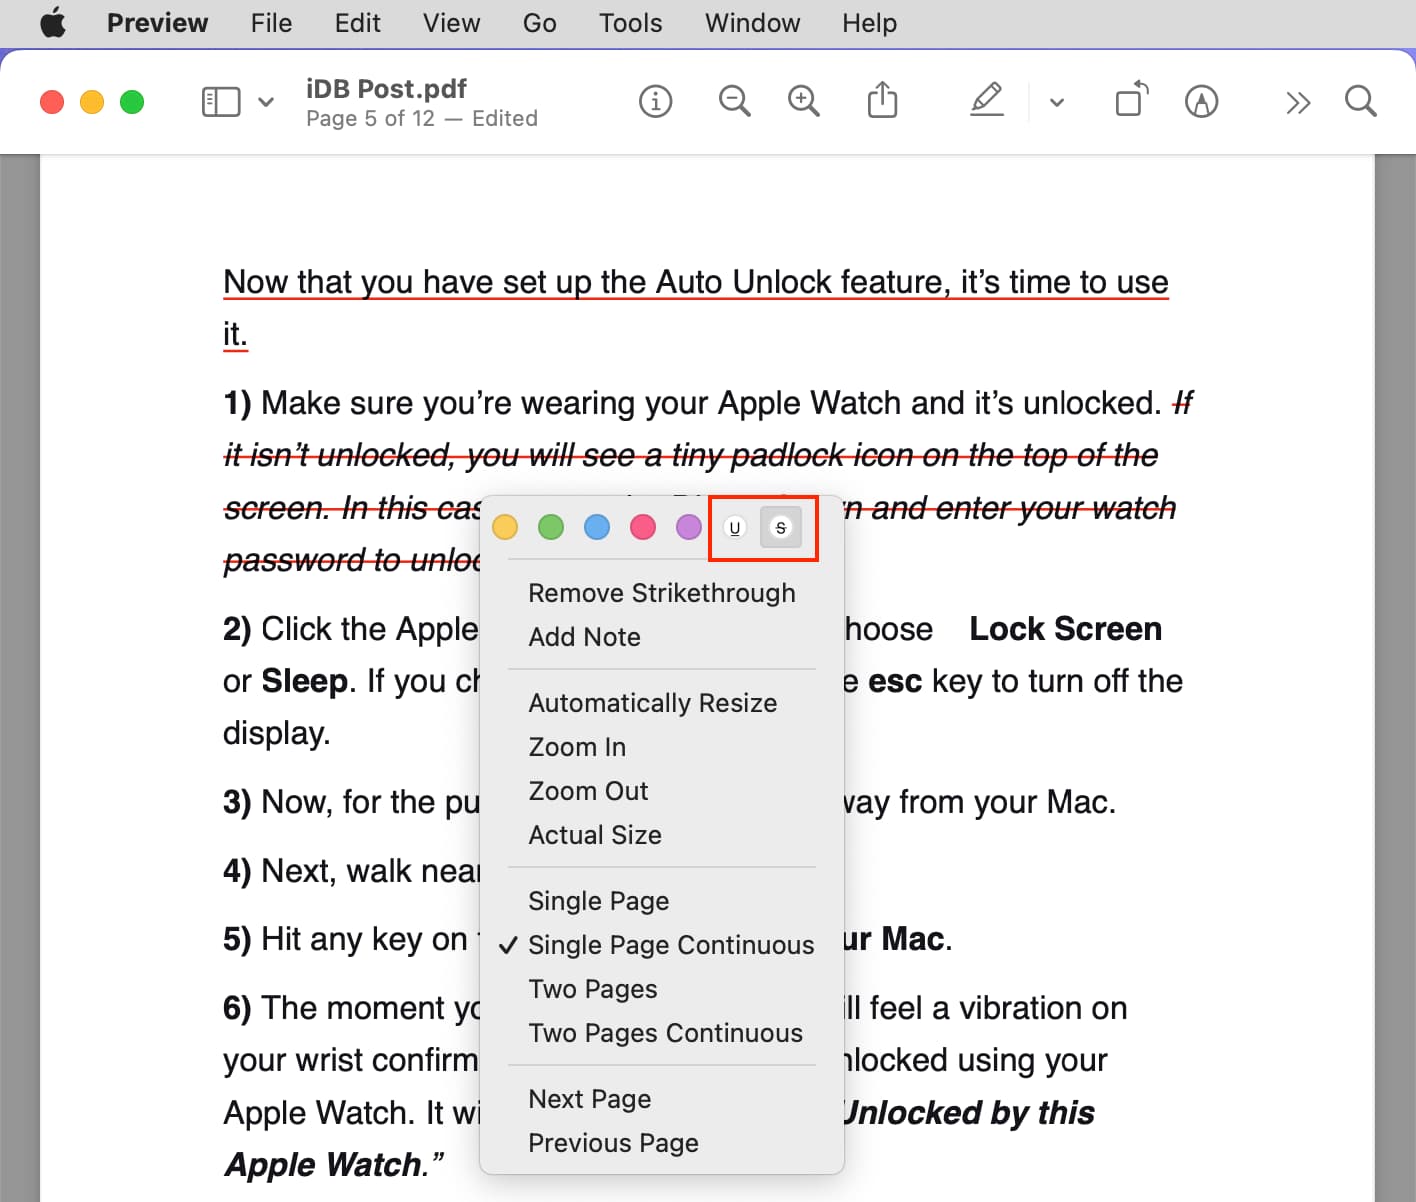
Take away underline or strikethrough
1) Proper-click or Management-click over the textual content that’s underlined or struck out.
2) Choose the U or S instrument to take away the added spotlight.
Third-party Mac apps to annotate PDFs
The built-in Apple Preview app is ideal for most individuals. Nonetheless, one factor I didn’t like a lot is that the spotlight colours are too darkish. So, if you wish to spotlight textual content with a lighter hue, you should use third-party apps like Highlights.
1) Proper-click on the PDF and select Open With > Highlights.
2) Choose the textual content, and add the spotlight from the popup menu or the highest toolbar.
3) When you’re finished, click on File from the highest menu bar and maintain the Choice key to reveal the Save As button.
4) Lastly, click on Save As, select a reputation and placement, and hit Save.
Along with the above strategies, it’s also possible to strive the Wondershare PDF Component app to focus on PDF textual content. Nonetheless, the free model will add a small watermark on the top-right nook of every web page.
Associated suggestions: