

Should you’ve checked your disk utilization on a Mac, you’ve most likely seen that among the recordsdata that take up quite a lot of reminiscence area are referred to as Different Volumes. What are these recordsdata, and methods to clear them? You’ll discover solutions to those questions on this article.
Earlier than we reply the query, “What’s Different Volumes in Container Mac?”, let’s take a look at methods to verify disk area utilization.
- Go to Apple menu > About this Mac
- Click on Storage
- Wait.
When macOS has calculated it, you’ll see a coloured bar displaying how your storage is distributed. The field usually seems, as proven within the image under. You’ll see containers equivalent to Apps, macOS, System Knowledge, Bin & Others. Nevertheless, sometimes, you’ll be able to see {that a} portion of the field is grey and that it says Different Volumes in Container.
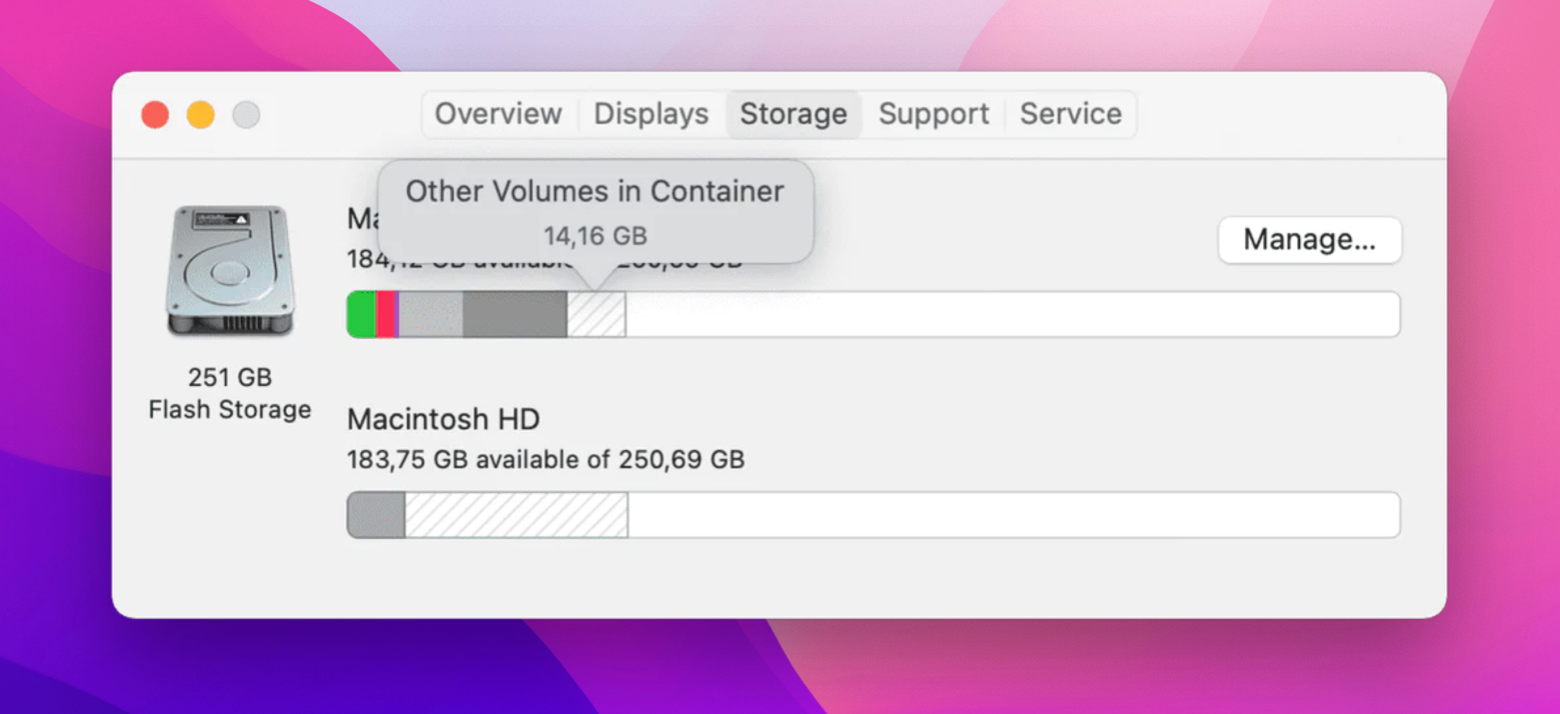
What’s Different Volumes in Container?
Different Volumes in Container is the results of a file system that Apple has been utilizing since Excessive Sierra – APFS. The APFS file system permits a bodily onerous drive to have a number of digital quantity containers.
These APFS containers usually embody:
- Macintosh HD – the principle folder containing the macOS system software program.
- Preboot – the quantity answerable for managing the boot configuration.
- Restoration – a quantity that shops restoration knowledge that you should use to revive your Mac.
Digital Machine (VM) – this quantity is designed to complement your system’s RAM. Since it isn’t potential to retailer all knowledge in RAM, the system can generally use disk area to host a swap file, a sleep picture, or different massive elements.
With that stated, it’s clear which you could’t simply eliminate Different Volumes in Container by merely deleting them. They’re necessary. Nevertheless, you’ll be able to nonetheless scale back the area they take up.
The right way to view and handle every quantity in a Mac container utilizing Terminal
To take away Different Volumes in Container, you have to first decide what’s housed in your Apple Storage. You are able to do that with the assistance of Terminal. Observe the steps under:
- Go > Utilities > Terminal
- Sort the next command: diskutil listing and press Return
- Study the breakdown of drives and volumes that exhibits up in your display screen attentively.
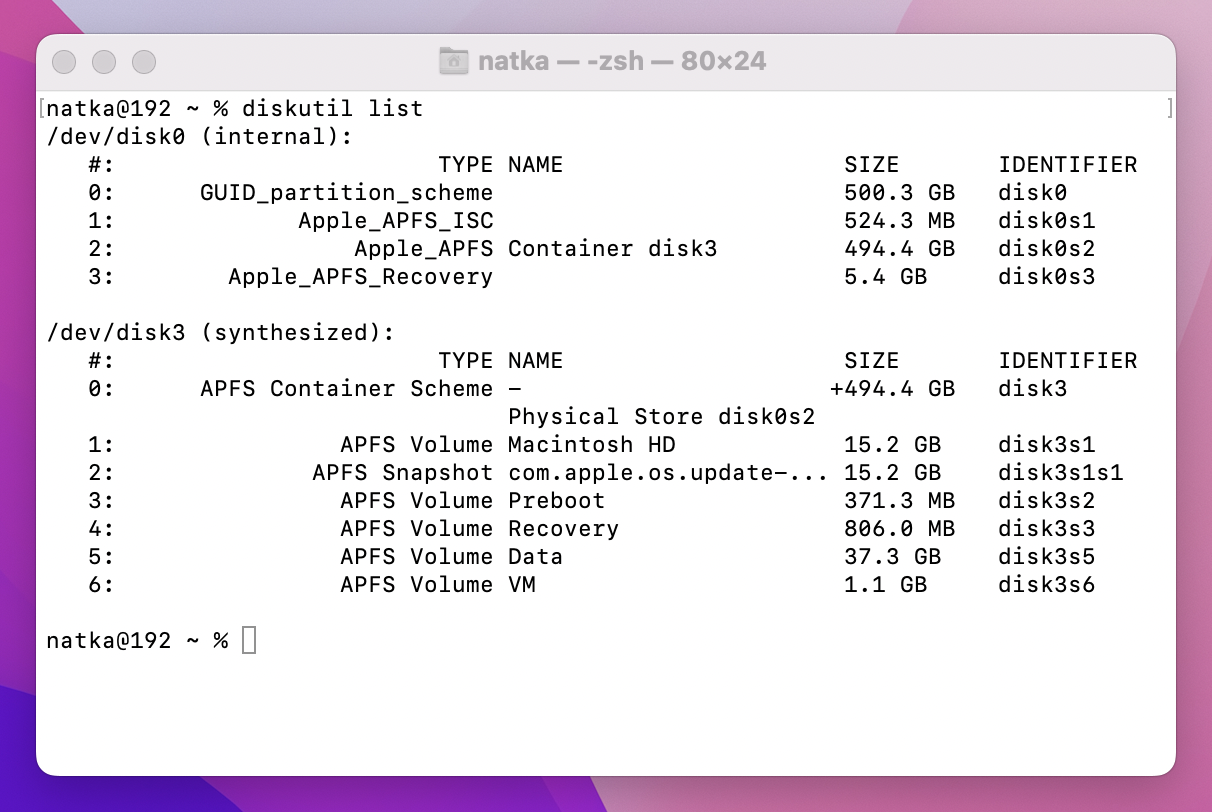
Preboot, Restoration, and VM volumes, in addition to your system quantity – usually Macintosh HD – ought to all be seen by way of Terminal. You must also see a Knowledge Quantity that contains your whole further recordsdata.
Because it accommodates your full OS, your Macintosh HD Quantity is kind of massive. Relying on how a lot you’ve loaded onto your Mac, the Knowledge Quantity might also comprise an enormous quantity of data. The Different Volumes, then again, shouldn’t be storing quite a lot of knowledge.
Should you see Different Volumes consuming an uncommon quantity of storage in your pc, you’ll want to attempt a couple of strategies and delete an additional quantity from a Mac container, if any. We’ll present you the way. Hold studying.
In case it already occurred to you that you just misplaced some knowledge, right here’s an answer. Disk Drill to recuperate knowledge rapidly. A single click on, and the app will carry out all of its scanning operations and current an inventory of recordsdata that may be recoverable. Observe the steps under to get your knowledge again:
- Open Disk Drill
- Choose the disk you’d wish to recuperate from and click on the Seek for misplaced knowledge button
- DiskDrill will scan for corrupted and deleted recordsdata
- When you’ve chosen the recordsdata you’d wish to recuperate, specify the place you’d like them to be saved and click on the Get better button.
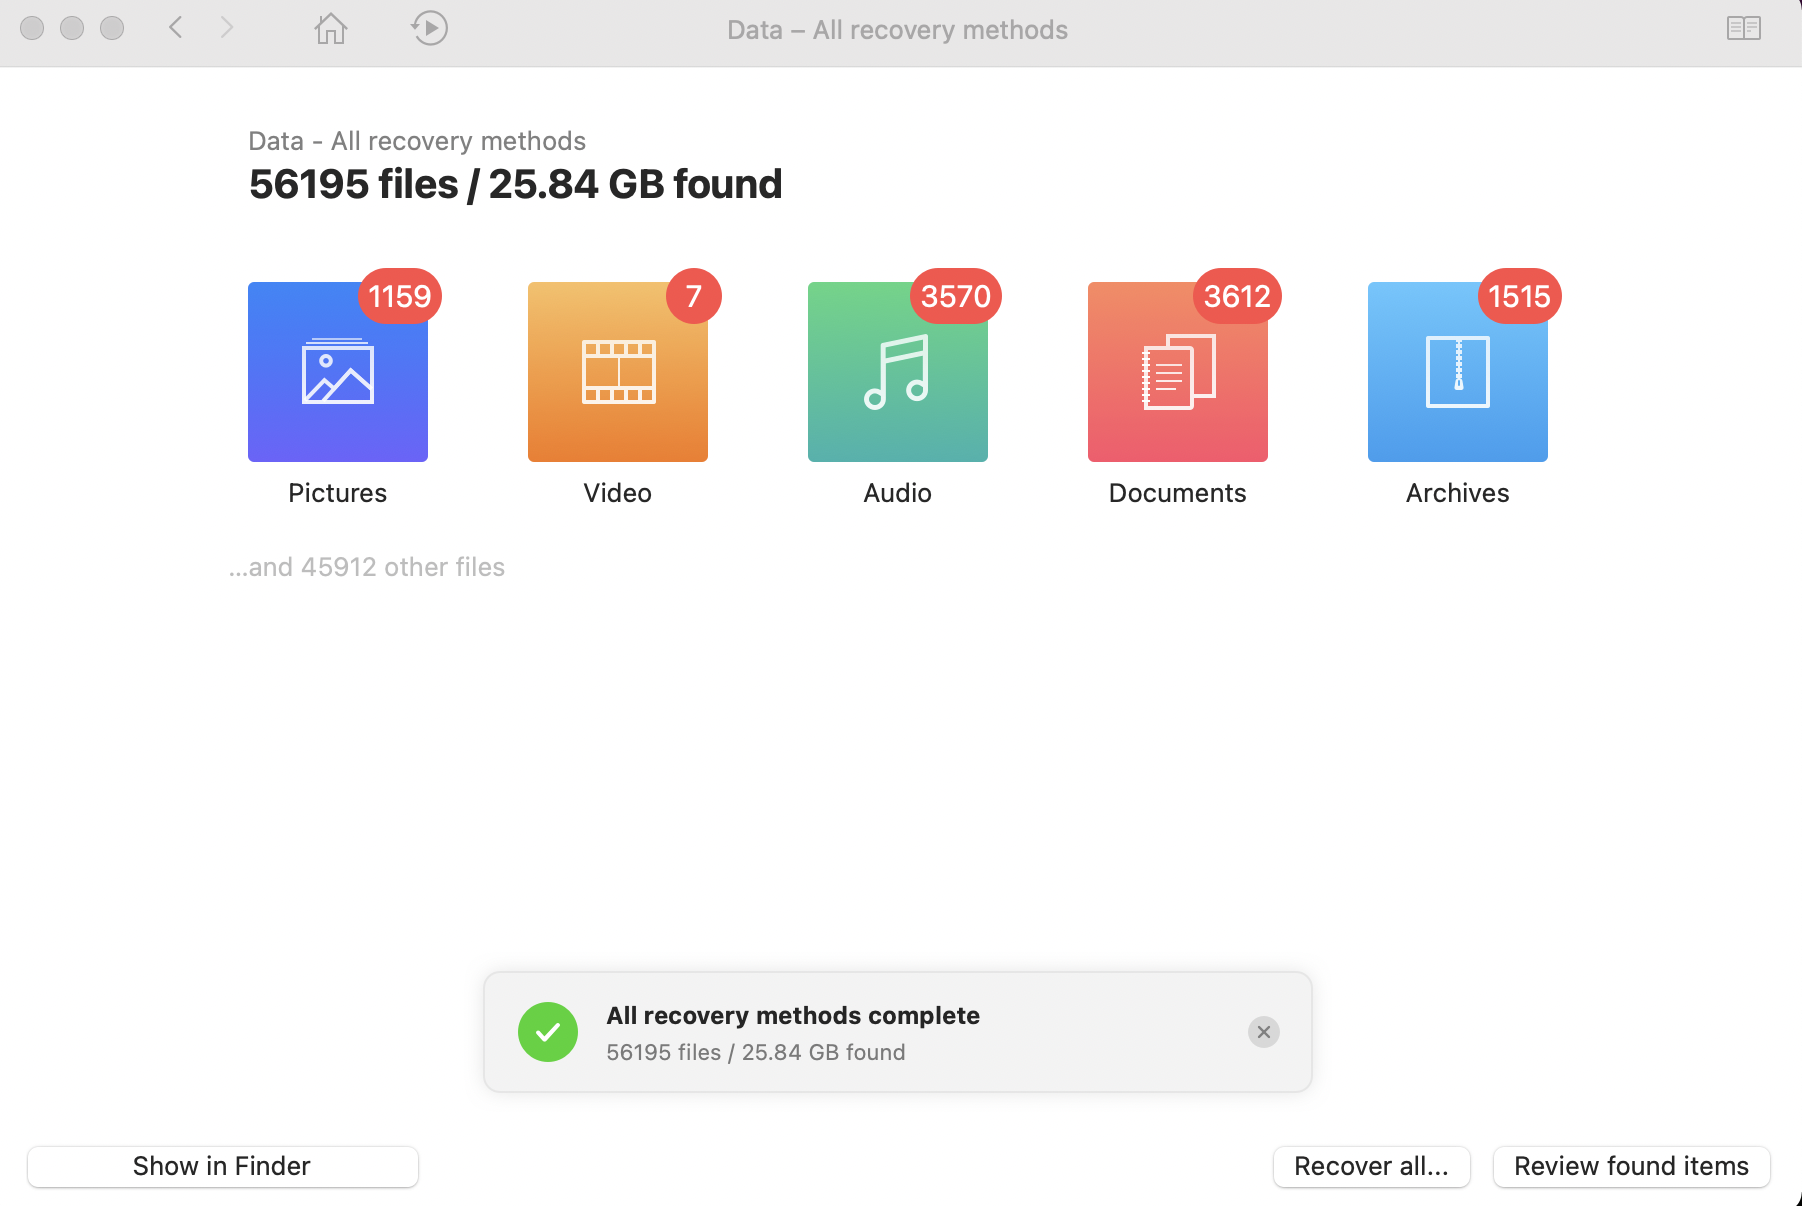
You may even preview recordsdata to determine should you want them again!
The right way to take away Different Volumes in a Container
As we talked about, it’s not a good suggestion to delete volumes as a result of a few of them are necessary for the system to run. Should you do this, it will erase and take away all knowledge on that quantity. Nevertheless, there are nonetheless a couple of methods to cope with Different Volumes in Container. Let’s take a more in-depth look.
Technique 1: Use Mac cleansing software program
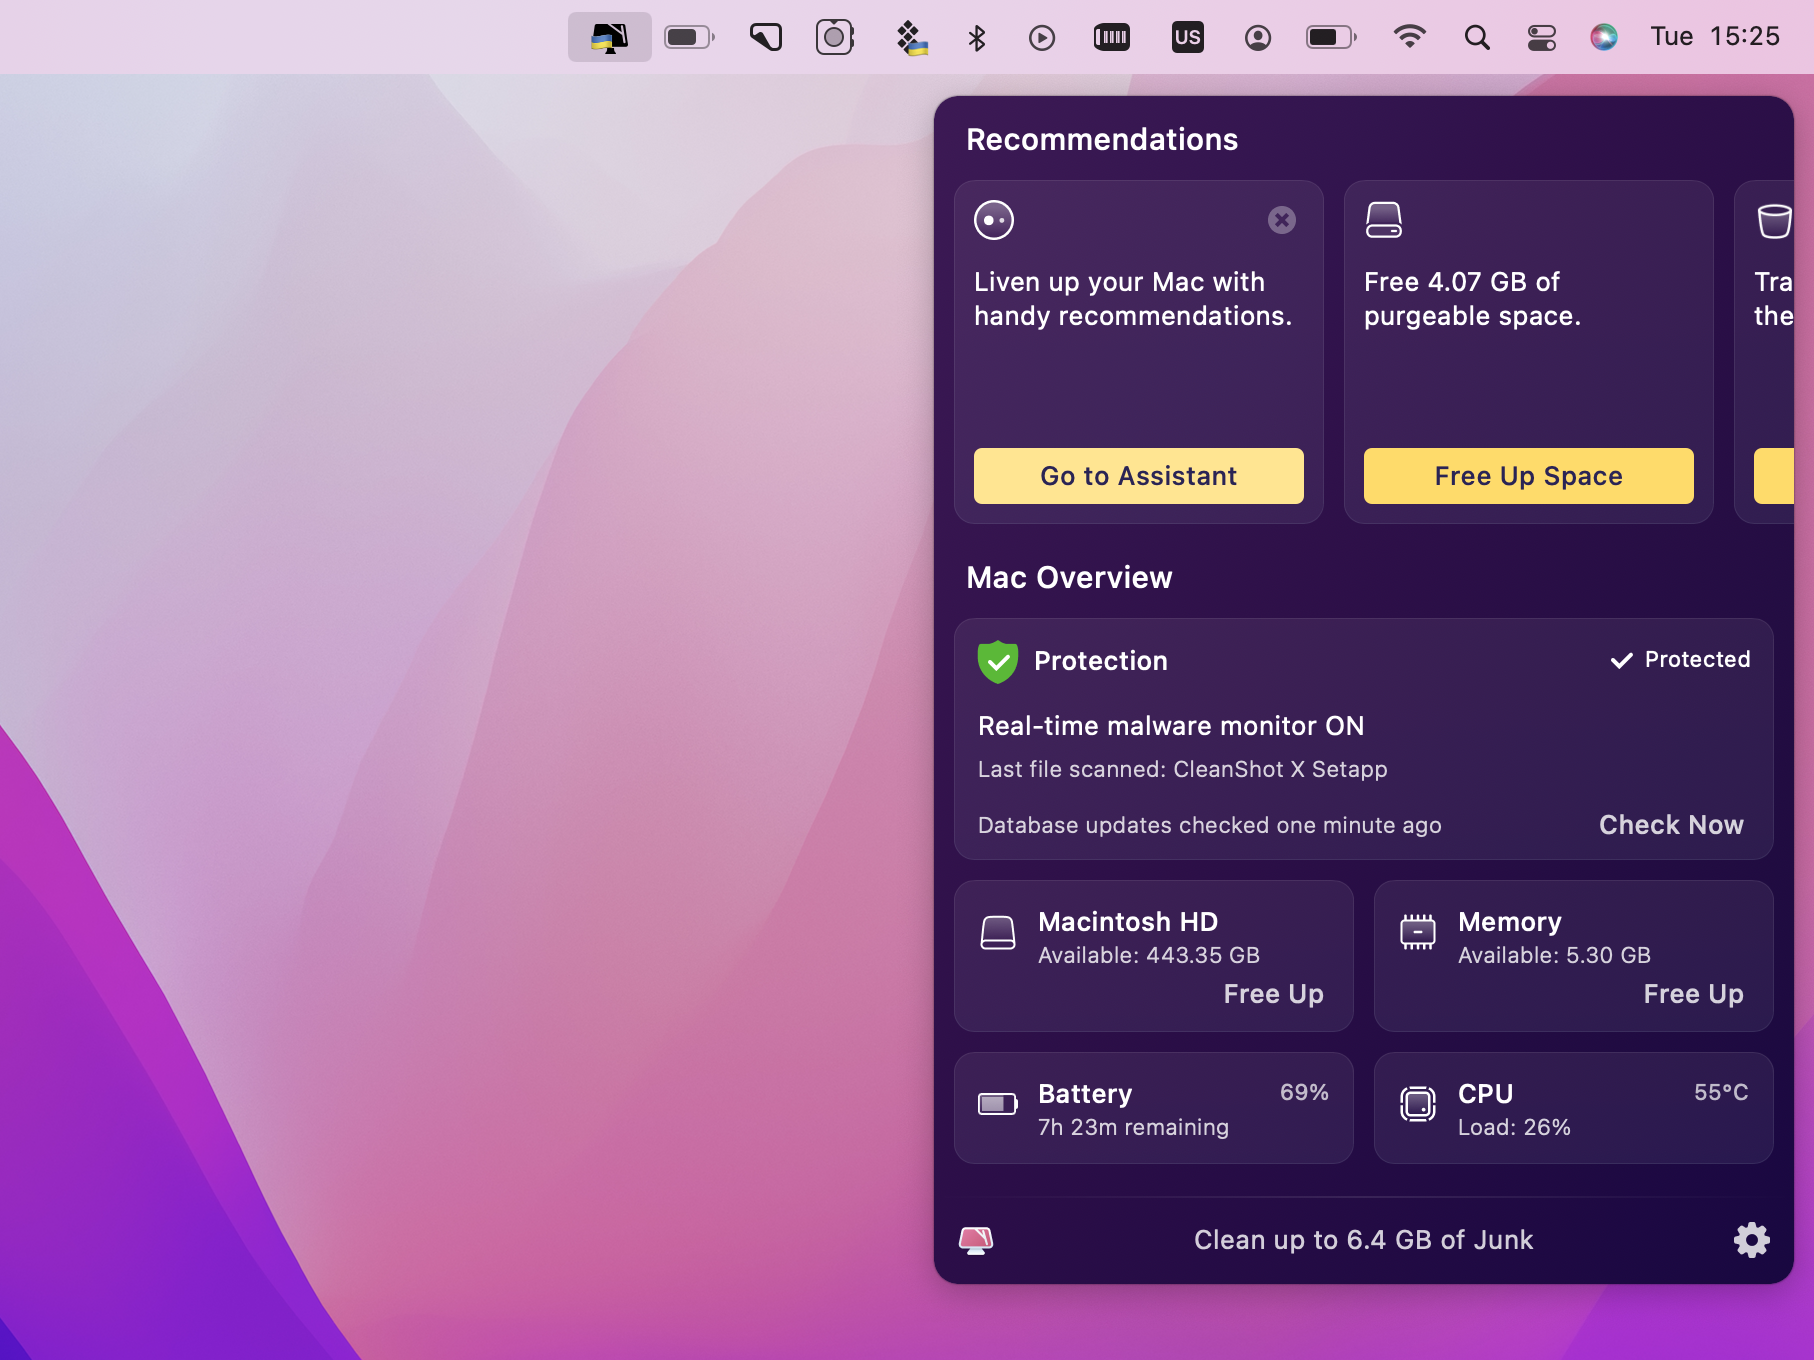
Should you don’t have time to dig deep and discover the Different Volumes in Container in your Mac storage however have to rapidly release disk area, use the devoted device CleanMyMac X. That is the most effective and most secure resolution for cleansing your pc and eradicating 1000’s of pointless recordsdata, equivalent to cache, extensions, service recordsdata, duplicates, and different junk recordsdata. In contrast to guide quantity elimination, CleanMyMac X will delete knowledge with out inflicting hurt to your Mac.
Right here’s how one can release some area in your Mac and eliminate Different Volumes in Container:
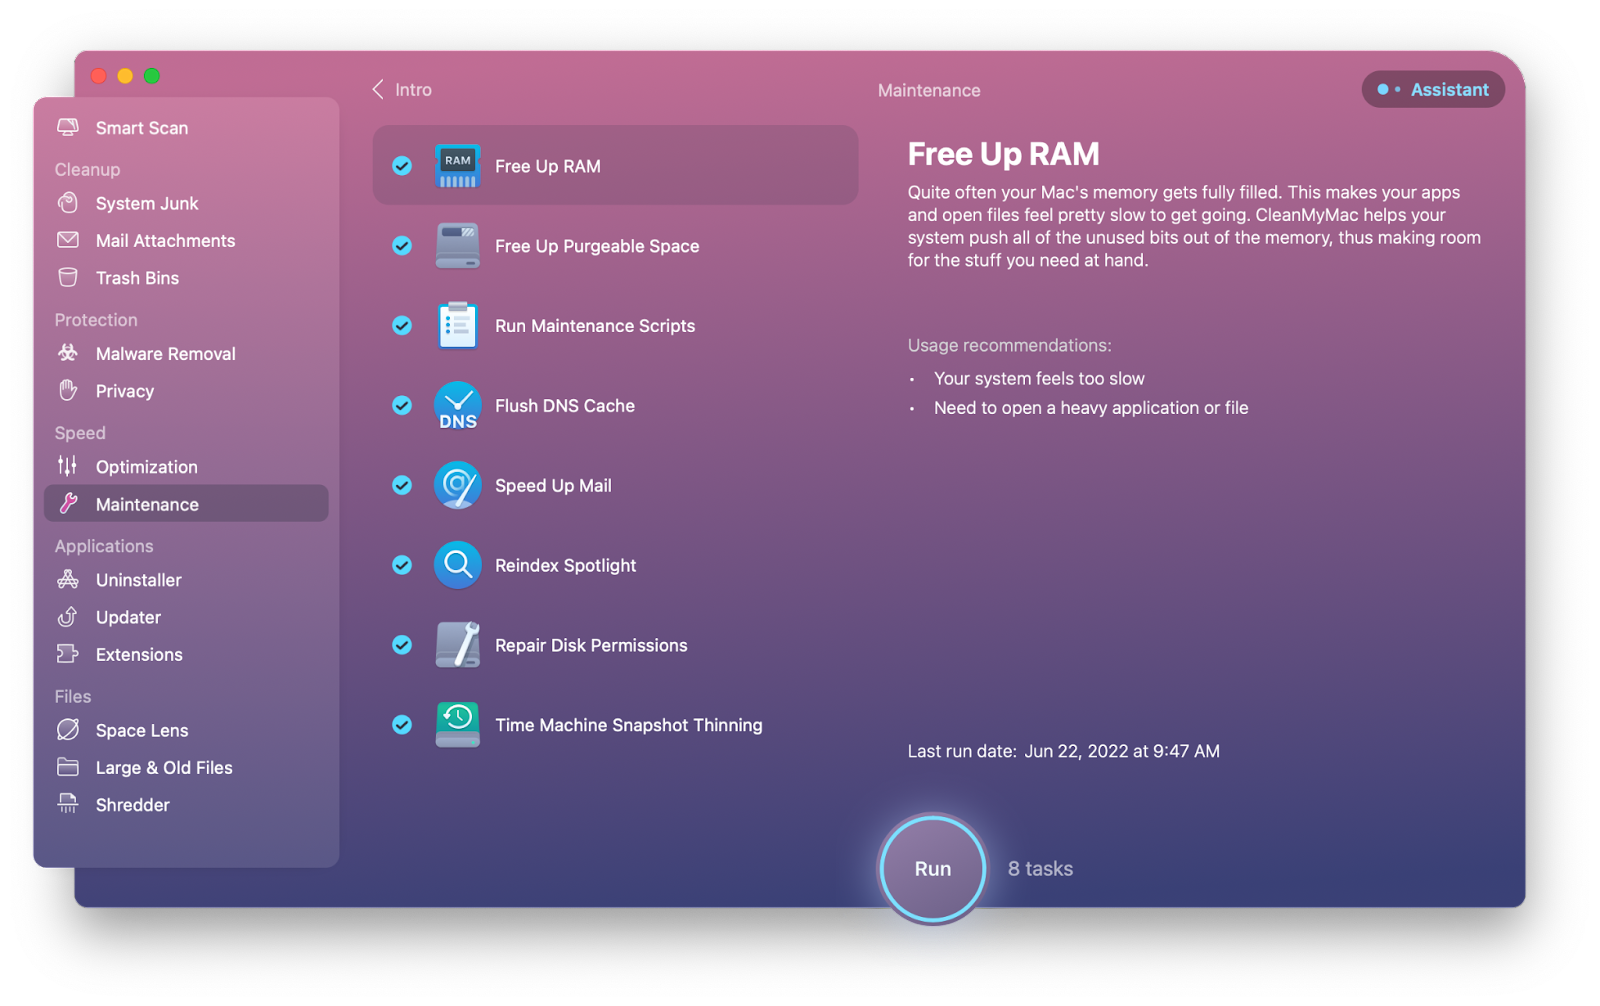
- Open CleanMyMac X
- Click on Upkeep within the sidebar on the left
- Test the field subsequent to Free Up Purgeable House and click on Run
- Wait a couple of minutes
- When the method is completed, you’ll hear an alert and see a message telling you it’s completed.
If there was a problem with Different Volumes in Container Mac taking on an excessive amount of area, it ought to now be fastened.
Moreover, with CleanMyMac X, you’ll be able to routinely clear the whole disk and routinely release area!
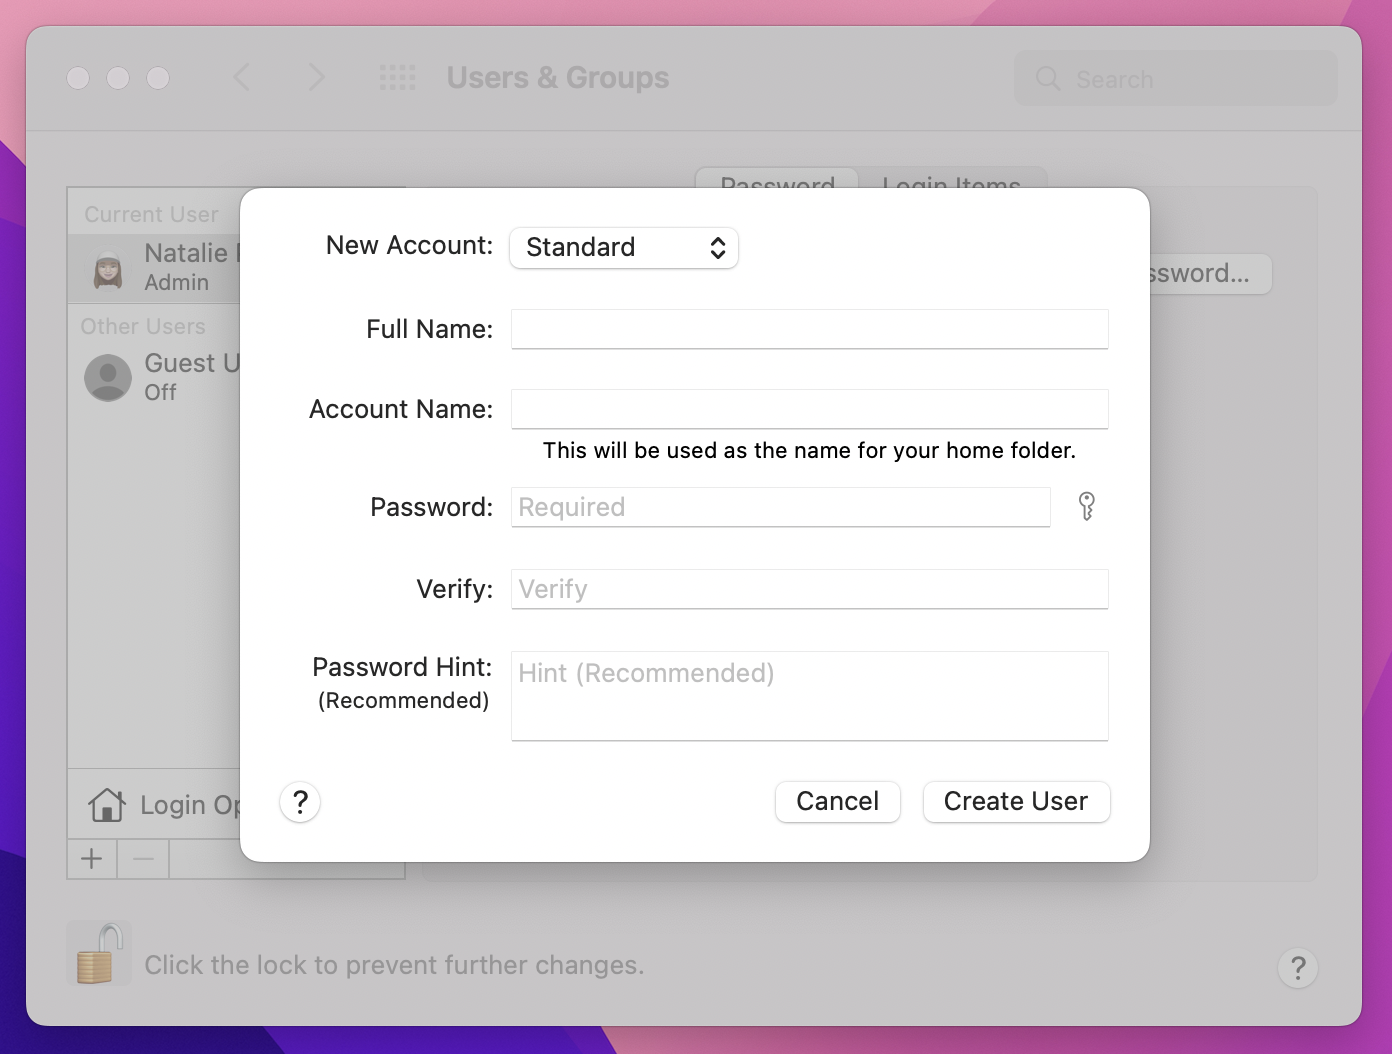
Technique 2: Arrange a brand new consumer account
Some Mac customers declare that after establishing a brand new consumer account, they had been capable of efficiently reclaim storage from Different Volumes in a Container. Right here’s the way you create a brand new consumer account on Mac:
- Go to Apple menu > System Preferences
- Click on Customers & Teams
- Unlock the lock on the backside left and kind in your password
- Click on the + button on the backside left of the display screen
- Then Choose Administrator from the drop-down menu and add particulars on your new account
- Once you’ve created the account, reboot your Mac and log in with the brand new Administrator account
- As soon as once more, go to Apple Menu > About This Mac > Storage. Test if the Different Volumes in Container disappeared.
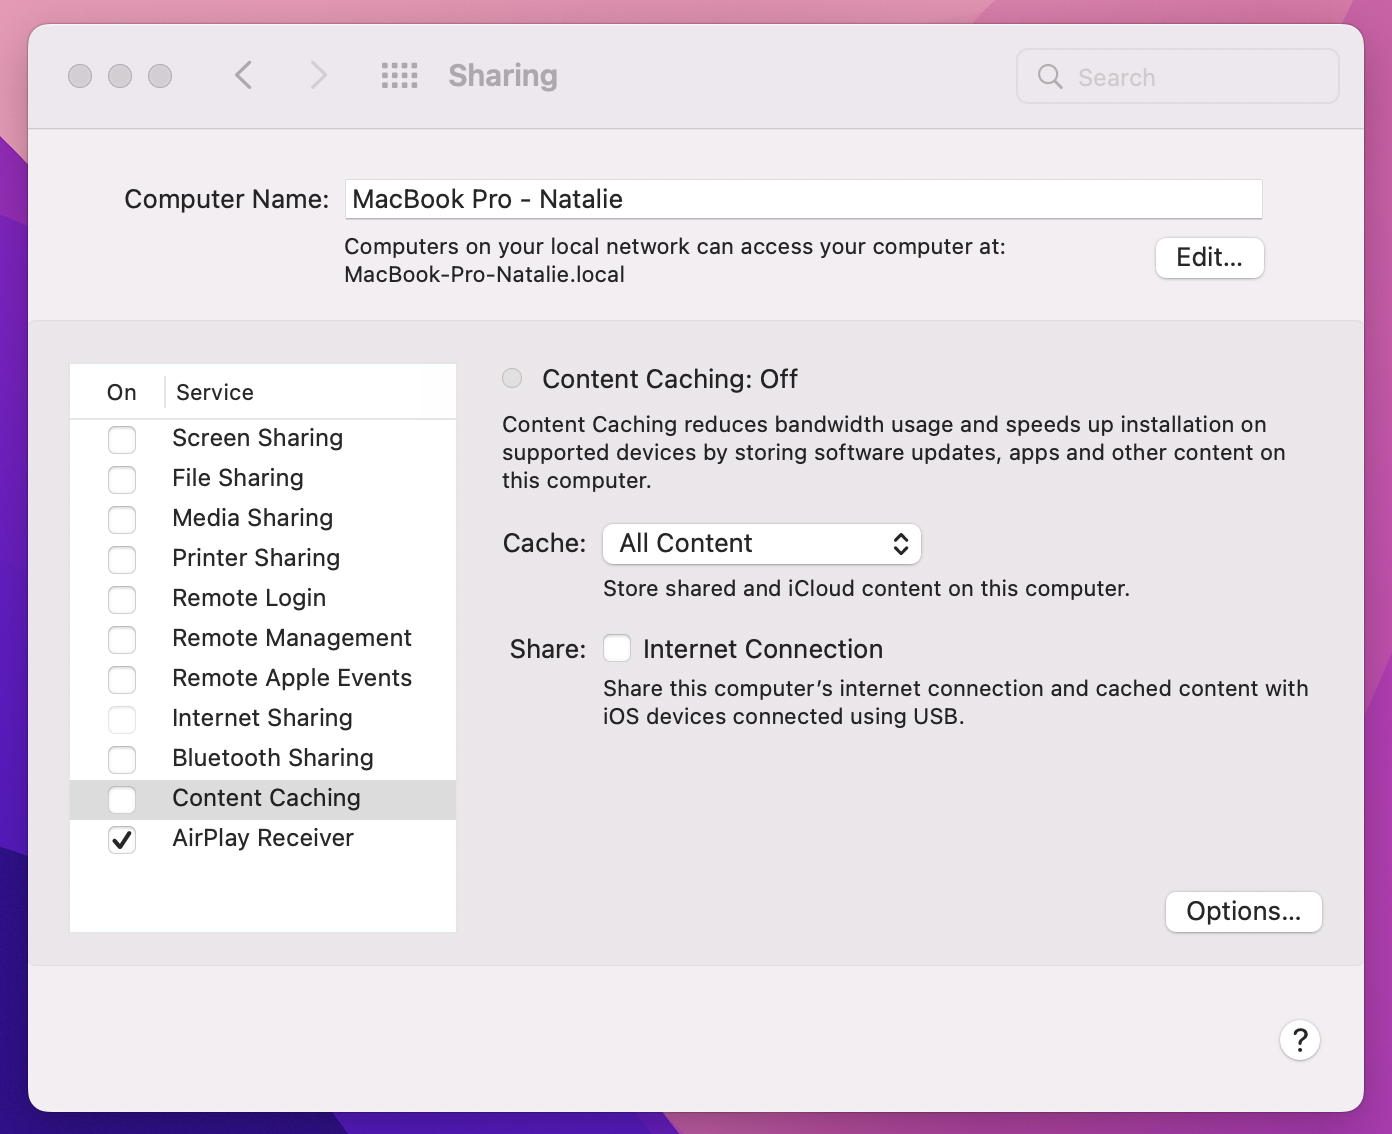
Technique 3: Flip off the content material cache
To keep away from having to obtain updates from the web, content material caching shops them domestically in your Mac for synced gadgets. These, nonetheless, are area scavengers on the prowl for priceless Mac areas. To show off the content material cache, comply with these steps:
- Go to Apple menu > System Preferences > Sharing
- Uncheck the choice subsequent to Content material Caching
- Reboot your Mac.
Technique 4: Delete the additional quantity
Should you seen the additional quantity with the assistance of the diskutil listing Terminal command (talked about earlier on this article), maybe that’s the quantity that eats out your area. You may delete it however keep in mind concerning the backup to keep away from knowledge loss.
To delete this further quantity, comply with the steps under:
- Go > Utilities > Disk Utility
- Pinpoint the Quantity that you just wish to delete
- Proper-click on the Quantity and choose Delete APFS quantity
- Hit the Delete choice when prompted
- Wait till the elimination course of ends.

If the At the moment in Use message or a dimmed Delete button seem, it signifies which you could’t take away the quantity. In such a state of affairs, you’ll be able to attempt to use Disk Utility in macOS Restoration mode. When your Mac begins up, maintain down Command + R besides into macOS Restoration. Once you see the Apple brand, a spinning globe, or one other startup display screen, let off the keys. Go to Disk Utility from the Utilities window.
Technique 5: Erase disk and reinstall macOS
The ultimate choice, if nothing else works, is to erase the disk and set up the latest model of macOS.
To erase your disk:
- Again up your knowledge with Get Backup Professional
- Then begin your pc within the Restoration mode (press and maintain Command + R on Mac’s startup)
- After the Utilities window seem, select Disk Utility and click on Proceed
- Within the Disk Utility’s sidebar, select Macintosh HD, then click on the Erase button.
- Use Macintosh HD because the title
- Select both APFS or Mac OS Prolonged (Journaled) within the Formal subject
- Click on Erase
- Delete any volumes that may nonetheless be seen within the sidebar after the erase is completed. (Don’t delete the Macintosh HD quantity)
- Give up Disk Utility
- The Utilities window will seem as soon as once more. After clicking Reinstall macOS, look ahead to it to complete.
The right way to eliminate Different Volumes in Container
On this information, we discover the difficulty with Different Volumes in Container on Mac after which introduce 5 strategies to release your space for storing. Amongst these methods, utilizing CleanMyMac X is the best and the quickest one. Together with this device, we additionally counsel utilizing Gemini to take away duplicates, Get Backup Professional to backup your recordsdata should you determine to delete an additional quantity from a Mac Container, and Disk Drill to recuperate misplaced recordsdata.
All these apps belong to a big Setapp household, which counts greater than 240+ apps for Mac and iPhone. One of the best half, you’ll be able to attempt all of them totally free with Setapp’s 7-day free trial.